
This post may contain affiliate links/ads and I may earn a small commission when you click on the links/ads at no additional cost to you. As an Amazon Affiliate, I earn from qualifying purchases. Techsphinx also participates in the StationX Affiliate program. You can read my full disclaimer here.

Are you facing the most common and annoying Ubuntu login loop issue that’s stopping you from accessing your system?
Then welcome aboard, this post will provide you with the methods to solve it.
But before starting, let’s understand what exactly is this login issue and why this happens?
What is Login Loop? and Why this happens?
Login loop is an issue when you log-in to your system and it takes back you to the login screen again, instead of letting you use the desktop and this process repeats indefinitely.
So why do this happen?
This happens because of some irrelevant changes to the files in your system caused by the display manager.
For example, because you installed/updated graphic card drivers, or some changes happen to your ‘Xauthority’ file (which is used by display manager).
Whatever the case, you are lucky, there are some methods to solve this annoying issue.
Methods to Fix Ubuntu Login Loop
In this post, I am going to show you various methods to fix the Ubuntu login loop issue. If one method doesn’t work for you then try another one.
Method 1 (Edit GRUB Configuration)
This method will most probably work if you’ve got looping issue after installing Nvidia drivers and you’ve auto-login enabled in ubuntu.
This is a known bug in gdm3 and thanks to Martin, there is a workaround to this problem.
1. Press Ctrl + Alt + F3 to switch to tty3 command console and login using your username and password.
or
Reboot and enter into recovery mode
select ‘root – Drop to root shell prompt’
and remount ‘/’ in rewrite mode using the command:

mount -o rw,remount /
3. Run the command to edit the GRUB file. I’m using nano text editor here, you can use any command-line text editor you like.
sudo nano /etc/default/grub
Go to the line that contains
GRUB_CMDLINE_LINUX_DEFAULT=”quiet splash”
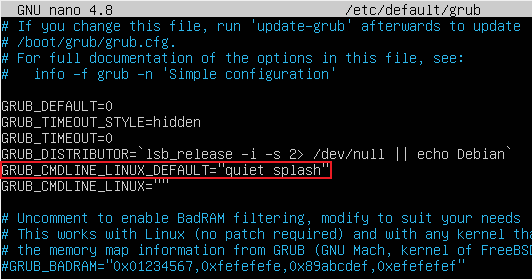
Remove ‘splash’ from the above line, so it will look like
GRUB_CMDLINE_LINUX_DEFAULT=”quiet”
Press ‘Ctrl + x’ to exit Nano and hit ‘y’ when asked to save changes.
4. Update GRUB to apply new changes.
sudo update-grub
5. Exit the recovery mode or reboot system if working with tty3 command console.
Method 2 (Xauthority)
Xauthority is a file that stores credentials and cookies used by xauth for authentications of X sessions. Once an X session is started it uses the cookie to authenticate connections to that specific display.
So, this means if you are not the owner of the file, you can’t store your credentials in here. Unless credentials are stored, it cannot authenticate connections to the display.
Hence, you will be taken back to the login screen.
So, let’s change the ownership of the file to the correct user.
1. Switch to tty3 command console using Ctrl + Alt + F3 and login using your username and password.
2. Run command to list the permission of ‘.Xauthority’ file.
Note: Dot(.) in front of a filename or directory name represents a hidden file or hidden directory in Linux.

ls -lah
If you don’t find .Xauthority in your user’s home directory, then navigate to
cd /run/user/1000/gdm/
(Replace ‘1000’ with the user’s id (uid). If you don’t know user’s id, then use ‘id’ command)

And use ls -lah command again.
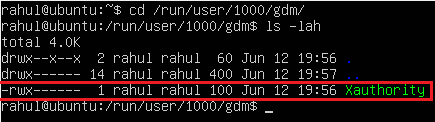
There you’ll find Xauthority file.
3. If the owner is not the desired user, then run the chown command to change the owner.
chown username:username .Xauthority
Replace username with your user’s name and remove the dot (.) from the front of Xauthority file, if your file is located in gdm folder.
For example, if your username is john and the .Xauthority is located in the home directory, then the command should look like.
chown john:john .Xauthority
4. If the above command didn’t work, then rename the file.
mv .Xauthority .Xauthority.bak
5. Reboot the system.
Method 3 (Change /tmp Permission)
If the “.Xauthority” file was not the problem, then it may be a problem with /tmp directory.
Permission issues with /tmp, sometimes leads to the same issue.
So, check the permissions and change it if necessary.
1. Switch to tty3 command console using Ctrl + Alt + F3 and log in using your username and password.
2. Check the permissions of the /tmp directory.
ls -ld /tmp

3. If it shows ‘drwxrwxrwt’ then it’s fine, else run the below command to change it.
sudo chmod 1777 /tmp
again run

ls -ld /tmp
to confirm that chmod command executed successfully.
4. Reboot the system and try logging-in again.
Method 4 (Re-install Display Manager)
If none of the above steps worked for you, then try re-installing the display manager.
Lightdm is standard display manager for Ubuntu. If you have any other display manager like “GNOME” then re-install that.
You can also try switching display managers.
For example, if you have GNOME installed, then uninstall GNOME and switch to lightdm or vice versa.
This method requires an active internet connection to work, so make sure your system is connected to the internet.
1. Switch to tty3 command console using Ctrl + Alt + F3 and log in using your username and password.
2. To uninstall and reinstall Ubuntu lightdm, run the following commands in order:
sudo apt-get purge lightdm
sudo apt-get install lightdm
dpkg-reconfigure lightdm
3. Reboot the system.
Conclusion
The above methods are the most common ways to fix login loop in Ubuntu.
Sometimes re-installing graphics card driver or updating it to the latest version or rolling back to the previous version also helps to solve this looping problem.
Did any of these method solved your problem?
Do you have any other method to solve this issue?
Tell me in the comments.

If you like this post, then follow Techsphinx on Facebook and Twitter for more reviews, tricks, tips and tutorials.
This article needs update or correction? Report the issue here so I can update it.