This post may contain affiliate links/ads and I may earn a small commission when you click on the links/ads at no additional cost to you. As an Amazon Affiliate, I earn from qualifying purchases. Techsphinx also participates in the StationX Affiliate program. You can read my full disclaimer here.
There are various desktop environments available for Linux based systems.
Manjaro already ships with many flavours with different desktop environments – GNOME, KDE Plasma, XFCE. Also, the community released editions – Budgie, Cinnamon, Mate, LXDE, LXQt and many others.
Yes! Budgie is also there on the list; you can download the community released edition of Manjaro with budgie desktop.
But if you have already installed Manjaro OS, then re-installing it just for the desktop environment is not a viable solution.
So, in this post, I will show you how to install Budgie desktop environment on Manjaro.
What is Budgie Desktop Environment?
Budgie is a popular, feature-rich and modern desktop environment developed by Solus project which integrates tightly with the GNOME stack.
It is available for Majority of the distributions like Arch, Debian, Manjaro etc. and offers a simple, elegant and complete desktop experience for its users.
In the next section, we are going to have a look at some of the components budgie provides for great user experience.
Features of Budgie Desktop Environment
Let’s have a look at some of the distinct features budgie desktop provides for a complete desktop experience.
- Budgie Menu – Budgie menu provides a quick and easy to use menu, which is suitable for both mouse and keyboard-driven users. It also features search-as-you-type and category-based filtering.
- Raven – Raven is pretty much an all-in-one center for calendar, media playback, app-based sound control and notifications. If you are playing a song on VLC or Spotify, then you can have quick playback access for the same from the raven.
- Run Dialog – Budgie Run Dialog provides the means to quickly find an application in a popup window. You can trigger this window using “ALT+F2” keyboard shortcut, thereby providing keyboard-driven launcher facilities.
- Notifications – Budgie Desktop has awesome notifications center that enables applications to send visual alerts to the user. These notifications support actions, icons as well as passive modes.
Pre-Requisites to install Budgie Desktop in Manjaro
- Manjaro Linux Installed and Running.
- An active internet connection to download and install Budgie Desktop on Manjaro
- Sudo privileges
Install Budgie Desktop
You know the features of budgie desktop, now let’s see how to install Budgie desktop environment on Manjaro Linux.
There are two ways you can install Budgie desktop on Manjaro:
Installing Budgie desktop on Manjaro using Terminal:
To Install budgie desktop environment and other necessary packages using terminal run:
sudo pacman -S budgie-desktop network-manager-applet gnome-control-center gnome-screensaver
Install Additional Components (Optional)
If you want, you can also install additional commonly used components:
sudo pacman -S gnome-terminal nautilus budgie-extras dconf-editor
Install and Configure LightDM (Optional)
Its recommended to install and use LightDM, the recommended display manager for Budgie.
sudo pacman -S lightdm lightdm-slick-greeter lightdm-settings
Enable the lightdm service.
systemctl enable lightdm.service --force
Now, edit the Lightdm configuration file and change the session settings, else lightdm won’t work.
You can use any text editor (I am using Nano command-line editor here)
sudo nano /etc/lightdm/lightdm.conf
Find the line “greeter-session=” under “[Seat:*]” and change it to
greeter-session=lightdm-slick-greeter
(Uncomment the line if its commented)
Press Ctrl + x and then press Y to save and exit Nano editor.
Install Manjaro settings and theming for Budgie (Optional)
Install the Manjaro configuration and theming for Budgie.
sudo pacman -S manjaro-budgie-settings manjaro-settings-manager papirus-maia-icon-theme
Configure LightDM to match the Official ISO (Optional)
Now, you can also configure LightDM to match the official ISO.
To do that edit the “slick-greeter.conf” file.
sudo nano /etc/lightdm/slick-greeter.conf
Remove everything in that file and add the following lines:
[Greeter]
background=/usr/share/backgrounds/manjaro-budgie/manjaro-budgie.jpg
theme-name=Matcha-sea
icon-theme-name=Papirus-Maia
draw-grid=false
Save and exit.
Once the installation is complete then reboot the system.
Installing Budgie Desktop on Manjaro using GUI
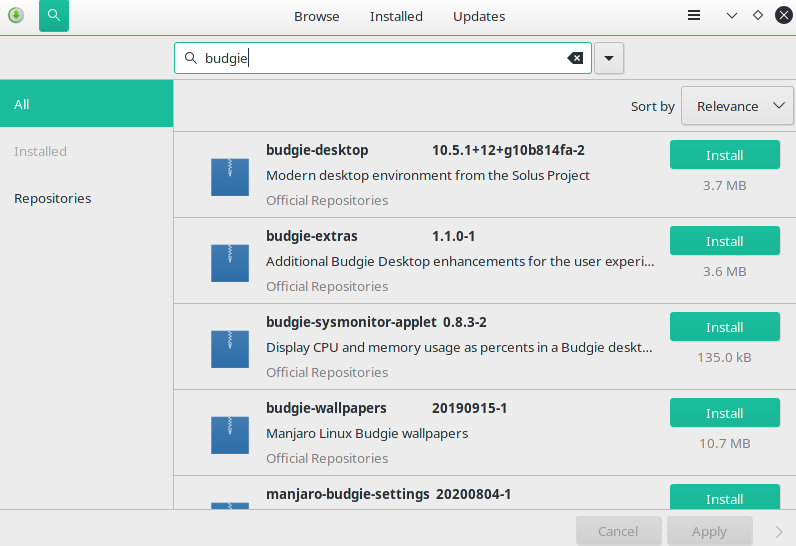
You can also install budgie desktop and related packages via software installer on Manjaro.
1. Open Software installer (Add/Remove Software).
2. Click on Search icon and type “Budgie” in the search field.
3. You’ll see budgie desktop and related packages there.
4. Install budgie-desktop, budgie-extras and manjaro-budgie-settings for a great budgie desktop experience.

5. Restart the system after installing all the packages.
Login to Budgie Desktop
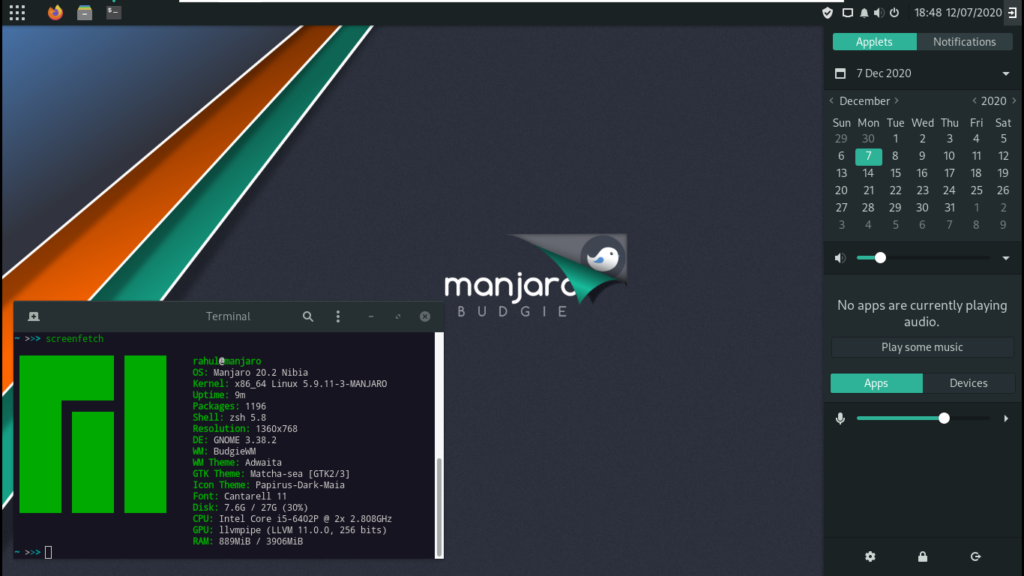
Once logged in, you’ll be greeted with budgie desktop

Before login make sure you have selected budgie desktop for your session.
Conclusion
You’ve successfully installed Budgie desktop on Manjaro, now you can customize it as you want.
If you like Budgie desktop, then as I mentioned before, Manjaro also has a community edition that ships with budgie desktop. If you ever plan to re-install Manjaro you can download and install that community version.
What are your thoughts on customizing Manjaro Linux?
If you like this post, then follow Techsphinx on Facebook and Twitter for more reviews, tricks, tips and tutorials.
This article needs update or correction? Report the issue here so I can update it.


