This post may contain affiliate links/ads and I may earn a small commission when you click on the links/ads at no additional cost to you. As an Amazon Affiliate, I earn from qualifying purchases. Techsphinx also participates in the StationX Affiliate program. You can read my full disclaimer here.

Kali Linux is an open-source and free Debian-based Linux distribution designed for penetration testing. There are more than 600 tools pre-installed in Kali, which makes it the best operating system in terms of penetration testing.
VMware is virtualization software that allows us to run an operating system virtually.
This means you can run an operating system inside another operating system using this software. The OS installed in VMware is called a virtual machine or the guest OS.
You can download VMware Workstation Player which is free for personal use. If you want to use VMware commercially then you have to buy the VMware Workstation pro.
Go to VMware product download page, where you’ll find the latest versions of all VMware products. Scroll down and find VMware Workstation Player.
I am not covering VMware Workstation player installation, as it is pretty straightforward.
Now, there are two ways to install Kali Linux on VMware:
1. To download and import the kali Linux VMware image provided by kali itself. (Quickest way)
2. To manually install Kali Linux on VMware using the ISO file.
In this post, we are going to cover the second way, that is, to install Kali Linux on VMware using the ISO file.
Pre-Requisites to install Kali Linux on VMware
- Minimum 20 GB of free disk space.
- Minimum 4 GB of RAM.
- VMware Workstation Player installed and running.
- Internet to download Kali Linux ISO image.
Steps to install Kali Linux on VMware
This step by step guide is explained with screenshots for easy understanding.
If your system meets the pre-requisites, then let’s install Kali Linux on VMware.
Step 1: Download Kali Linux ISO Image
Head over to Kali Linux Downloads section to download Kali Linux ISO image.
You can download 64bit or 32bit ISO image depending on your system architecture.
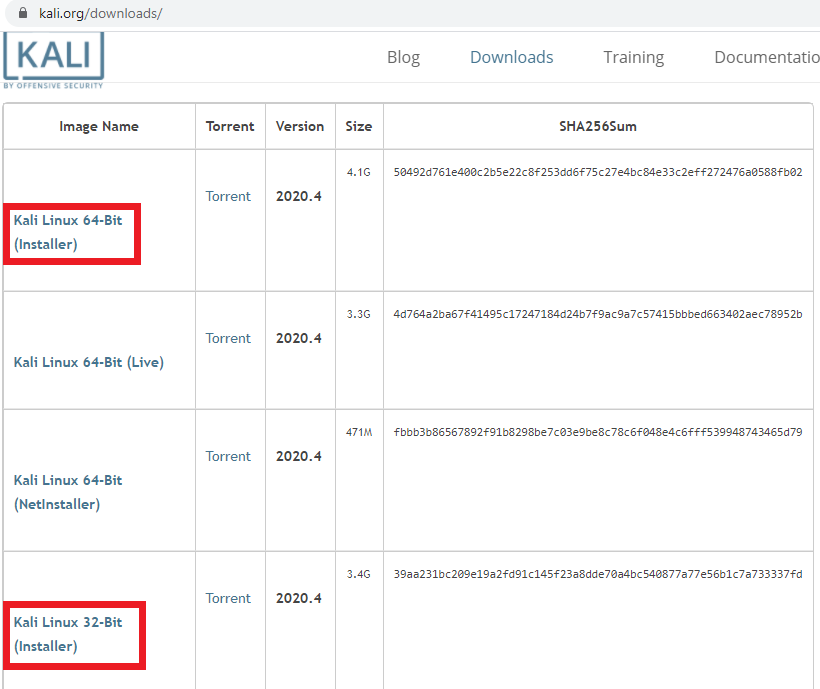
Download “Installer” version, don’t download “NetInstaller” or “Live” image.
It can take time to download depending on your internet speed. Once downloaded, proceed to the next step.
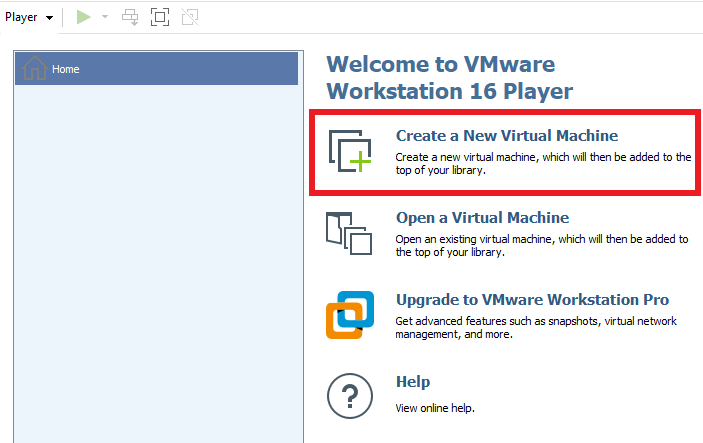
Step 2: Create new VMware container for Kali
To install Kali Linux on VMware, first let’s setup the virtual environment.
1. Start VMware workstation player and click on “Create a new virtual machine”.

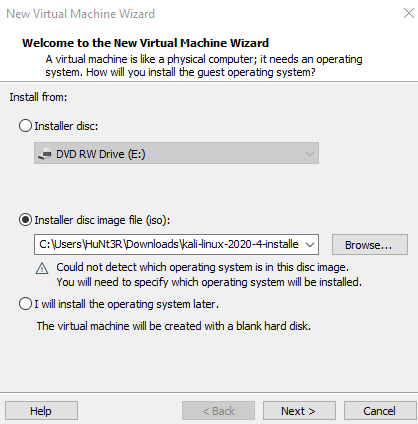
2. Installer disk image file: Browse and select the Kali Linux ISO image file you downloaded earlier, then click on Next.
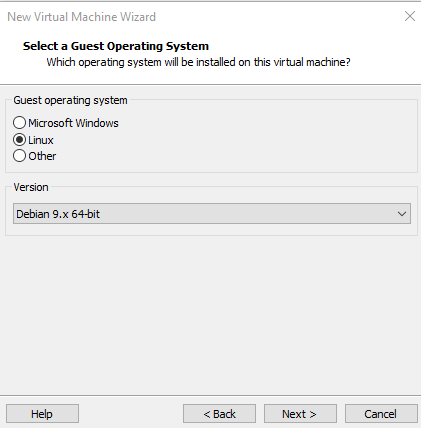
3. Guest Operating System: Choose Linux and set version as Debian 9.x 64bit (if you have 64bit architecture). Kali Linux is not available as a version in VMware, so you can choose Debian. Kali is based on Debian architecture.
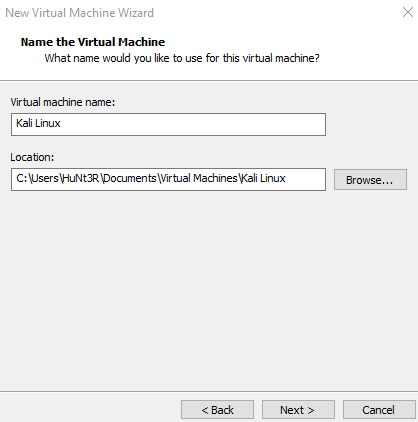
4. Name the virtual Machine: Provide a name for your virtual machine (I am using Kali Linux). You can also change the location if you don’t have enough space on the drive (I am leaving it as default). Click Next.
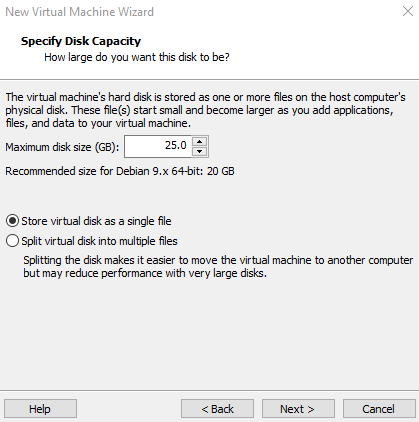
5. Specify Disk Capacity: Choose a disk space for your new kali machine. It is recommended to provide 20 GB disk space (I am giving it 25 GB). Also, select “Store Virtual Disk as a single file option” before clicking next.
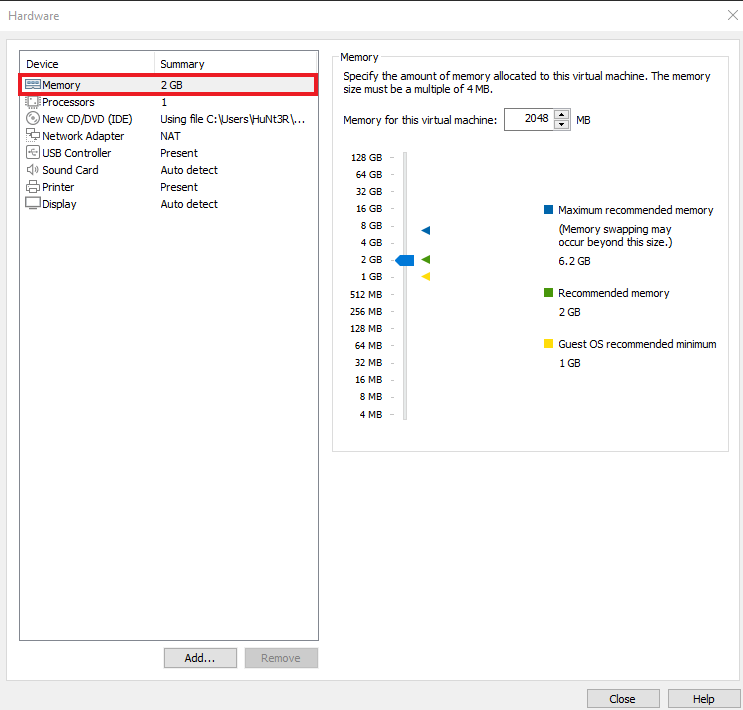
6. Customize Hardware: Click on “Customize hardware” button and select the memory you want to give to your Kali Linux machine.

It is recommended to give it 2GB (I am giving it 2GB). After adjusting memory, click close.
7. Click on Finish.
Step 3: Install Kali Linux on VMware
Let’s install Kali Linux on VMware.
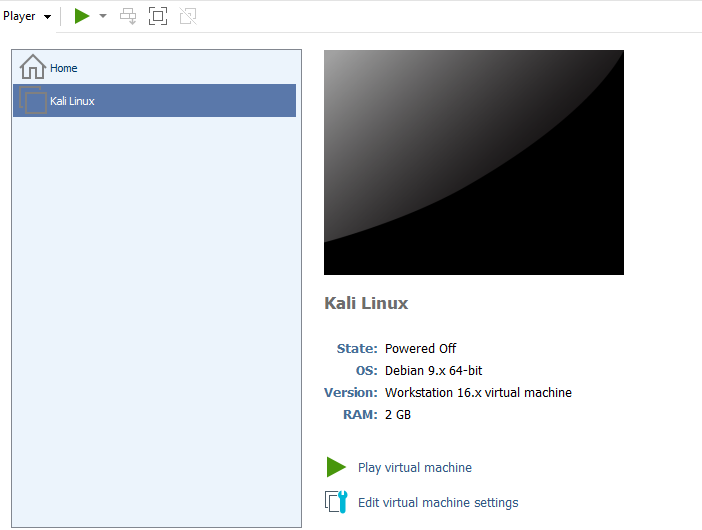
1. Start VMware and select the Kali Linux machine and click on “Play virtual machine” button.
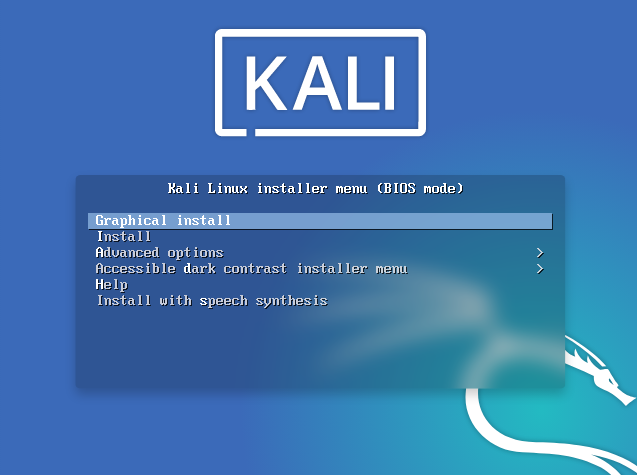
2. Kali Linux Installer Menu: Select “Graphical install”.
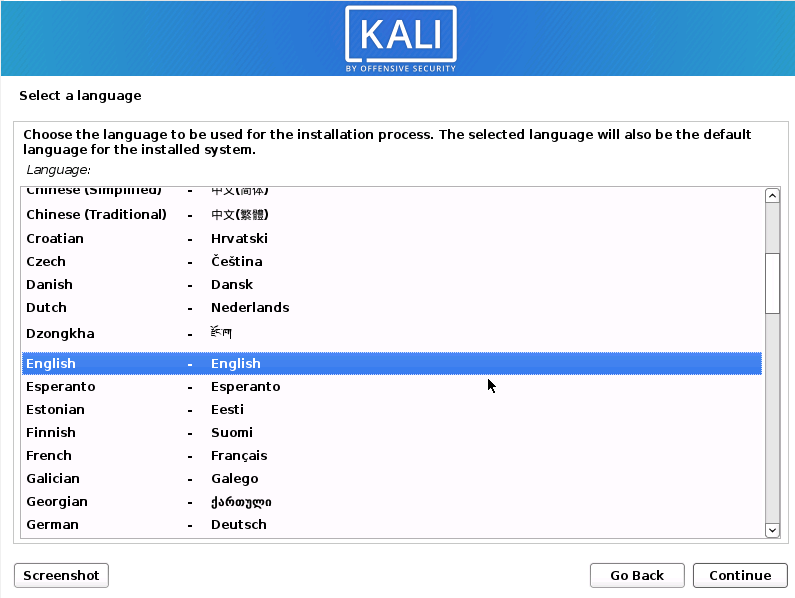
3. Select a language: Select your preferred language and click continue.
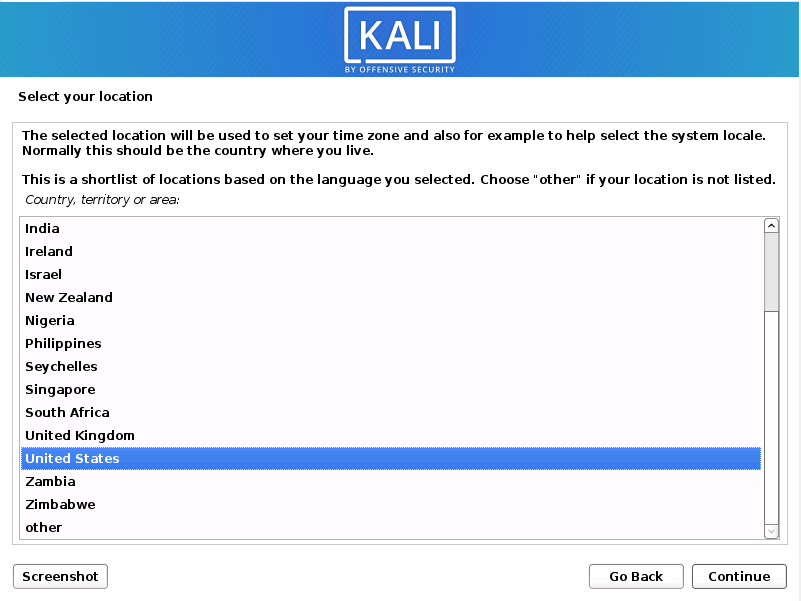
4. Select your location: Choose your preferred location form the list and click continue.
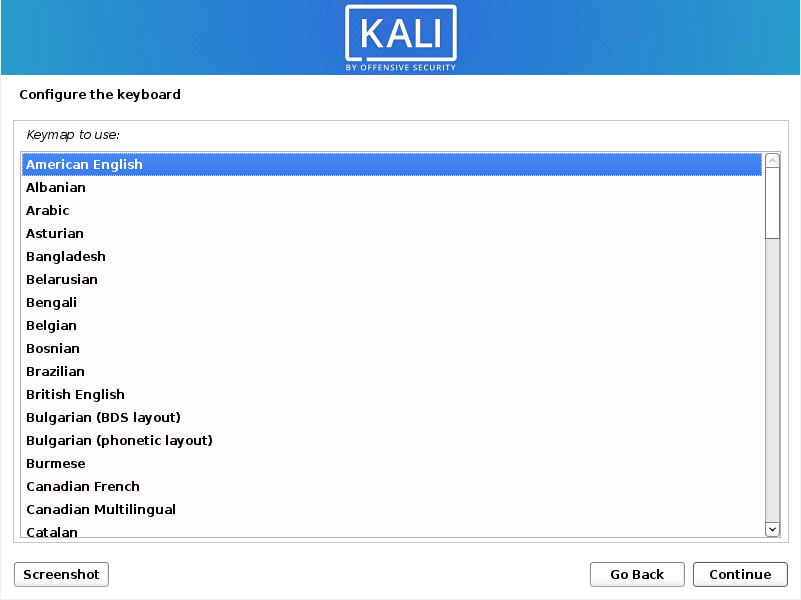
5. Configure the keyboard: Choose your desired keyboard layout and click continue.
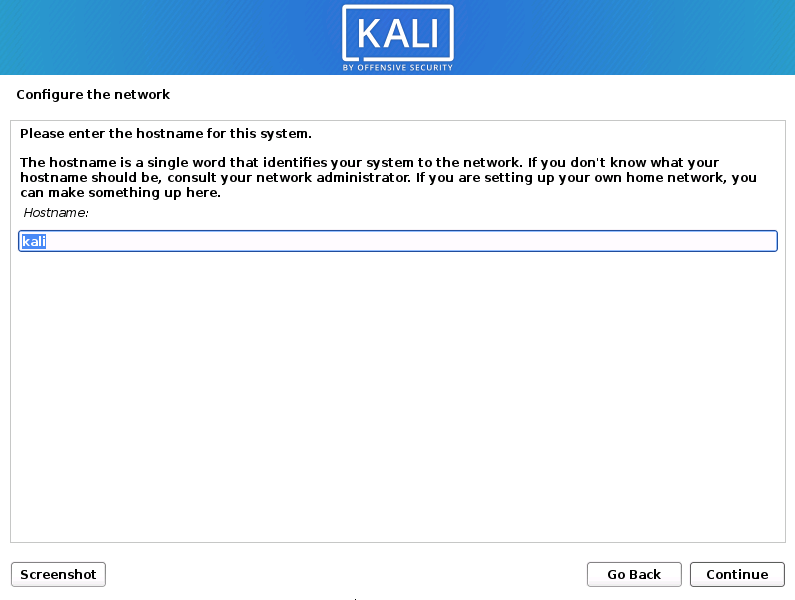
6. Enter a hostname for your system: (I am using “kali” as hostname). You can also change hostname later. Click on continue.
7. Enter a domain name: If you don’t have a domain name registered, you can make something up (I am using “example.com” as domain name). Click on Continue.

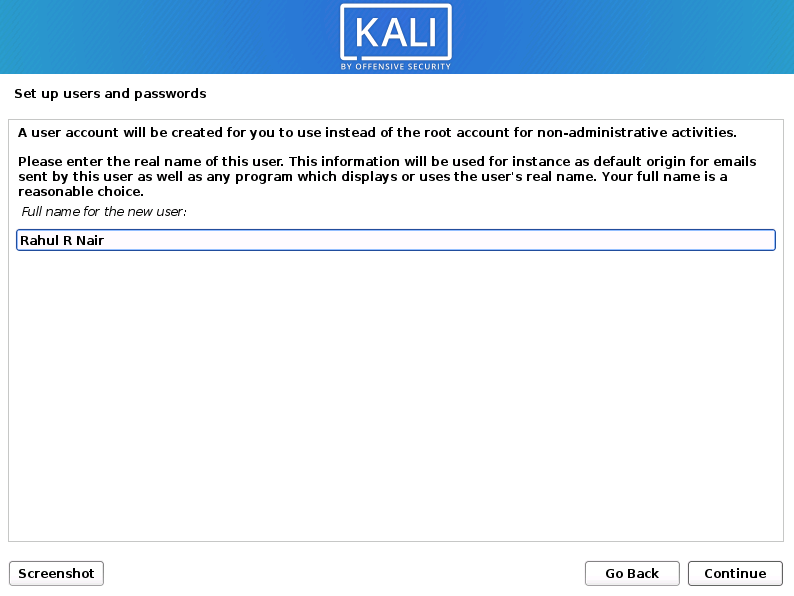
8. Set up users and Passwords: Enter your full name and click continue.
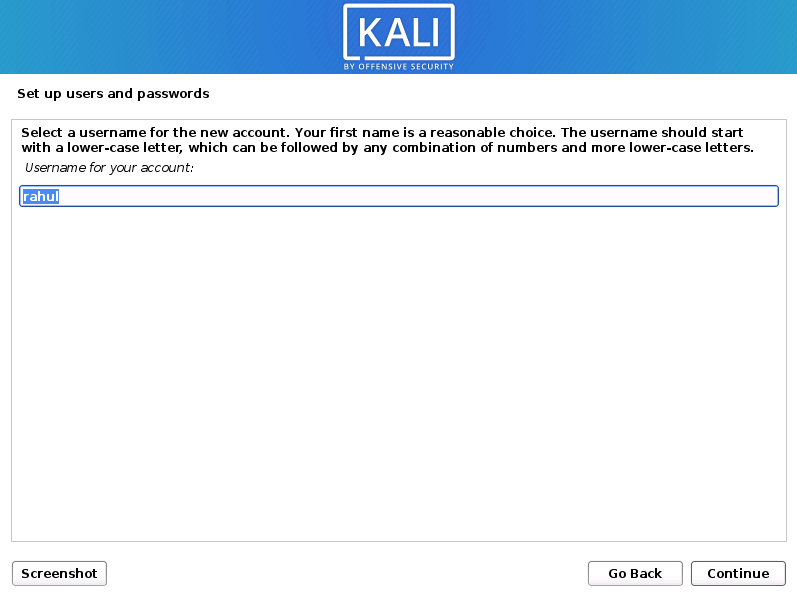
9. Select a username: You can enter any username you want and click on continue.

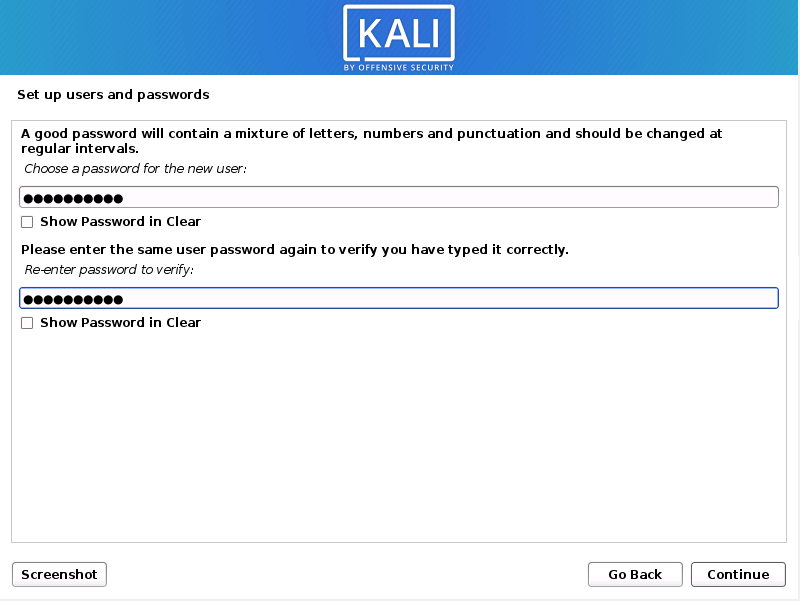
10. Setup Password: Set password for the user you created earlier. and click on continue.
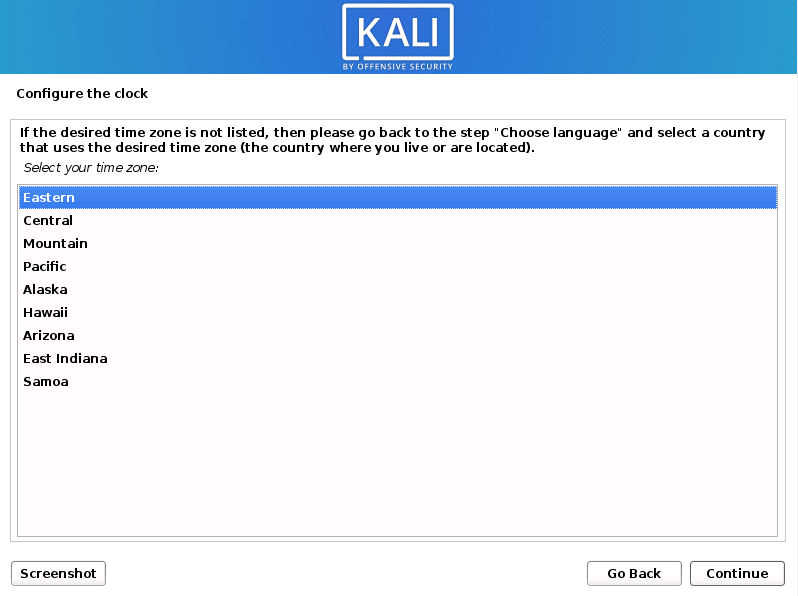
11. Configure the clock: Select a time-zone and click continue.
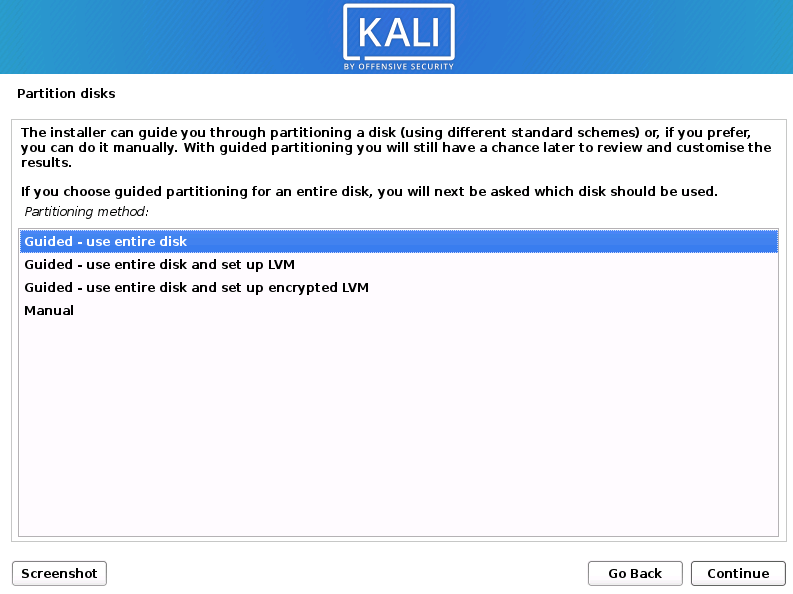
12. Partition Disks: Unlike installing on main hardware, you can choose “Guided – use the entire disk” option on VMware. Partitioning hard disk for the virtual machine doesn’t affect the main system. It will create partitions in the virtual disk (25 GB) we created earlier when setting up the virtual environment. Click on continue.
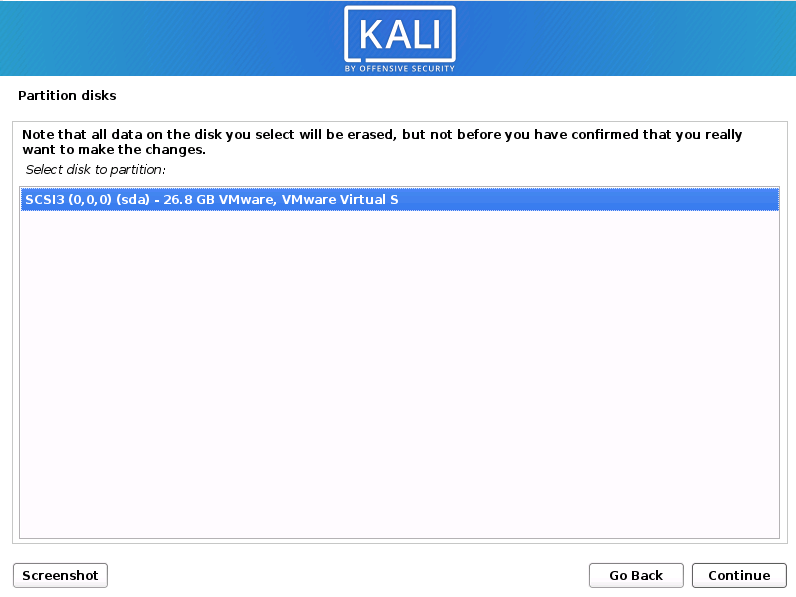
13. Select the disk and click continue.
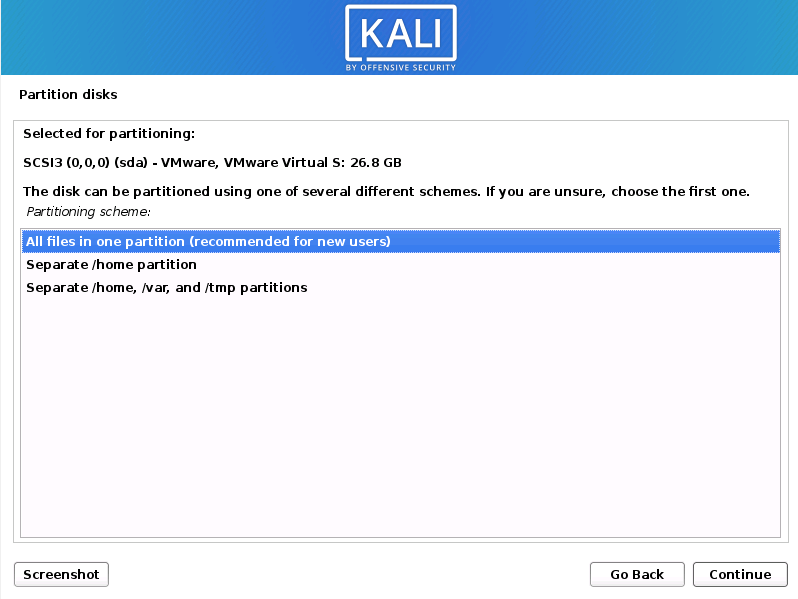
14. Choose all files in one partition (recommended for new users) and click on continue.
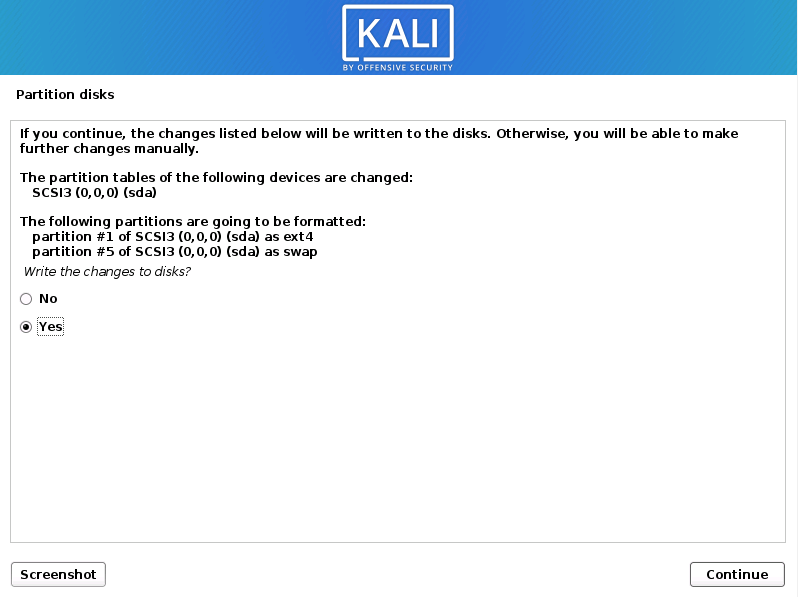
15. Select Finish Partitioning and write changes to disk and then click on continue.

16. Select “Yes” to write the changes and click on continue.
The installation process will begin.
After installing the base system, you’ll be prompted with software selection.
17. Software Selection: Choose the software you want to install (If you are unsure, then you can also leave it as default) and click continue.
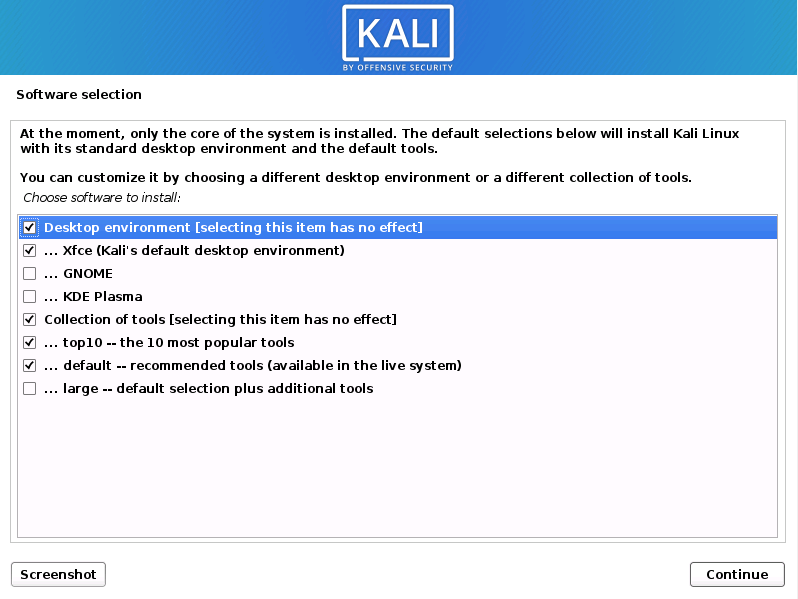
It will take some time to complete the software installation. Once it’s completed you’ll be prompted to install the GRUB bootloader.
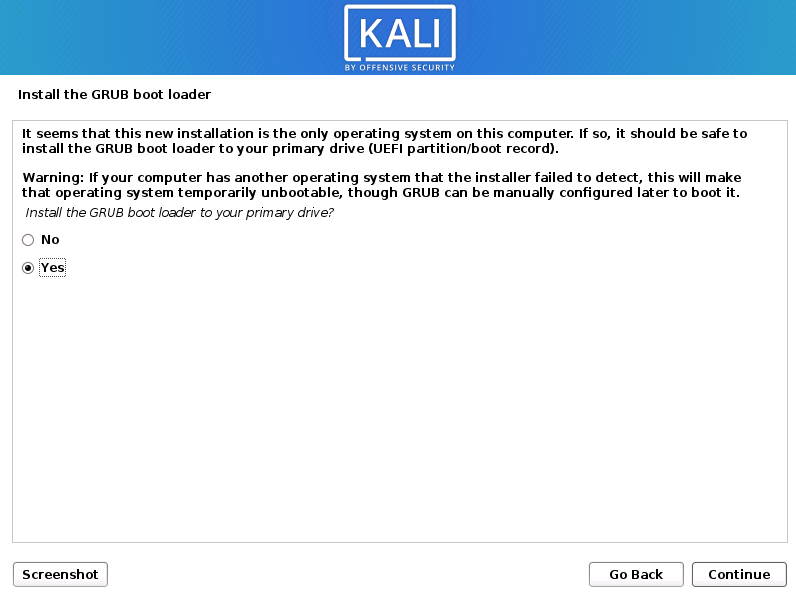
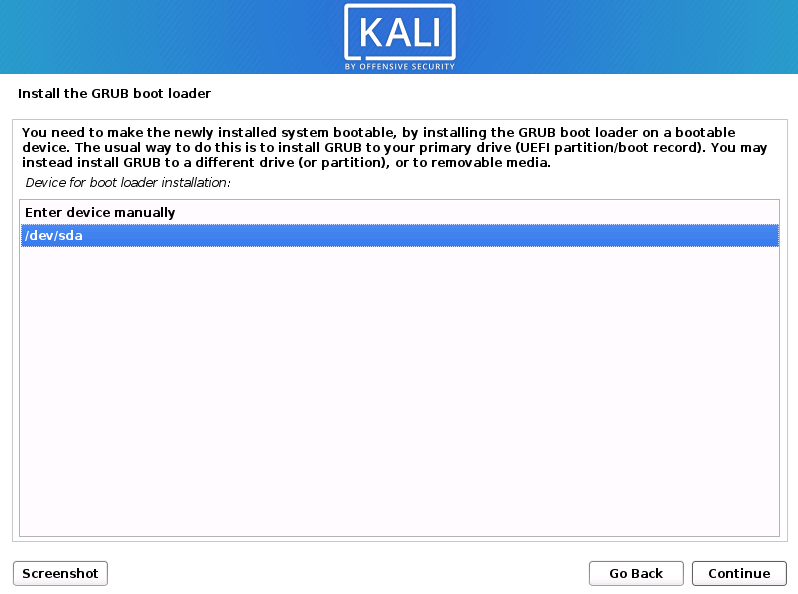
18. Install the GRUB Bootloader: Select “Yes” and click continue.
19. Select /dev/sda drive for bootloader installation and click continue.
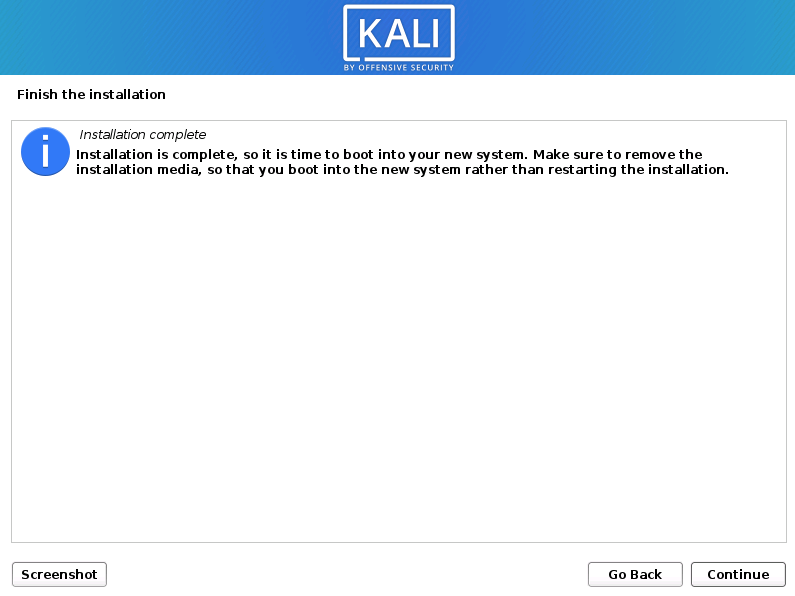
20. Finish the installation: Click continue to boot into your newly installed kali system.
Once Kali is booted, you ‘ll see Kali Linux login screen.
Log in to Kali using the username and password you created earlier.
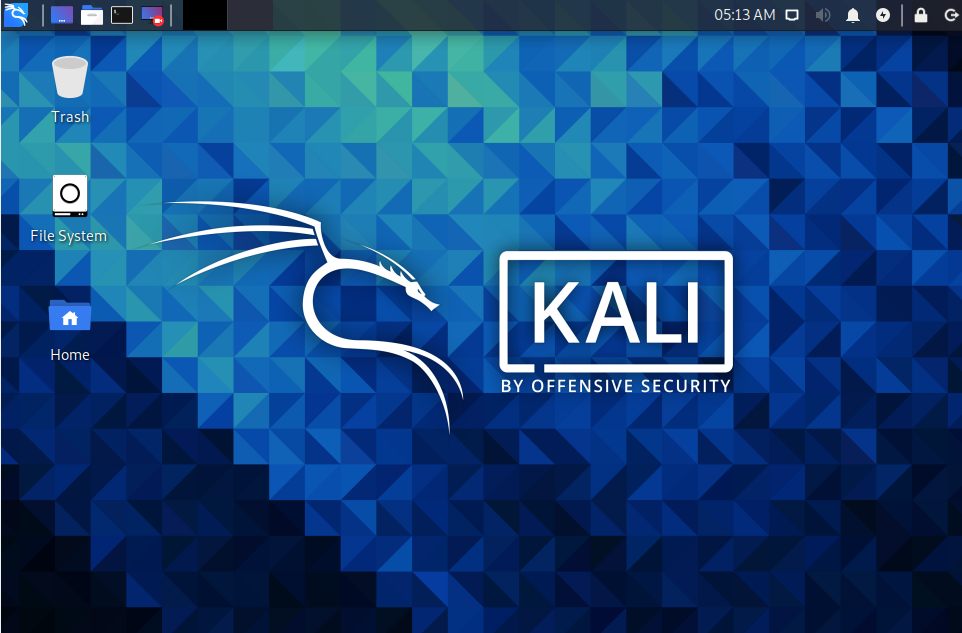
You’ll see the Kali Linux Desktop.
Step 4: Install VMware tools (Optional)
VMware tools provide useful drivers and utilities that improve the performance of virtual machines and provide many other benefits like:

- Shared Clipboard (Copy and paste from main to the virtual machine and vice versa).
- Drag and Drop functionality.
- Improves resolution for virtual machines.
- Improve color depth.
- Improves sound.
- Improved network adapter performance.
- Provides Smooth Mouse Experience.
- Time Sync between guest and host machine.
If you have problems with resolutions of the virtual machine or want to share files between main and virtual machine, then you can install VMware tools.
To install VMware tools:
1. Open terminal in Kali and update the repositories:
sudo apt update
2. Install open-vm-tools package:
sudo apt-get install open-vm-tools-desktop
3. Restart the Kali machine for changes to take effect.
reboot
4. You can check the version of installed VMware tools:
vmware-toolbox-cmd -v
Conclusion
Having a pen-testing lab is a great idea if you want to practice your hacking skills.
I have written full guide to create a penetration testing lab:
Hacking for beginners: Setup a Penetration Testing lab
You can also checkout my other guides related to hacking where I use kali Linux to exploit different types of vulnerabilities.
Command Injection Vulnerability
The Ultimate Guide to Cross Site Scripting
I hope this guide helped you to install Kali Linux on VMware workstation player without any problems.
It was pretty easy isn’t it?
You can comment your thoughts below.

If you like this post, then follow Techsphinx on Facebook and Twitter for more reviews, tricks, tips and tutorials.
This article needs update or correction? Report the issue here so I can update it.