This post may contain affiliate links/ads and I may earn a small commission when you click on the links/ads at no additional cost to you. As an Amazon Affiliate, I earn from qualifying purchases. Techsphinx also participates in the StationX Affiliate program. You can read my full disclaimer here.
PuTTy is popular and free telnet and SSH client, originally developed for the Windows platform. However, thanks to its open-source code PuTTy is now available for various Linux and Unix Distros.
Although Linux already has inbuilt SSH and telnet clients which can be accessed via terminal, still you may prefer using PuTTy for some reasons like:
1.) If you are already using PuTTy on Windows, you may want the same and friendly tool on Linux too.
2.) PuTTy has a butter-smooth and user-friendly GUI, if you want to save yourself from the hassle of editing SSH config files or running long commands on the terminal (especially when you are a newbie), then PuTTy is a great choice.
3.) PuTTy makes it easy to debug connections to serial ports and raw sockets.
4.) PuTTy supports many protocols such as Telnet, SCP, SFTP, Serial, Rlogin, SSH and also has multiple x11 authentication protocols.
You may have your other personal reason for using PuTTy on Linux, but whatever the case PuTTY is undeniably a great and user-friendly tool.
As I previously mentioned earlier, you can install PuTTy on various Linux distros. In this post, we are going to install PuTTy on some of the most commonly used Linux distros.
Open your terminal and let’s get started.
Install PuTTy on Ubuntu
For Ubuntu 20.04
$ sudo apt install update && apt install upgrade
$ sudo apt install putty
Install PuTTy on Centos / RedHat
Check out How to Install RHEL 8 (Explained with Pictures)
For Centos 8.1 / RedHat 8.1
$ sudo yum install https://dl.fedoraproject.org/pub/epel/7/x86_64/Packages/p/putty-0.73-1.el7.x86_64.rpm
Install PuTTY on Fedora
For Fedora 32
$ sudo dnf install putty
Install PuTTy on Debian
For Debian 10.3
$ sudo apt install putty
Install PuTTy on ArchLinux
For ArchLinux 2020
$ sudo pacman -S putty
Install PuTTy from Source
You can also compile PuTTY from the source thanks to its free and open-source code. You can download source code from here.
You’ll also need to have GCC and GTK development libraries pre-installed to successfully compile the source code.
I am compiling this on Ubuntu 2020. It didn’t have “GCC”, “GTK development libraries” or “make” pre-installed, so am installing it now with the following commands.
$ sudo apt install gcc libgtk-3-dev make
Now, to extract the downloaded source code tar file
$ tar -xvf putty-0.73.tar.gz
Change to extracted directory
$ cd putty-0.73/
Configure installation
$ ./configure
Finally, compile PuTTy and install
$ sudo make && sudo make install
Use PuTTy to SSH into other System
Using PuTTY is pretty straight forward.
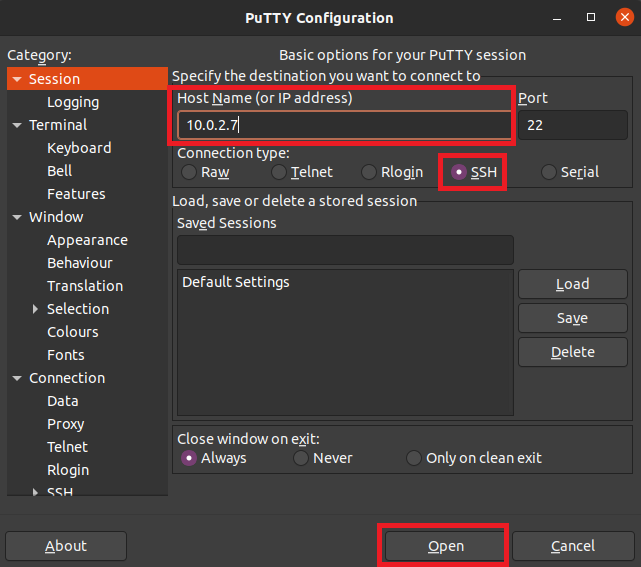
1.) Start PuTTy
2.) Enter the IP or Hostname of the system you want to connect to. Make sure the target computer has ssh server configured and running.
3.) Click on “Open”.

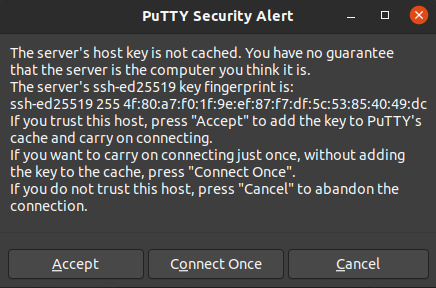
4.) If connecting for the first time it will ask to cache the server’s key. You can choose “Accept” to cache or “Connect Once” to continue without caching.

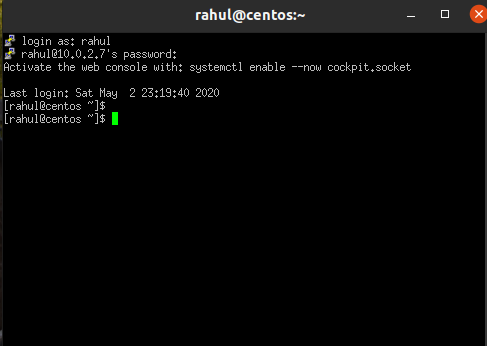
5.) Now, in the PuTTy terminal. Enter the login and password for the account you wish to connect on the remote computer.

If everything’s done correctly, you will gain shell access and you can continue working remotely.
Conclusion
Now, you know how to install PuTTy on different Linux distros. You can even install PuTTy from the source in any environment.
Hope you enjoyed installing this handy tool. If you encountered any errors, feel free to ask in comments.
If you like this post, then follow Techsphinx on Facebook and Twitter for more reviews, tricks, tips and tutorials.
This article needs update or correction? Report the issue here so I can update it.


