This post may contain affiliate links/ads and I may earn a small commission when you click on the links/ads at no additional cost to you. As an Amazon Affiliate, I earn from qualifying purchases. Techsphinx also participates in the StationX Affiliate program. You can read my full disclaimer here.

Before diving into “change the MAC address of android”, let’s first understand some basic things about MAC address and advantages of changing the MAC.
What is MAC Address?
MAC (Media Access Control) address is a physical and unique address assigned to a networking device (such as Wi-Fi or Ethernet). A MAC address is used to uniquely identify a device on the internet and local network.
MAC address is made using six two-digit hexadecimal numbers separated by colons (“:”)
Example of a MAC address = 00:0C:43:B4:C1:8E
Advantages of Changing MAC Address on Android Phone
Now you know what a MAC address is let’s see why go with the hassle of changing the MAC address on an Android phone.
1.) You carry your smartphone to different places, also you connect it to many different networks such as home, office or public Wi-Fi (hotel, airport, library, café etc.).
Home or Office Wi-Fi may be safe for you but public Wi-Fi is the hunting grounds for hackers.
If you ever need to connect to a public Wi-Fi, then its best to change MAC address for privacy reasons, if a hacker knows your original MAC address then he can use it to impersonate you and can do many illegal things using your MAC address.
2.) Some networks have MAC address filtering enabled so that only the devices which are allowed can connect to the network. Changing MAC address allows us to impersonate a MAC that is allowed on the network and bypass the MAC address filtering.
3.) To stay anonymous and conceal your identity from Wi-Fi providing companies who keeps records of users based on their MAC address. Changing MAC can prevent you from this type of tracking.
Find MAC Address of your Phone
I will show you two methods to locate the MAC address of your android phone.
Note: Your Wi-Fi MAC address will only be visible when your phone’s Wi-Fi is “On”.
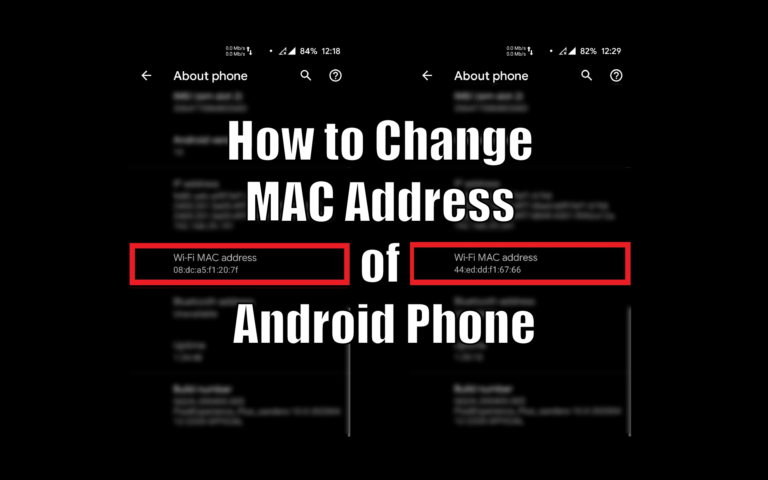
About Phone Method
1.) Go to settings
2.) Click on About Phone
3.) You’ll find Wi-Fi MAC address there.
This is my phone’s way of getting the Wi-Fi MAC address, since every phone is different, you have to search more in the settings.
For most devices, you can find Wi-Fi MAC in about phone.
Dialer Code Method
1.) Open the dial pad
2.) Enter

*#*#4636#*#*
It will open a screen with phone, usage and Wi-Fi information.
3.) Click on Wi-Fi information
4.) Click on Wi-Fi stats
5.) (Optional) Click on refresh stats.
You can find the Wi-Fi MAC address in there. This dialer code provides many other info about your device. I use this one most often. There is another dialer code that shows MAC address.
*#*#232338#*#*
But this one doesn’t work for me, you can try it if you want.
Note: The dialer code method will not work on some android phones, mainly the Samsung phones. For those devices you have to find MAC address in “settings”.
Change MAC Address on Android
Before proceeding, take a backup of your original MAC address by noting it down somewhere. You’ll need to revert to your original MAC address if things don’t go as planned.
Without Root Access
Pre-requisites:
1.) Terminal Emulator for Android App
2.) A valid MAC address. Use MAC address generator to generate one.
To be honest, there’s no proper way of changing MAC address in android phone without root.
Android phone is shipped with a normal user account instead of root, so that the user doesn’t accidently mess up the phone.
The normal user account doesn’t have the power to change the MAC address.
There is a way to change MAC address temporarily, but this will only work in phones with MediaTek processors, this method will not work with Snapdragon processor.
1.) Download and install Terminal Emulator app from play store.
2.) Open the app and type
ip link show
3.) Use the MAC address generator to generate a valid random MAC.

4.) Check the MAC address of wlan0. Wlan0 is the name of Wi-Fi interface in my device. Just check which interface has the same MAC address that you noted previously and use that name in the below command.
ip link set wlan0 XX:XX:XX:YY:YY:YY
Replace wlan0 with your interface name and XX:XX:XX:YY:YY:YY with your desired MAC address or the address you generated in 3rd step.
4.) Run “ip link show” command again to verify.
If everything done correctly, you’ll see your changed MAC address.
This method is temporary, once you restart your phone, your MAC Address with change back to original one.
Once again, let me remind you if you don’t have a rooted phone, don’t expect that you can change MAC address easily, this method may or may not work for you.
I have a device with snapdragon processor, it doesn’t work for me.
Change MAC address on Android Phone With Root Access
Pre-requisites:
1.) BusyBox download and install from Play store
2.) Change my MAC – Spoof Wifi MAC app download and install from Play store
Warning: Doing anything wrong with a rooted phone may damage/brick your device. Do not proceed without taking full (nandroid) backup. I / Techsphinx shall not be held responsible for your actions.
1.) Download and install busybox app from play store.
2.) Click on busybox app and click install.
3.) BusyBox will ask for root permissions, grant it.
4.) Now, download and install Change my MAC app from play store.
5.) Grant it root access.
6.) Enter your desired MAC or Click on the shuffle icon to generate random MAC address.
7.) Click on the “Tick” icon to apply changes.
If everything done correctly, the mac address will be changed. You can verify the changes by using “ip link show” in terminal emulator.
You can make this permanent:
1.) Click on the Profiles tab at the bottom.

2.) Add a profile by clicking on the Plus Icon.
3.) Enter profile name and your desired MAC address.
4.) Click on the Tick icon.
5.) Go back to the “home” tab and click on settings icon.
6.) Turn on the Change MAC address on boot option.
7.) Select your profile from the dropdown.
Done, your MAC address will automatically change on boot.
You can verify this by restarting your phone.
There are other ways to change MAC address for rooted android phone using terminal emulator. But, it didn’t work on my device (running android 10).
If I find another way to do this without using any app, I will update this post.
The Bottom Line
Some people say that changing/spoofing MAC address is illegal, that isn’t true. Changing the MAC address is not illegal but what you do after changing the MAC may be illegal.
For example, if you change the MAC address of android to connect to a network for which you don’t have permission is definitely illegal. (That’s what hacker do)
If you’re changing MAC address to secure yourself from spying eyes, then there is no harm in that.
Protecting your Privacy should be taken seriously in online world, especially when it comes to smartphones.
You can check my post: How to Secure an Android Phone in 2020?
to secure your android phone in just 12 easy steps.
Did it work? Do you know any other method?
Tell me in the comments.

If you like this post, then follow Techsphinx on Facebook and Twitter for more reviews, tricks, tips and tutorials.
This article needs update or correction? Report the issue here so I can update it.