
This post may contain affiliate links/ads and I may earn a small commission when you click on the links/ads at no additional cost to you. As an Amazon Affiliate, I earn from qualifying purchases. Techsphinx also participates in the StationX Affiliate program. You can read my full disclaimer here.

In this post, we will have a look at the features, compatible devices and installation of Corvus OS.
What is Corvus OS?
Corvus OS is an AOSP based custom ROM that is inspired by Dirty Unicorns.
If you don’t know about Dirty Unicorns, then let me tell you it is one of the ROMs that focuses on heavy customizations and is jam-packed with cool features.
The focus of Corvus is to provide a feature-rich OS for your phone but without compromising stability.
Currently, it is also the best custom ROM for Gamers. It offers game driver preferences and also provides decent battery customization.
Corvus OS Compatible Devices
Corvus OS officially supports 40+ devices across 11 OEMs as of writing this post.
Here’s a list of all the manufactures Corvus OS supports officially.
Note: Corvus OS team regularly updates the list of supported devices, so always check their official site for updated information.
- Asus
- Oppo
- Xiaomi (Mi, Redmi)
- Poco
- Realme
- OnePlus
- Motorola
- Lenovo
- LeEco
- Yu
The above mentioned are the list of manufacturers, if you want to know if your particular device supports this custom ROM, then go to the Corvus OS official website.
If there is no official build of Corvus OS for your phone, then you can try the following:
1. Go to XDA developers and find an unofficial port of Corvus OS for your device.
2. Wait for someone to create/port a build of Corvus OS for your phone.
3. Navigate to my Best custom Roms for android post and pick another custom ROM for your device.
Features of Corvus OS
Here’s a list of features Corvus OS provide out-of-the-box:
- Theme, icons, button customizations
- Heads up options
- Edge Lighting
- Show status bar on the lock screen
- Disable QS when locked
- Lockscreen album art filter
- Media artwork blur level
- DT2sleep
- Battery Customization
- Aggressive Battery
- Ambient Display
- Lift to check phone
- Hand wave pulse
- Pocket notifications on removal
- Brightness options on Ambient
- Ambient music ticker
- Ambient wake gestures
- Display Colors
- Game driver preferences
- DT2wake
- And many other cool enhancements.
Disclaimer
If you follow along with this post, your device warranty will be void. Don’t blame me if your device is hard bricked.
Any damages or loss incurred is your sole responsibility. I or Techsphinx shall not be held responsible for your actions.
Pre-Requisites to Install Corvus OS
- Unlocked bootloader
To install Corvus OS ROM on your device, you will need to unlock the bootloader. If you want to know more about OEM unlocking, then check the following link:
What is OEM Unlock? and How to enable it?
- Custom recovery installed on your device.
You’ll need a custom recovery to install a custom ROM. If you don’t have one installed already then check the below link:

Best Custom Recovery for Android devices
- NANDroid Backup of device, in case something goes wrong.
A Complete NANDroid backup is recommended as you have to wipe the old system to install the new one. If there is trouble during installation, you may have to revert to your old ROM.
Learn more about NANDroid backup from the following link:
How to Create and Restore NANDroid Backup?
Note: NANDroid backup doesn’t backup internal storage files like Pictures or downloads, make sure to back up all those files manually.
- Corvus OS ROM for your device.
Go to the Corvus OS ROM site and download the ROM file compatible with your phone.
- GAPPS compatible with your device. (Optional)
To gain play store functionality and other google apps, you’ll need to download and flash Gapps.
Head over to OpenGapps, and download the version compatible with your device.
If you don’t find the Android 11 version, then download NikGapps (a custom Google Apps package).
- Magisk App (Optional)
If you want to root your device, then you’ll need to flash the Magisk.
Download Magisk App from its official Github repository.
- Device charged up to 70%
Charge your device at least 70%. The last thing you want is to run out of juice while installing or troubleshooting custom ROM.
Install Corvus OS on Phone
I am installing Corvus OS on Moto G5S Plus device with TWRP recovery installed.
For a Clean Install of Corvus OS:
-
Reboot your phone to recovery and click on Wipe > Advanced Wipe. Then select System, data, cache, Dalvik cache partition and wipe it.
-
Connect your phone to the PC and copy the Corvus OS installation zip file to your phone.
-
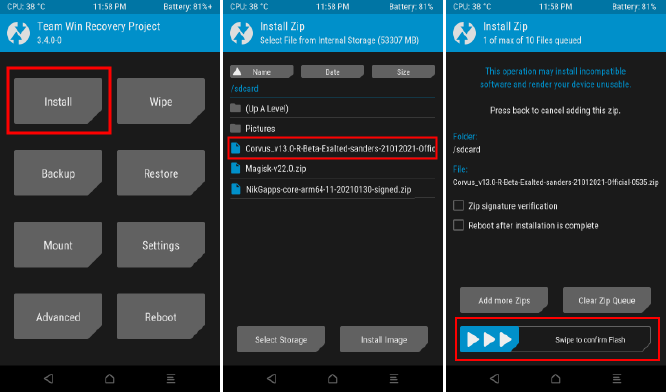
Click on Install.
-
Select the Corvus OS zip file.
-
Swipe to Confirm Flash

-
Wait for the flashing process to complete.
-
Wipe Cache/Dalvik.
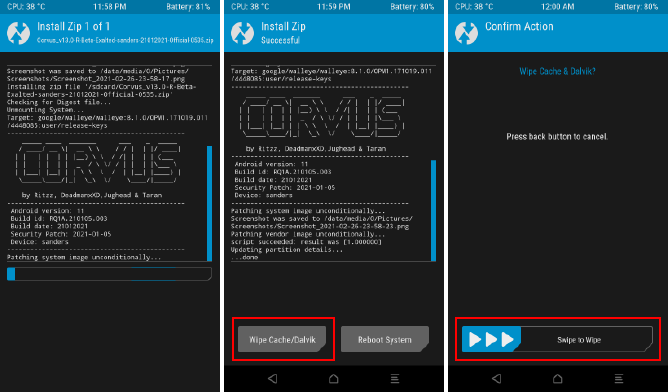
-
Reboot to system.
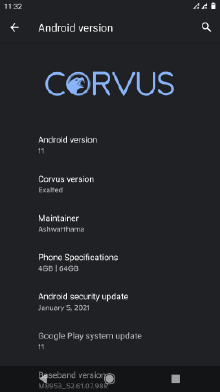
First boot may take some time; after that you will be greeted with Corvus OS home screen.
Flash Gapps (Optional)
To flash Gapps, reboot your device to recovery then follow the steps:
1. Copy the Gapps package to your phone.
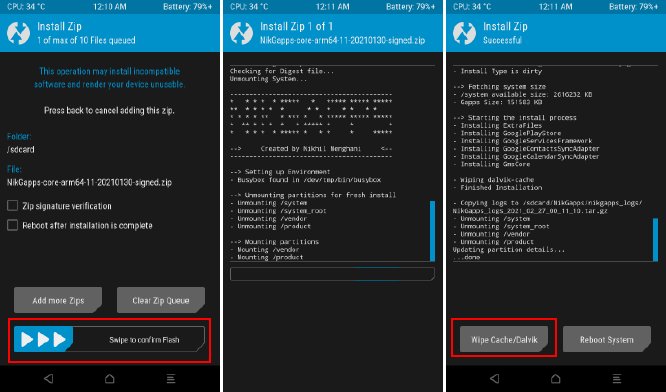
2. Select install.
3. Select the Gapps zip file.
4. Swipe to Confirm flash.
5. Wipe Cache/Dalvik.
6. Reboot to system.
Now, you’ll see play store and other Google apps in your app drawer.
Flash Magisk (Optional)
You can flash Magisk if you want to gain root access on your device. This step is optional.
If you’re not aware of rooting android devices, then I recommend to read my “Rooting Android Phone: Is it Worth the Risks” post.
Now, steps to flash Magisk:
1. Change the extension of the Magisk file from “.apk” to “.zip”. This will make it flashable.
2. Copy Magisk App (.zip file) to the phone.
3. Reboot to recovery.
4. Select install.

5. Choose the Magisk zip file.
6. Swipe to confirm flash.
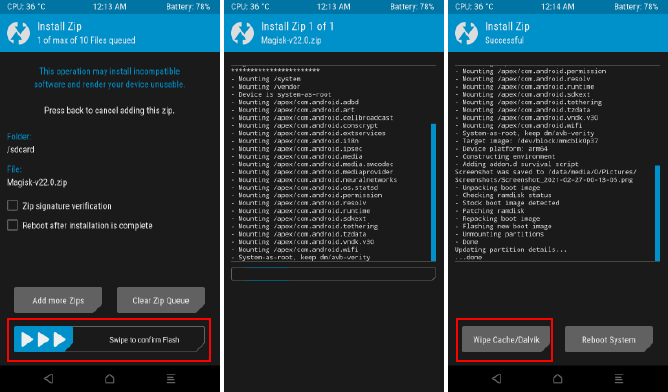
7. Wait for the process to complete then Wipe Cache/Dalvik and reboot to system.
8. Now go to app drawer and click on the Magisk app icon.
9. If it says to download and install the full Magisk package, then go ahead and do that.
10. Once it’s done, you can click on the “Check SafetyNet” option in the Magisk app.
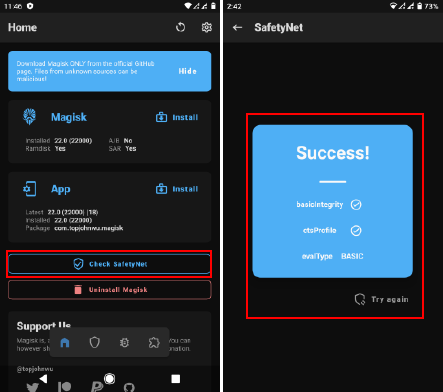
11. You should get a success message.
Note: If SafetyNet check fails, then download and flash kdrag0n’s SafetyNet-fix.
FAQ on Corvus OS
No, Corvus OS is not pre-rooted. You have to flash Magisk if you want to root it.
Yes, Corvus OS is open source and its source code is available on GitHub.
Yes, new Corvus OS builds are based on Android 11.
Yes, the ROM is frequently updated with the new features and latest security patches.
The ROM is well maintained, also it is open source and provides monthly security updates. Therefore, I don’t have any reason to call it unsafe.
Your device may be at a security risk but it may not be because of any custom ROM but because of your daily habits.
I have written a guide on securing android phone. You can check that out.
Enjoy Corvus OS
I hope this tutorial helped you to install Corvus OS custom ROM on your Android phone.
Using the steps mentioned in this post you can flash Corvus OS on any Android phone. However, if you encountered any device-specific error, then check on XDA developers for the solution.
If you like this project, then support the developers so they can continue this awesome project.

If you like this post, then follow Techsphinx on Facebook and Twitter for more reviews, tricks, tips and tutorials.
This article needs update or correction? Report the issue here so I can update it.