
This post may contain affiliate links/ads and I may earn a small commission when you click on the links/ads at no additional cost to you. As an Amazon Affiliate, I earn from qualifying purchases. Techsphinx also participates in the StationX Affiliate program. You can read my full disclaimer here.

A custom recovery allows us to do many things like flashing custom ROMs or other cool mods to enhance your android experience. With all flashing and customizing, there’s always a chance that something could go wrong. Having a “NANDroid backup” will definitely save your day.
With NANDroid backup in hand, you can experiment with your device without any worries. Having a NANDroid backup will give you an edge over the worst possible scenarios.
You can restore your android phone to a working state in no time.
If you are new to the term “NANDroid”, don’t worry this NANDroid backup how-to guide covers everything you need to know about NANDroid backup.
What is a NANDroid backup?
NANDroid derived its name from NAND flash memory which is a type of non-volatile (permanent) storage and Droid as you know an abbreviation for Android.
NAND flash memory is used in different types of storage devices to store data including – USB flash drives, SD cards, solid-state drives etc.
Android also uses NAND flash memory to store data that includes personal data, as well as system files (even the entire operating system)
With NANDroid backup you are not just backing up apps and personal data, it can create a perfect copy of the entire android system.
Restoring a NANDroid backup will feel literally like time travel.
You can use any custom recovery to create NANDroid Backup. You can read my post – Best custom recovery for android devices 2020 if you want to know about some of the best custom recoveries out there.
In this post I am creating NANDroid backup using TWRP recovery.
TWRP backup includes:
- The operating system itself (system and system image of stock or custom ROM)
- Boot partition
- All Data excluding storage.
- Recovery partitions
- All system settings
- All stored passwords, including Wi-Fi passwords
- Vendor and Vendor image
TWRP backup doesn’t include:
- Camera Images
- Music
- Movies
- Downloaded files and folders
- TWRP will not include any files or folders under /data/media or any data that you or any app has stored in the internal storage.
You have to take the backup of these internal storage files manually by transferring it to a PC / MAC or any other device or service like Google Drive, Dropbox etc.
As you can see, NANDroid backup can save almost an entire operating system with every data (excluding the storage data).

Therefore, it is recommended to have a large capacity SD card or enough space in internal storage to backup everything.
Pre-Requisites
– Custom Recovery Installed on your Phone (I am Using TWRP recovery for this post).
– Free space in phone or SD card to store backup files. (Backup files can be large)
– NANDroid Backup using TWRP will not backup storage files like pictures, music or downloads. Make sure you backup all such files manually.
– NANDroid Backup created by one recovery can only be restored by the same recovery.
For example, if you used TWRP recovery for creating the backup, then you can only restore your backup using TWRP recovery. If you use CWM recovery for creating the backup, you can restore the backup using CWM only.
How to create a NANDroid backup?
Now, you know what is NANDroid backup, let’s see how to create one.
1. Enter into recovery mode of your android device.
2. Press Backup button.

3. In the backup tab, you can select the partitions you want to backup.
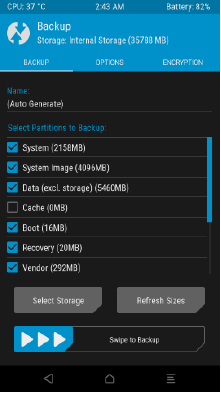
If you know about these partitions, then you can select the partitions you need. If you don’t know what these partitions do, then leave it at default selection.
4. Enable Compression (Optional)
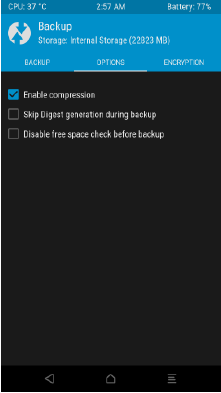
In the options tab, you can enable compression for the backup. This step is optional.
5. Enable Encryption for backup (Optional)
This backup contains all the system information and settings of your android device, so obviously you would not want the data to fall into wrong hands. In the Encryption tab, you can encrypt your backup using a password.

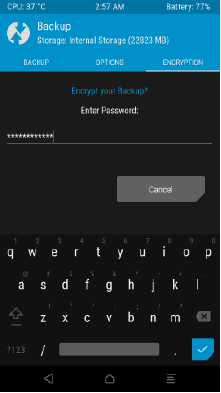
Important: Remember the password, otherwise you will not be able to decrypt it at the time of restoring the backup.
6. Go to backup tab, and swipe to start the backup process.
Wait for the backup to finish.
My device’s backup is approximately 13GB in size without compression.
7. After completion, reboot the device back to system.
Done! You have successfully created NANDroid Backup of your android phone.
How to Restore NANDroid backup?
You have already prepared a backup of your android phone. If something goes south, then you have the option to restore the backup.
Let’s see the steps to restore NANDroid Backup.
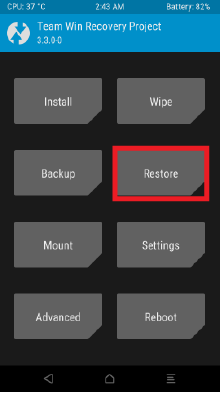
1. Enter into recovery mode.
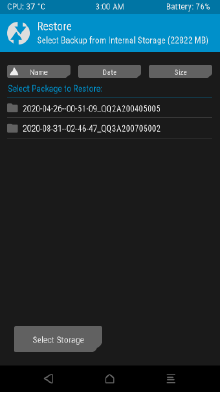
2. Click on Restore button.
3. If you have multiple backups, then select the backup package you want to restore.
4. Select the Partitions you want to restore.
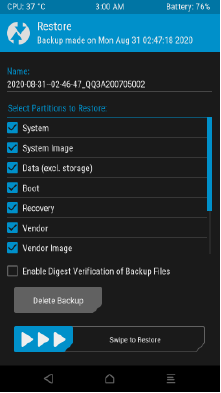
If you want to restore everything the way it was, then select everything.
5. Swipe to Restore.
Wait for the process to finish, after that reboot the system.

Move NANDroid Backup to PC
For tech enthusiasts, who love to tinker with stuff, it is recommended to take NANDroid backup at a regular basis so that you have the recent version to restore to.
Judging by the size of my one backup (approx. 13GB), it will be a good idea to move all the backups to a more convenient place.
Keeping all backups on the android phone will be like putting lock and key together.
If your phone’s internal storage or SD card gets erased accidentally, you’ll lose all the backup.
TWRP stores all backup files under TWRP/BACKUPS
Connect your phone to PC and find TWRP folder in your internal storage and transfer NANDroid backup to PC.
Extract NANDroid Backup data using App
If you want to restore just the app and app data or extract contacts, call logs, SMS etc. from backup, you can use the Titanium Backup app. However, it requires root access and also you need pay for the donate version if you want to use it to extract data from NANDroid backup.
If you want to extract call logs, contacts and SMS data from your NANDroid Backup, then this XDA thread by Mirhawk can save your day especially if you don’t want to pay for the Titanium Backup.
[GUIDE] Extract and Restore Contacts, SMS, Call logs from nandroid backups(TWRP) by Mirhawk
You’ll find many other guides and ways to solve your problems with android devices on XDA forums.
Staying Curious but also Cautious.
It doesn’t matter if you are a flash-maniac who loves to try different custom ROMs or an enthusiast who wants to customize the android device to his/her heart’s content by flashing different mods on your android device.
It is always a good idea to have a NANDroid backup around.
Head over to my Best Custom Roms for Android Devices post to know about different custom ROMs available for your android phone.
Have fun with android with a peace of mind.

If you like this post, then follow Techsphinx on Facebook and Twitter for more reviews, tricks, tips and tutorials.
This article needs update or correction? Report the issue here so I can update it.