This post may contain affiliate links/ads and I may earn a small commission when you click on the links/ads at no additional cost to you. As an Amazon Affiliate, I earn from qualifying purchases. Techsphinx also participates in the StationX Affiliate program. You can read my full disclaimer here.

A smartphone has many more features than you think, but these features are locked due to security reasons or so that you don’t damage your device unintentionally.
Android is based on a Linux kernel. Linux has a superuser account named “root”. By gaining access to “root”, you can have maximum control over your device. By default, you don’t have access to root, this is locked by the manufacturer of the device.
In this post we are going to see, how to unlock Bootloader, install custom recovery and of course how to root Moto G5s Plus.
Let’s start
But, Wait, before starting let me make some of the things clear to you:
I am not responsible for any damage in any way. (Don’t blame me for any bricked/dead devices or your Wi-Fi is not working after rooting.)
You are doing this at your own risk.
Lastly, by following this post, the warranty of your device will be void. (This means no service centre will repair your device for free, you have to pay for your crimes.)
I am assuming that you know all the advantages and disadvantages of rooting android phone, if you don’t know about the risks that come with it, then I recommend you to read my “Rooting Android Phone: Is it worth the risks?” post, before making up your mind on rooting moto g5s plus.
Pre-requisites to root Moto G5s Plus:
- Take Backup of Important files to your PC (Images, Music, Documents, Contacts, Blueprints of some secret technology etc.), Your Phone’s Internal Storage will be cleared. Also, remove the micro SD card, in case you make some mistake and clear its data too.
- Charge your device at least up to 80%.
- Motorola drivers installed, ADB and fastboot drivers extracted. (If you don’t know how to do that, then check out the section of this post regarding the same)
- Motorola Moto G5s Plus phone and USB cable.
- Custom recovery (TWRP recovery image for Moto G5s Plus)
- Magisk zip file for rooting.
Now, Let’s Begin by Unlocking the Bootloader.
Unlocking OEM unlocks doors to truly customize your device, starting by installing custom recovery to even root and install custom ROMs.
I have written an entire post on OEM unlocking, make sure to check that out if you want in-depth knowledge regarding the same.
What is OEM Unlock in Android? and How to enable it?
Let’s start the process:
1.) Enable developer option on your Device, You can do that by going to Settings > System > About phone > Then tap on Build Number Seven times to enable Developer options.
2.) After enabling developer options of your device, go to developer options and turn on OEM unlocking and USB debugging.
3.) Switch off your device and then Switch it on holding the Power button + Volume Down button simultaneously for 5-6 seconds to enter into fastboot mode.
4.) Now, connect your device to pc using USB.
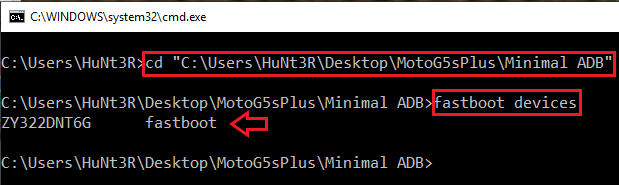
5.) Open CMD prompt in windows. (Hit Win+R key and type “cmd” (without quotes) in the run dialog and hit enter), Navigate to the folder where you have extracted ADB and fastboot drivers using the “cd” command.

6.) Now type “fastboot devices” (without quotes) and make sure you see your device listed here. (If not then you have made some mistake in following the steps correctly, troubleshoot your errors before proceeding further.)
7.) Now, run this command:
fastboot oem get_unlock_data
8.) The returned output will get you, your unlock key. The output will be something like shown in this image.
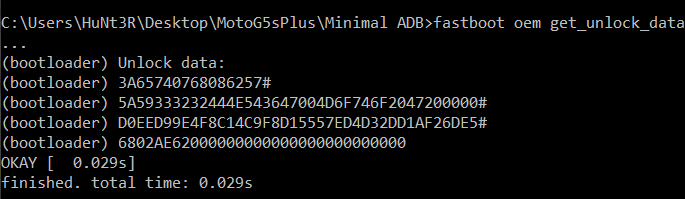
9.) We need full string in continuous format i.e without the “(bootloader)”. You can do it manually or use the Moto data scrub tool.
10.) Now, visit Motorola bootloader unlock website Read All the warning present there. After reading all this and you are still daring to face your fears then click next.
11.) Sign in or create an account.
12.) Paste the string you obtained earlier after removing “(bootloader)”.
13.) Click on “can my device be unlocked”.
14.) If your device can be unlocked, then you find a Request Unlock Key Button Below. Click on it after agreeing to the terms.
15.) Press ok for any Pop up that occur.
16.) Now, check your email for the unlock key.
17.) Now run the command:
fastboot oem unlock *******
Replace the asterisks with the unlock key you get from the email.
18.) Retype the command because of the warning. (As shown in the image)
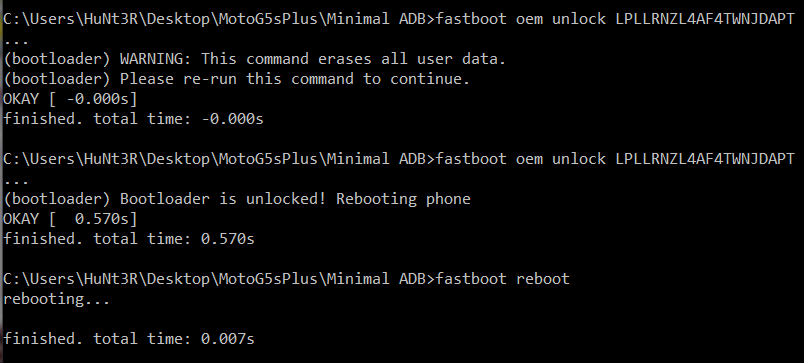
19.) Restart your device using :

fastboot reboot
Your Device will be rebooted and your device’s bootloader is now unlocked.
Install Custom Recovery(TWRP)
Now, after unlocking bootloader you can any install custom recovery you want.
We are going to flash TWRP recovery in this Post.
1.) Download and copy TWRP image to the ADB and fastboot folder.
2.) Open CMD prompt and navigate to ADB and fastboot folder.
3.) Reboot your phone into fastboot mode.
4.) Check your fastboot connection to verify that fastboot has detected your device.
fastboot devices
5.) Run the following command:
fastboot flash recovery twrp-3.1.1-sanders.img
Change name of “twrp-3.1.1-sanders.img” with the twrp you downloaded.
6.) Boot into recovery using the volume buttons on your device (Keep using volume button until you get “RECOVERY” on the fastboot screen and then hit power button to select that option.)
7.) You have successfully booted into TWRP screen if you see the TWRP logo.
8.) If TWRP is asking to allow modifications, then Swipe to allow modifications.
There you go, TWRP up and running on Moto G5s Plus.
Now, to root Moto G5s Plus.
We will be using the Magisk zip file. To get the latest release of Magisk, Head over to topjohnwu’s Magisk repo on GitHub.
1.) Download the Magisk zip file from topjohnwu’s magisk GitHub repo. (Make sure you download the magisk zip for flashing through TWRP, don’t download the magisk apk file.)
2.) Boot into TWRP recovery. (Follow the step 6 above) and make sure your device is connected to pc via USB.
3.) Wipe Data and cache.

4.) Copy the Magisk zip file to your device.
5.) Go to install option in TWRP and select the Magisk zip file and flash it.
7.) Wipe Cache/Dalvik and reboot the device.
8.) After rebooting, download any Root checker app from play store and check the root status of your device.
If everything done right, then you will see that your device is rooted.
Next steps
Now, you have rooted moto g5s plus and gained the power to customize your device to your hearts content.
But before starting to experiment, I recommend you to take a full NANDroid backup of your phone using TWRP custom recovery.
How to create and restore NANDroid backup?
If you want to get your hands dirty with custom ROMs. Check the below posts I have written:
Best Custom ROMs for Android Phones 2020
How to Install Pixel Experience ROM on your phone?
Conclusion
Now, you have successfully unlocked bootloader, installed custom recovery(TWRP) and root Moto G5s Plus.
If you encountered any problems along the way, please feel free to ask in the comment section of this post.
If you liked this post, then please share it.
And now your device is rooted but if you want to revert back to Stock ROM, then follow “Moto G5s Plus: Lock Bootloader and Install stock ROM” post.

If you like this post, then follow Techsphinx on Facebook and Twitter for more reviews, tricks, tips and tutorials.
This article needs update or correction? Report the issue here so I can update it.