
This post may contain affiliate links/ads and I may earn a small commission when you click on the links/ads at no additional cost to you. As an Amazon Affiliate, I earn from qualifying purchases. Techsphinx also participates in the StationX Affiliate program. You can read my full disclaimer here.

Accessing a computer remotely over the network is a basic task that every system and network administrator should know.
There are many network protocols like RDP, VNC, SSH etc. that can help you to establish a connection between two remote computers.
In this guide, I will show you how to install and access a remote computer using the SSH protocol.
What is SSH and How Does SSH Work?
SSH short for Secure Shell is a network protocol that allows secure data communications between two computers over the network. Therefore, it is mostly used by system administrators to remotely login to machines and perform tasks such as executing commands, copying files from one machine to another etc.
SSH works on a client-server model. The computer where an SSH session run is called a server, on the other hand, where an SSH session is displayed is called a client. The default port for SSH is 22. By default, SSH uses automatically generated public-private key pairs to encrypt a network connection on both ends (client and server), along with a password to authenticate the user.
Apart from remote login, SSH also supports tunneling applications, forwarding TCP ports and X11 connections for forwarding graphical sessions. Moreover, you can also use the associated protocols of SSH such as SFTP (Secure File Transfer Protocol) and Secure Copy Protocol (SCP) to transfer files securely over the network.
Advantages of Using SSH over Telnet
SSH was designed as a replacement for Telnet and other unsecured remote shell protocols like rsh (remote shell) and rlogin (remote login).
1. SSH is more secure as it encrypts the data whereas Telnet sends data in plain text.
2. SSH can be used to tunnel various applications.
3. It can forward graphical sessions through X forwarding securely.
4. Due to the lack of security features, using telnet is not recommended. Therefore, it is not provided as an option for remote login by many hosting and cloud service providers.
5. The extensions of SSH such as SFTP and SCP can be used to securely transfer files over the network.
Features of OpenSSH
- OpenSource project with free licensing.
- Strong cryptography (AES, ChaCha20, RSA, ECDSA, Ed25519…).
- X11 forwarding (which also encrypts X Window System traffic).
- Port forwarding (encrypted channels for legacy protocols).
- Strong authentication (public keys, one-time passwords).
- Agent forwarding.
- SFTP client and server support.
- Optional Data Compression.
Pre-Requisites to use SSH on Linux
- Two machines connected via the network.
- Internet connection to download and install the required packages.
- Sudo privileges.
My setup
| Hostname | OS | IP Address | |
|---|---|---|---|
| Server: | rahul@techsphinx | Ubuntu 22.04 | 10.0.2.15 |
| Client: | john@example | Debian 11 | 10.0.2.4 |
Install and Enable SSH on Linux
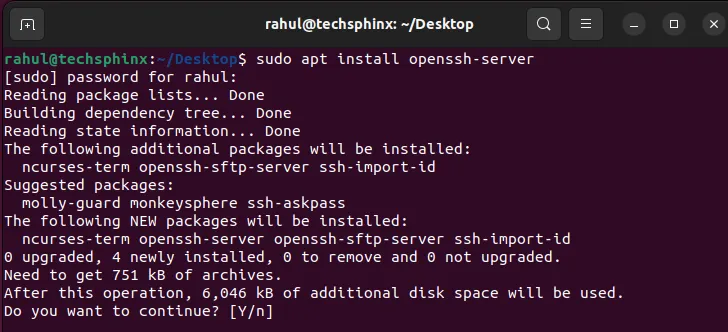
1: Install Open SSH server Package
On Ubuntu/Debian:
sudo apt update
sudo apt install openssh-server
For RHEL/Fedora:
sudo dnf update
sudo dnf install openssh-server
On Manjaro/Arch based distros:
sudo pacman -S openssh
2: Start the SSH Service.
sudo systemctl restart ssh
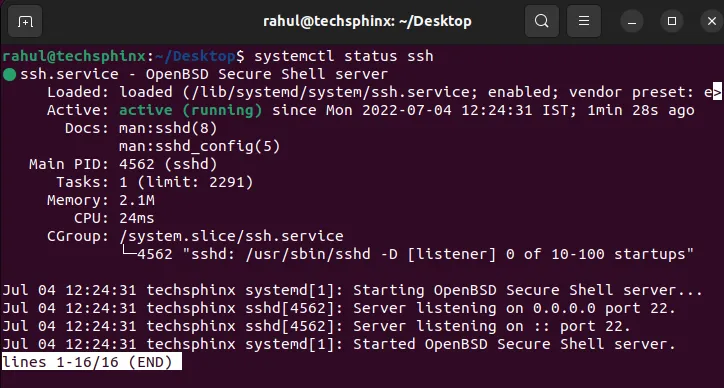
3: Check the SSH service status.
sudo systemctl status ssh
4: Allow SSH through the firewall.

sudo ufw allow ssh
5: Make SSH service persistent after reboot.
sudo systemctl enable ssh
Using SSH to Connect to Linux Server
After your SSH server has been set up, you can connect to it from any other system. Here I am connecting to the Ubuntu server via a Debian system.
Find the IP Address of the SSH server
To connect to the server, you’ll need the IP address. Use any of the following commands to find the IP address of the SSH server:
ip a
ifconfig
Connect Using OpenSSH Client (Linux)
Now, we need client software to connect to the server. There are many client software (both GUI and Command-Line based) out there on the internet.
If you want to connect using the terminal, then you can use the OpenSSH clients package which is pre-installed on most Linux distros. If your system doesn’t have it pre-installed, then you can install it via your distro’s package manager.
1. Install OpenSSH Clients Package
For Debian / Ubuntu
sudo apt update
sudo apt install openssh-client
On CentOS / Fedora / RHEL
sudo dnf install openssh-clients
For Arch / Manjaro
sudo pacman -S openssh
2. To connect to the SSH server using OpenSSH run the following command:
ssh [email protected]
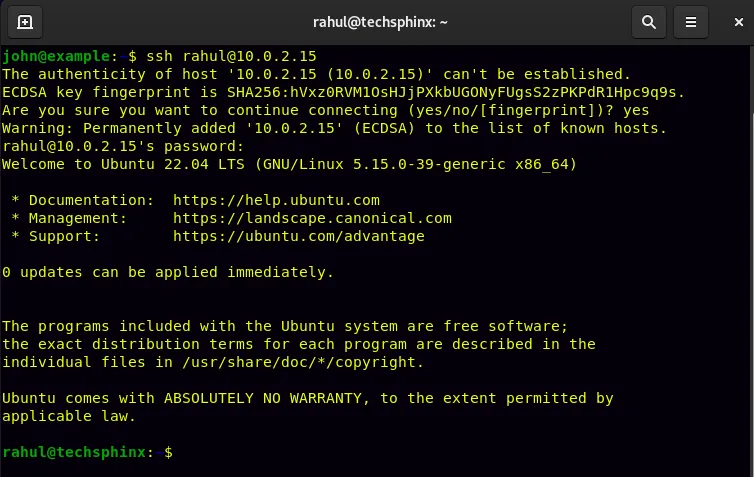
Replace username and IP address accordingly. Also, enter the password when asked.
Note: There will be no indication while typing the password.
Connect Using PuTTY (Windows)
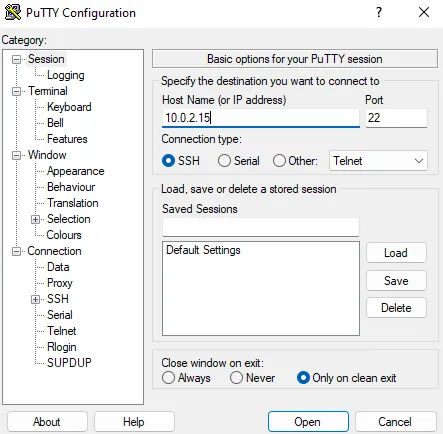
If you want to connect to the SSH server using a Windows computer, then you can use a program called PuTTY.
1. Download and Install PuTTY.
Note: PuTTy is also available in a portable version.
2. Start PuTTY and enter the IP address of the SSH server.
3. Choose SSH and make sure the port is set to 22.
4. Click on Open.

5. Click on “Accept” on the PuTTY Security Alert prompt.
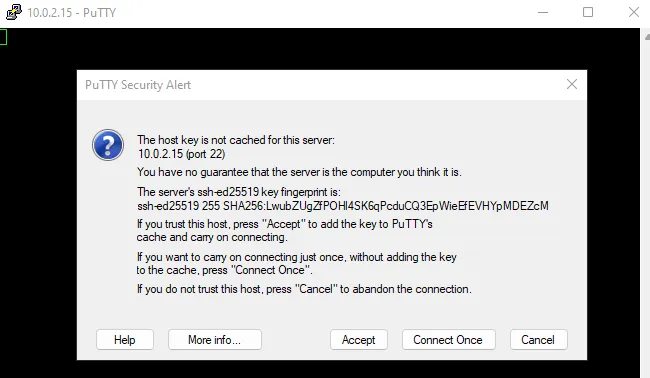
6. Enter the Username and Password of the account you wish to connect to on the SSH server and hit enter.

If you have done everything correctly, then you will be able to execute commands on the Linux machine using SSH from Windows.
Bonus Tips
Now, you know how to use SSH to connect to a remote system. Here are some extra tips on using the SSH protocol effectively.
Disable SSH on Linux
If you don’t want to use the SSH server anymore, you can stop its services using the following command:
sudo systemctl disable --now ssh
If you ever wish to re-enable it later, then run the following command:
sudo systemctl enable --now ssh
Use Password-less Login
Password-less login or key-based authentication allows you to connect to the server without the need for entering a password. The authentication will be carried out by matching the public-private key pairs.
This is useful when you want to automate tasks across multiple machines.
I have written a complete guide on setting up the SSH key-based authentication.
Change SSH Port (For Advanced Users)
You can change the default SSH port (22) with any other port. Mostly it is done to prevent brute force attempts on the default known port 22.
However, before doing this I would like you to keep the following things in mind:
1. Changing the default port of SSH on Linux may cause some applications (that rely on the “22” port of SSH) to stop working.
2. Make sure the new port you are assigning is not used by any other service.
3. You may also need to configure the firewall.
Now, to change the default port of SSH follow the steps:
1. Open the sshd_config file using any command-line text editor. I am using Nano.
sudo nano /etc/ssh/sshd_config
2. Find the line that has “Port 22”.
3. Uncomment the line (remove the hash {#} symbol) and change 22 to any number between 1024 and 65535. I am changing it to 2222.

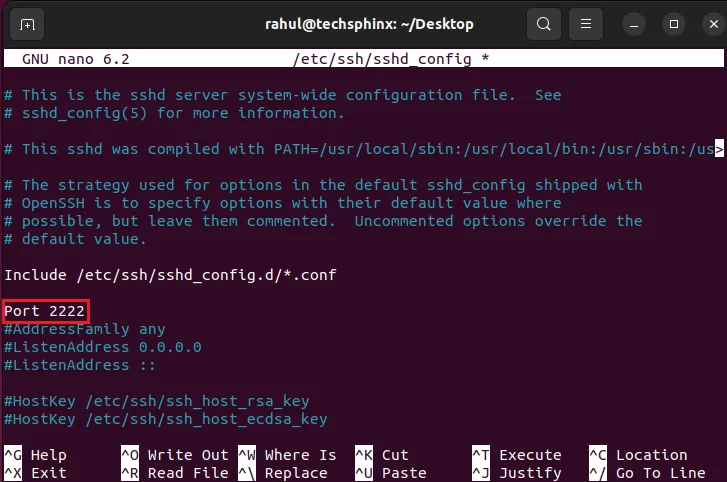
4. Save and exit the file.
5. Restart the SSH service.
sudo systemctl restart sshd
6. Check if the SSH port is changed and listening on the newly assigned port (2222 in this case).
sudo ss -ntulp | grep ssh

Since you have changed the default port of the SSH, the client machine will need to mention the port new port number to connect to the server. So, from the client machine, use the following command to connect to the SSH server:
ssh [email protected] -p 2222
Replace 2222 with your newly assigned port number.
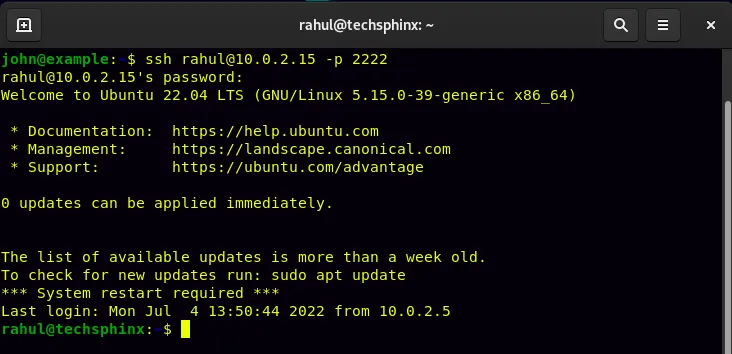
If everything is set up correctly, then you will be able to connect to the server via SSH using the new port.
Using Hostname instead of IP
You can connect to the SSH server using its hostname instead of the IP address.
If you haven’t set a hostname for your server or want to change the hostname, then you can do so using the “hostnamectl” utility.
sudo hostnamectl set-hostname example123
Replace “example123” with your hostname.

Before connecting using the hostname, make sure the IP and hostname resolve correctly.
If the DNS doesn’t resolve correctly, you can create an entry for the hostname and IP address of the server in the client machine’s host file.
sudo nano /etc/hosts
Add the following line anywhere in the file. Make sure to replace the IP address and hostname accordingly.
10.0.2.15 example123
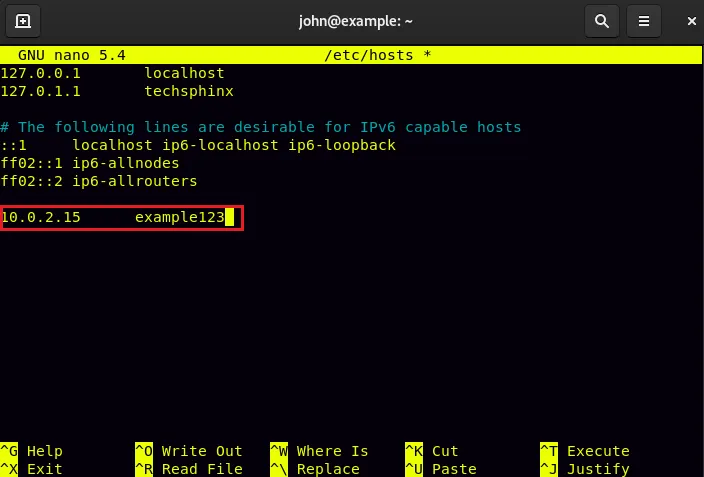
Save and exit the file.
Now, to connect using the hostname run the following command;
ssh rahul@example123
(Replace username and hostname accordingly.)
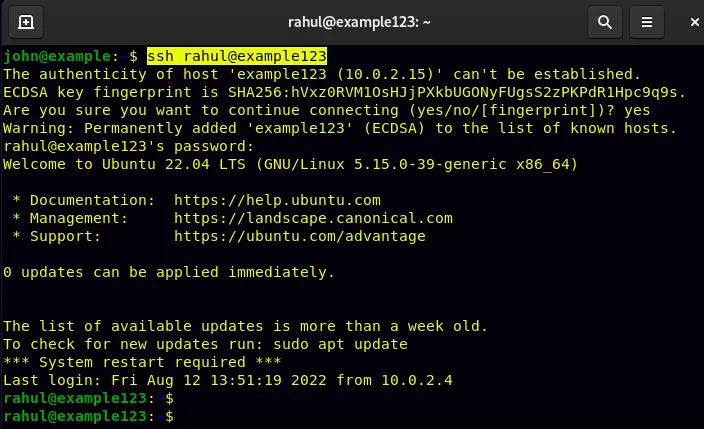
You should be able to connect to the server using the hostname. This way you don’t have to remember the IP address of every single machine you want to connect to using SSH.
Conclusion
As you have seen, installing and using SSH to connect to a remote computer is not that difficult. If you encounter any problems while setting up SSH, then feel free to ask in the comments.
Also, you can check out my other articles related to Linux here.

If you like this post, then follow Techsphinx on Facebook and Twitter for more reviews, tricks, tips and tutorials.
This article needs update or correction? Report the issue here so I can update it.