This post may contain affiliate links/ads and I may earn a small commission when you click on the links/ads at no additional cost to you. As an Amazon Affiliate, I earn from qualifying purchases. Techsphinx also participates in the StationX Affiliate program. You can read my full disclaimer here.

In this guide, I will show you How to set up passwordless SSH login (key-based authentication) between local and remote systems using SSH keygen.
By using key-based authentication, you don’t have to worry about remembering long passwords or taking risks by writing them down anywhere.
Moreover, after setting up the key-based authentication, you can disable the password login, thereby adding an additional layer of security.
If you use the best practices to generate, copy, store, remove, and handle the keys, then key-based authentication will prove to be the most secure way for both interactive and automated SSH connections.
How does SSH key-based Authentication Work?
SSH key-based authentication uses the public-private keypair to authenticate the client and server instead of using a password. The client will create a keypair with a utility called “ssh-keygen”.
Each SSH key pair includes two keys:
- A public key that is copied to the SSH server(s). Anyone with a copy of the public key can encrypt data which can then only be read by the person who holds the corresponding private key. Once an SSH server receives a public key from a user and considers the key trustworthy, the server marks the key as authorized in its authorized_keys file. Such keys are called authorized keys.
- A private key that remains (only) with the client. The possession of this key is proof of the client’s identity. Only a client in possession of a private key that corresponds to the public key at the server will be able to authenticate successfully. The private keys need to be stored and handled carefully, and no copies of the private key should be distributed. The private keys used for user authentication are called identity keys.
Once the Key pair is created by the client, the client will send the public key to the server and will keep the private key on the client machine only.
The server will store the received public key and “mark” the key as authorized. After that, the server will allow access to anyone who can prove they have the corresponding private key.
Pre-requisites
- One Local and one remote system/server.
- SSH access from local to remote system/server.
Note: Follow my “installing SSH on Linux” guide, if you need help setting up the SSH server and client.
My Setup
| Hostname | OS | IP Address | |
|---|---|---|---|
| Server: | rahul@techsphinx | Ubuntu 22.04 | 10.0.2.15 |
| Client: | john@example | Debian 11 | 10.0.2.4 |
Setup SSH Passwordless Login
Before generating a new SSH key pair, it’s recommended to check if there are any existing keys.
Check the available keys using:
ls -al ~/.ssh/id_*.pub
If you have existing pair of keys, then you can use those keys (skip to step 2) to log in to the remote system. If you don’t want to use existing keys, then I recommend you backup (copy or move) these keys, if you don’t want to accidentally overwrite them.
1. Generate a new SSH key pair using SSH Keygen
Generate a new SSH key pair using the ssh-keygen command.

ssh-keygen -t rsa -b 4096 -C [email protected]
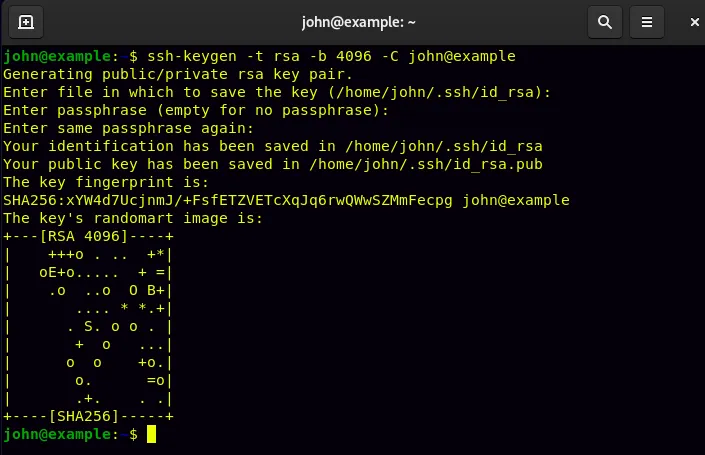
ssh-keygen: Name of the command we are using to create a new key pair.
-t: type of algorithm you want to use.
rsa: Name of the algorithm.
-b: Specify the key length in bits.
4096: Length of the key in bits.
You can also use the “-C” option to provide the comment. (Optional)
Just hit enter when asked for the key location and passphrase.
Once, your key is generated, you can list the keys using the following command:
ls ~/.ssh/id_*
You’ll notice two files (id_rsa and id_rsa.pub) are generated. The key with the “.pub” extension is the public key which you’ll have to copy to the server. The one without any extension (id_rsa) is the private key which should remain only on the current machine.
2. Copy the public key to the remote system
The second step is to copy the public key to the remote system.
There are various methods to copy the public key. I am showing you two methods, you can use any one of them.
There are a few things to keep in mind when copying the public key:
1. The key file should be saved as “authorized_keys” on the remote machine in the “~/.ssh” directory of the user.
2. The permission of the copied key should be “600” or “-rw——-“. (Read and write permissions for the owner, no permissions for group or others.)
You don’t have to worry about the two above-mentioned points if you are using the “ssh-copy-id” command to copy the key.
Copy using the ssh-copy-id command (recommended)
Ssh-copy-id is the recommended utility to copy the key as it will copy the key at the correct location along with the correct name and permission.

ssh-copy-id [email protected]

Replace username/IP address accordingly and enter the password to copy the key file.
Now, you can log in without the need for a password.
Copy using SCP command
Using the scp (secure copy) command is an alternate way to copy the public key to the server. However, the scp command is not specifically made to copy the public key. So, you’ll need to save the file as authorized_keys and change its permission manually.
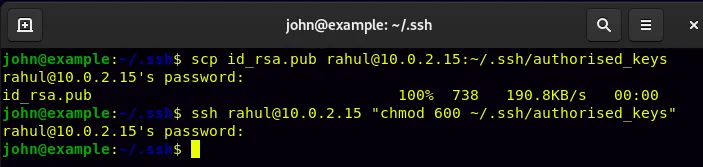
1. To copy the public key using the scp command:
scp ~/.ssh/id_rsa.pub [email protected]:~/.ssh/authorized_keys
scp: name of the command we are using to copy the file.
~/.ssh/id_rsa.pub: location and name of the file we are copying.
[email protected]: Username and IP address (Replace it accordingly).
~/.ssh/authorized_keys: Where the copied file should be saved and under what name it should be saved. In this case, we want the “id_rsa.pub” file to be saved as “authorized_keys” in the .ssh directory of the user.
2. Use the ssh command to change the permission of the copied file:
ssh [email protected] “chmod 600 ~/.ssh/authorized_keys”
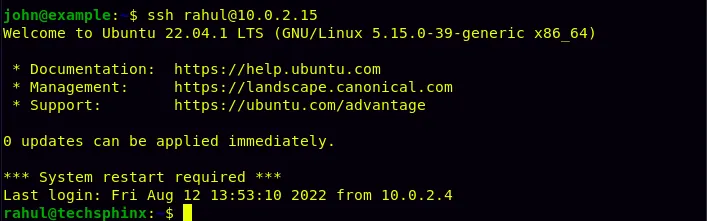
3. log in to the remote system using SSH keys
You can use the ssh command to log in.
ssh [email protected]
Replace username and IP address accordingly.
You should be able to log in directly without the need of entering a password.
Bonus Tips
Here are some bonus tips for your passwordless SSH setup:
1. Correct permissions of the copied Public key
If for some reason you’re unable to log in using the public key, then make sure you have correct permissions for the .ssh directory and the authorized_keys file on the server.

ssh [email protected] "chmod 700 .ssh; chmod 600 .ssh/authorized_keys"
(Replace username and IP address accordingly.)
The above command will set the correct permissions for both the “.ssh” directory and the “authorized_keys” file on the server.
2. Disable SSH Password Authentication
Now, if you’re going to use the key-based authentication, it will be a good idea to disable the password authentication for SSH. This way no one will be able to log in to the server using SSH without the key.
To disable password authentication, you’ll need to edit the SSH config file. This can only be edited by the root or sudo user. So, ssh into the server using a sudo user.
ssh [email protected]
Replace “rahul” and “10.0.2.15” with your sudo username and IP address respectively.
Now, open the “sshd_config” file in any text editor. I am using Nano here.
sudo nano /etc/ssh/sshd_config
Find and uncomment the following line (Remove hash (#) from the beginning). Also, change the “yes” to “no”:
PasswordAuthentication no

Save and close the file, then restart the ssh service using the following command:
sudo systemctl restart ssh
Now, you’ll only be able to log in via SSH using the key-based authentication.
Conclusion
I hope this guide helped you to set up passwordless SSH login using ssh-keygen. If you encountered any errors, then feel free to ask in the comments.
Also, you can check my other articles related to Linux here.

If you like this post, then follow Techsphinx on Facebook and Twitter for more reviews, tricks, tips and tutorials.
This article needs update or correction? Report the issue here so I can update it.