This post may contain affiliate links/ads and I may earn a small commission when you click on the links/ads at no additional cost to you. As an Amazon Affiliate, I earn from qualifying purchases. Techsphinx also participates in the StationX Affiliate program. You can read my full disclaimer here.

PhpMyAdmin is an open-source web-based graphical tool written in PHP to manage MySQL or MariaDB database. In this post, I will show you how to install and secure phpMyAdmin in Ubuntu 20.04.
Why use phpMyAdmin?
Through this graphical tool, you can perform all the typical operations like managing databases, tables, users, permissions, columns, relations etc. while also able to execute any SQL statement directly from its interface.
PhpMyAdmin has well-maintained documentation with support for 72 languages (including both Right-to-left and Left-to-right languages).
PhpMyAdmin also offers a wide range of features to the administrators along with all the basic functions like managing databases, tables, users, permissions etc.
Features of phpMyAdmin:
- Intuitive and user-friendly web interface.
- Browse and drop databases and tables.
- Alter fields and indexes.
- Create, copy, drop, rename and alter databases.
- Create, copy, drop, rename and alter tables.
- Perform database and table maintenance.
- Import data from CSV and SQL.
- Execute, edit or bookmark any SQL statement (Even execute multiple queries).
- Manage user-account and privileges from its interface.
- Export data to various formats: SQL, CSV, XML, PDF, Spreadsheet, Word.
- Administer multiple servers.
- Creating graphics of database layouts in various formats.
- Search globally in a database or a subset of it.
- Transform stored data into any format using a set of predefined functions. (for example, displaying BLOB-data as image or download-link)
- And many more.
Pre-requisites to install phpMyAdmin in Ubuntu 20.04
– LAMP Stack installed and running on Ubuntu 20.04
Check the following post, if you have not setup LAMP stack yet.
How to Install LAMP Stack in Ubuntu 20.04?
– Basic Linux Knowledge
– Sudo or root account access
Install PhpMyAdmin in Ubuntu 20.04
Before proceeding with installation, it’s a good idea to update your software repositories using the command:
sudo apt update
Install PhpMyAdmin in Ubuntu with all the package dependencies (including PHP 7 extensions) using the command:
sudo apt install phpmyadmin
During installation process, it will prompt you to configure some settings.
If you are using apache as your web server then,
Select apache2 using space bar, when it prompts to select the webserver.
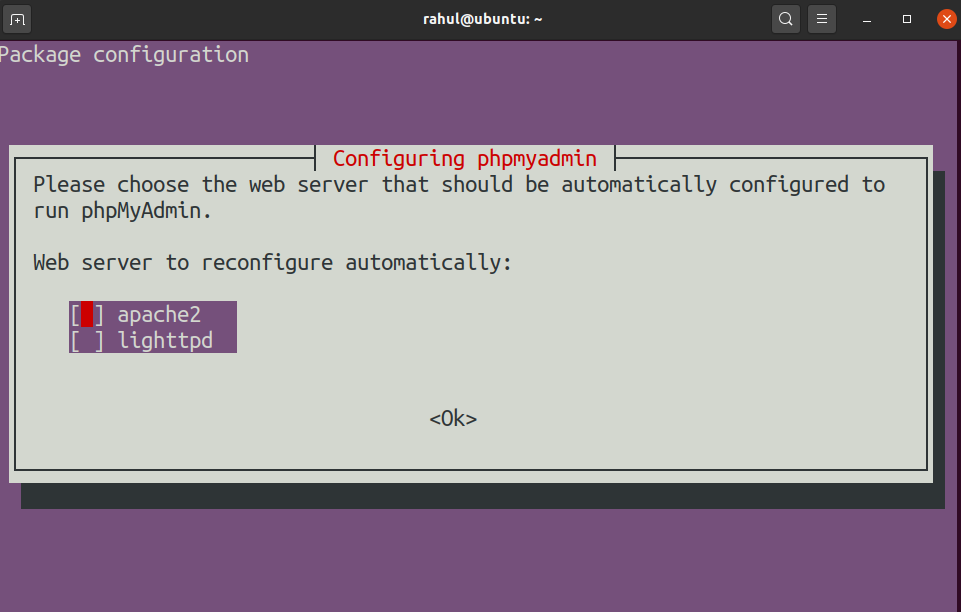
(An asterisk indicates the selected option)
Navigate to “<ok>” using Tab key and hit Enter.
Select “<Yes>” and hit Enter to configure the database for PhpMyAdmin with “dbconfig-common”.

In the next screen, it will ask you to set the password for phpmyadmin user.
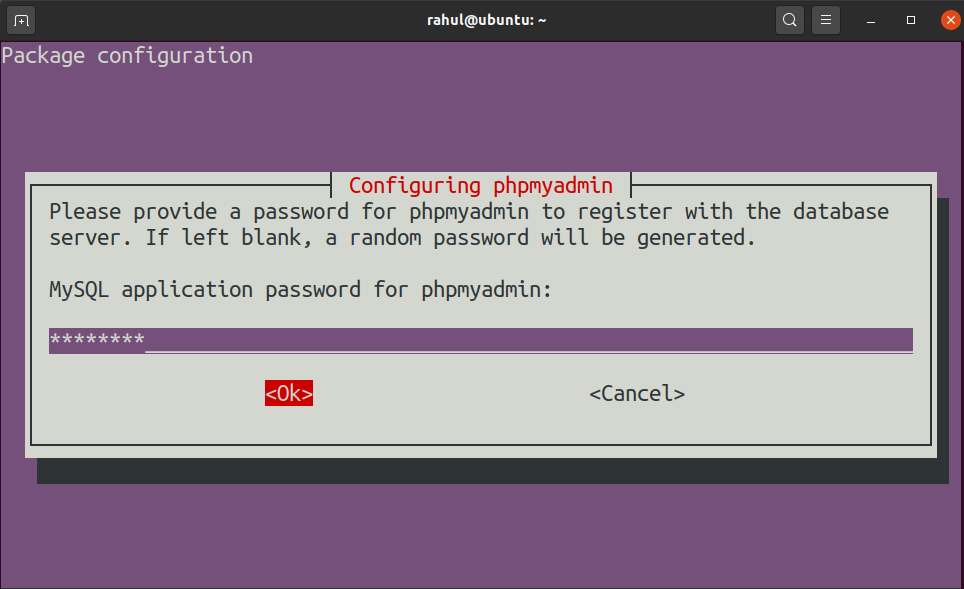
Once you have entered the password, select “<ok>” and hit Enter.
This will create a new phpMyAdmin user and with privileges to manage this database.
You can always login and check the privileges for phpMyAdmin by logging into to MariaDB server using the command:

sudo mysql -u root
To check the privileges run the following command in mariaDB console:
show grants for phpmyadmin@localhost;
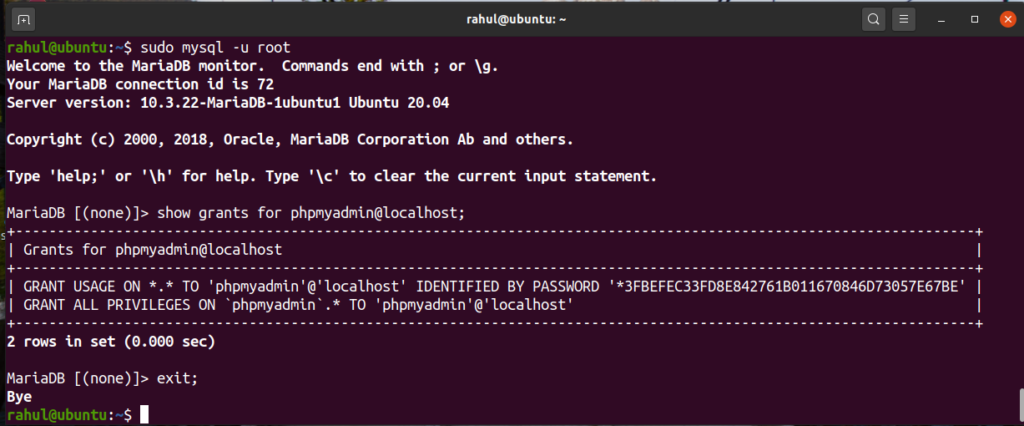
As you can see, phpmyadmin has all privileges on database phpmyadmin.
To exit mariadb use:
exit;
Configure Firewall for phpMyAdmin
Before accessing phpMyAdmin, let’s make sure that the firewall is configured properly to avoid any unwanted interruptions.
If you are using Iptables firewall, then run the following command to open both TCP port 80 and 443.
sudo iptables -I INPUT -p tcp --dport 80 -j ACCEPT
sudo iptables -I INPUT -p tcp --dport 443 -j ACCEPT
If you are using UFW firewall, then run the following command to open TCP port 80 and 443.
sudo ufw allow 80,443/tcp
Access PhpMyAdmin via sub-directory
When installing PhpMyAdmin in Ubuntu with apache webserver, a configuration file is placed at /etc/apache2/conf-enabled/phpmyadmin.conf which allows us to access PhpMyAdmin via sub-directory.
If the file is not automatically placed, then place it manually using the following command:
sudo cp /etc/phpmyadmin/apache.conf /etc/apache2/conf-enabled/phpmyadmin.conf
Restart the apache2 service for the changes to take effect.
sudo systemctl restart apache2
If you are using any application like WordPress on Ubuntu 20.04 server or have configured hostname for your server, then just add “/phpmyadmin” after your domain name.
http://example.com/phpmyadmin
If you are running PhpMyAdmin on local Ubuntu 20.04 server, then type the following in your web browser’s address bar to access it.
127.0.0.1/phpmyadmin
Configure VirtualHost for PhpMyAdmin
By default, you can access PhpMyAdmin web interface via sub-directory, to access it via sub-domain, you have to configure the virtualhost for PhpMyAdmin.
To configure virtual host for phpMYAdmin, move the “phpmyadmin.conf” file to “/etc/apache2/sites-available/” directory using the command:
sudo mv /etc/apache2/conf-enabled/phpmyadmin.conf /etc/apache2/sites-available/phpmyadmin.conf
Open the moved file for editing (I am using Nano editor here)
sudo nano /etc/apache2/sites-available/phpmyadmin.conf
To make it a virtualhost, add the following lines to the beginning of the file:
<VirtualHost *:80>
    ServerName pma.example.com
    DocumentRoot /usr/share/phpmyadmin
    ErrorLog ${APACHE_LOG_DIR}/pma.error.log
    CustomLog ${APACHE_LOG_DIR}/pma.access.log combined
Also add the closing virtualhost tag to the end of the file:
</VirtualHost>
Here’s a brief descriptions of the lines we added to the file:
<VirtualHost *:80>: Starting of virtual host tag, allowed from all IP on port 80.
ServerName pma.example.com: Name of the server. (Replace pma.example.com with your own server name). Also, don’t forget to create DNS A record for this sub-domain.
DocumentRoot /usr/share/phpmyadmin: location of phpmyadmin files.
ErrorLog ${APACHE_LOG_DIR}/pma.error.log: location and filename of error logs.
CustomLog ${APACHE_LOG_DIR}/pma.access.log combined: location and filename of custom logs.
</VirtualHost>: closing virtualhost tag.
Enable the newly created virtualhost using:
sudo a2ensite phpmyadmin.conf

Reload apache service to activate the new configuration.

sudo systemctl reload apache2
Navigate to the newly created sub-domain to access the PhpMyadmin web interface.
pma.example.com
(Replace pma.example.com to with your sub-domain)
Secure PhpMyAdmin in Ubuntu 20.04
PhpMyAdmin is installed and used on many web servers to manage the database. Therefore, making it a target for hackers due to its nature of work.
It is recommended to secure your phpMyAdmin interface, especially if you are using it on a production environment.
Disable Root Login for PhpMyAdmin
If any unauthorized person managed to get root access, he/she will have access to every database on the server and that’s not good in terms of security, so it will be a good idea to create different users to manage different databases on the server.
Go to phpMyAdmin interface and check if you can access database using root username. If you get access denied then you don’t have to follow these steps, you can jump directly to the next security measure else follow the below steps.
To disable root access via phpmyadmin follow the steps:
1. Open the config.inc.php file.
sudo nano /etc/phpmyadmin/config.inc.php
2. Make sure the following lines are in that file with their respective values. If not, then add these lines:
/* Authentication type */
$cfg['Servers'][$i]['auth_type'] = 'cookie';
$cfg['Servers'][$i]['AllowRoot'] = false;
Save and Close the file.
2. Restart apache2 service
sudo systemctl restart apache2
You should get access denied when using the root account to login to the database from phpMyAdmin interface.
Now, to create users to manage database:
3. Login to MySQL root via terminal and create a different user for each database.
sudo mysql -u root
CREATE USER 'rahul'@'localhost' IDENTIFIED BY 'secretpassword';
GRANT ALL PRIVILEGES ON mydatabase.* to 'rahul'@'localhost';
Replace “rahul”, “secretpassword” and “mydatabase” with your username, password and database name respectively.
4. Check if the new user can access the database by logging into phpMyAdmin interface.
5. Create different users for different databases and use them to manage the databases remotely.
Allow from Specific IP
To allow phpMyAdmin web interface to be accessed only from specific IP address is a good security measure.
To allow from specific IP follow the steps:
1. Open the phpmyadmin.conf for editing.

sudo nano /etc/apache2/sites-available/phpmyadmin.conf
3. Add the following lines below the line “DirectoryIndex index.php”
Require ip specific_ip_address
Require ip ::1
Replace specific_ip_address with actual IP address.
4. Save and close the file.
5. Restart apache for the changes to take effect.
sudo systemctl restart apache2
Password Protect PhpMyAdmin Interface
It would be a good idea if only authorized users are allowed to access the phpMyAdmin interface. You can block unauthorized users even from accessing phpMyAdmin web-page or subdomain.
To add password protection to the phpMyAdmin page, follow the steps below.
1. Create a directory in a secure location. I am creating a directory named “passwd” in “/etc/phpmyadmin”.
mkdir /etc/phpmyadmin/passwd
2. Use htpasswd command to create a username and password for authentication when accessing the password-protected page (phpMyAdmin page in this case) and store the generated file in /etc/phpmyadmin/passwd directory.
htpasswd -c /etc/phpmyadmin/passwd/.htpasswd rahul
If you want to add additional users, then use:
htpasswd /etc/phpmyadmin/passwd/.htpasswd seconduser
-c creates a new htpasswd file.
Only use “-c” when you are running htpasswd command for the first time otherwise it will overwrite the existing htpasswd file.
3. Edit the phpMyAdmin.conf file to only allow authorised users to access phpMyAdmin page.
nano /etc/apache2/sites-available/phpmyadmin.conf
Add the following lines below the line that states – “DirectoryIndex index.php”
AllowOverride None
AuthType Basic
AuthName "Authentication Required"
AuthUserFile /etc/phpmyadmin/passwd/.htpasswd
Require valid-user
Save and close the file and restart the apache2 service for the changes to take effect.
sudo systemctl restart apache2
Test phpMyAdmin in Ubuntu 20.04
It’s time to test all the configurations and see if everything is working properly.
Now, go to phpMyAdmin web interface
If you have enabled the password protection, then you should see an authentication dialog asking for username and password to access phpMyAdmin web interface.

Only after providing the correct authentication details, you should be able to access the phpMyAdmin interface.
If you have allowed phpMyAdmin from specific IP address, then try to access phpMyAdmin from any other IP other than allowed IP to check if the IP restriction is working properly.
Conclusion
You can now login to phpMyAdmin and manage the database from the web as you have successfully installed and secured phpMyAdmin in Ubuntu 20.04.

If you like this post, then follow Techsphinx on Facebook and Twitter for more reviews, tricks, tips and tutorials.
This article needs update or correction? Report the issue here so I can update it.