
This post may contain affiliate links/ads and I may earn a small commission when you click on the links/ads at no additional cost to you. As an Amazon Affiliate, I earn from qualifying purchases. Techsphinx also participates in the StationX Affiliate program. You can read my full disclaimer here.

In this tutorial, I will show you how to install Kali Linux on Raspberry Pi and turn it into a portable hacking station.
Kali Linux is an operating system that is primarily developed for penetration testing. It contains all the necessary tools and programs for testing the security of any application or network.
You can install Kali Linux on laptops, but it is not a good idea to use your day-to-day device for hacking. Instead, you can choose a much cheaper and portable option that is – a Raspberry Pi.
Raspberry Pi is a credit-card sized computer that can fit in your pocket. Hence, you can turn it into WiFi hacking hardware that you can carry around with ease.
Disclaimer
Installing Kali Linux on Raspberry Pi to turn it into a portable hacking device sounds cool. However, don’t use this to harm someone in any way.
Also, don’t use this device to hack something that you don’t have permission to test. This tutorial is for educational purposes and I am performing everything on my device or the devices that I have permission to test.
I/TechSphinx shall not be held responsible for your actions.
Pre-requisites
- Raspberry Pi (2,3 or 4 recommended).
- Micro SD card – Minimum 16GB capacity (Class 10 recommended).
- Power Supply (For Raspberry Pi 4).
- HDMI (For Raspberry Pi 2, 3) / Micro HDMI cable (For Raspberry Pi 4).
- A Raspberry Pi Case (Optional)
Alternatively, you can buy the CanaKit Raspberry Pi 4 Starter Kit that contains all the above-mentioned items.
- Ethernet Cable or WiFi Adapter (Pi 3 & 4 has WiFi inbuilt).
- Portable Display Screen (Optional)
- Keyboard and Mouse (Optional)
- Internet connection to download kali Linux Raspberry Pi Image.
Steps to Install Kali Linux on Raspberry Pi
1. Download Kali Linux Raspberry Pi Image
The first step is to download the Kali Linux Raspberry Pi image from the official Kali Linux Download page.
Download the appropriate version of the kali image according to your Raspberry Pi model.
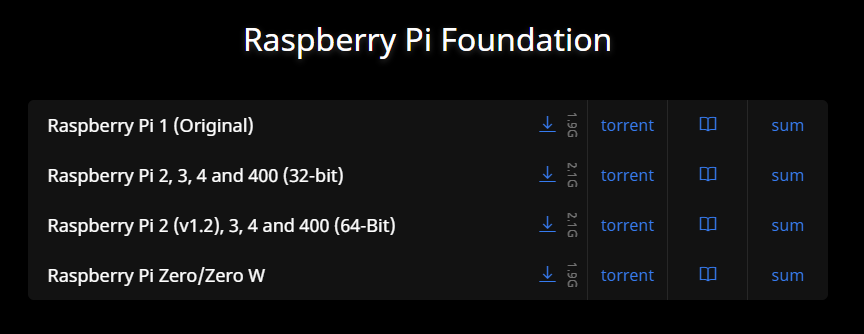
For this tutorial, I am downloading the Raspberry Pi 2, 3, 4 and 400 (32-Bit) version.
Once, you have downloaded the image, proceed to the next step.
2. Write Kali Linux Image to SD card
I am going to show you two methods to write the Kali Linux image to the micro SD card.

Using Balena Etcher
1. Download Balena Etcher from its official website.
2. Install and start Etcher.
3. Choose the “flash from file” option and select the downloaded Kali Linux Image.
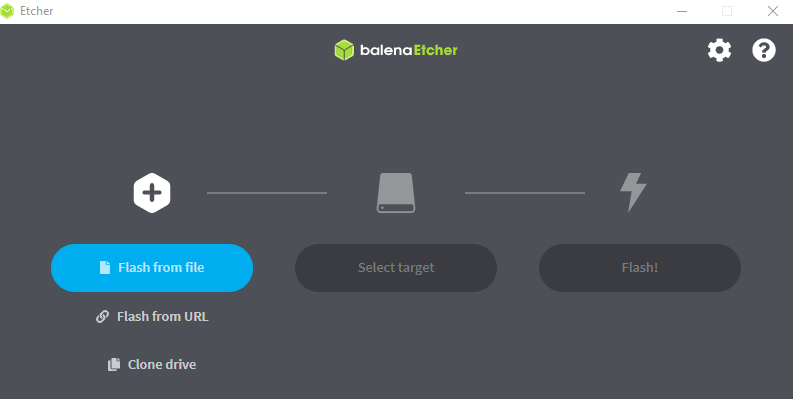
4. Next, select the target device and choose the micro SD card.
5. Click on “Flash” to start the flashing process.
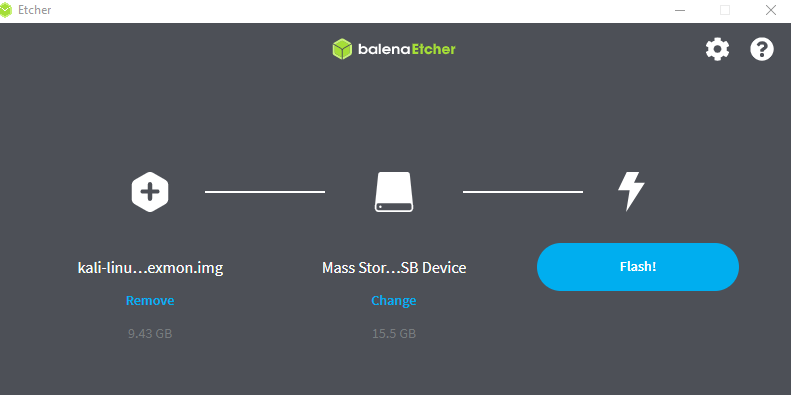
Wait for the flashing process to complete.
Using DD Command
If you are using Linux, then you can use the “dd” command to write the Kali Linux image to an SD card.
1. Open the Terminal
2. Use the following command to write the Kali Linux image.
xzcat kali-linux-2021.2-rpi4-nexmon.img.xz | sudo dd of=/dev/sdb bs=4M status=progress
Note: Don’t forget to replace the “/dev/sdb” with your device path. If you chose the wrong device path, you may end up wiping your hard drive.
Also, replace “kali-linux-2021.2-rpi4-nexmon.img.xz” with your downloaded filename.

Wait, for the process to complete.
3. Boot Kali Linux on Raspberry Pi
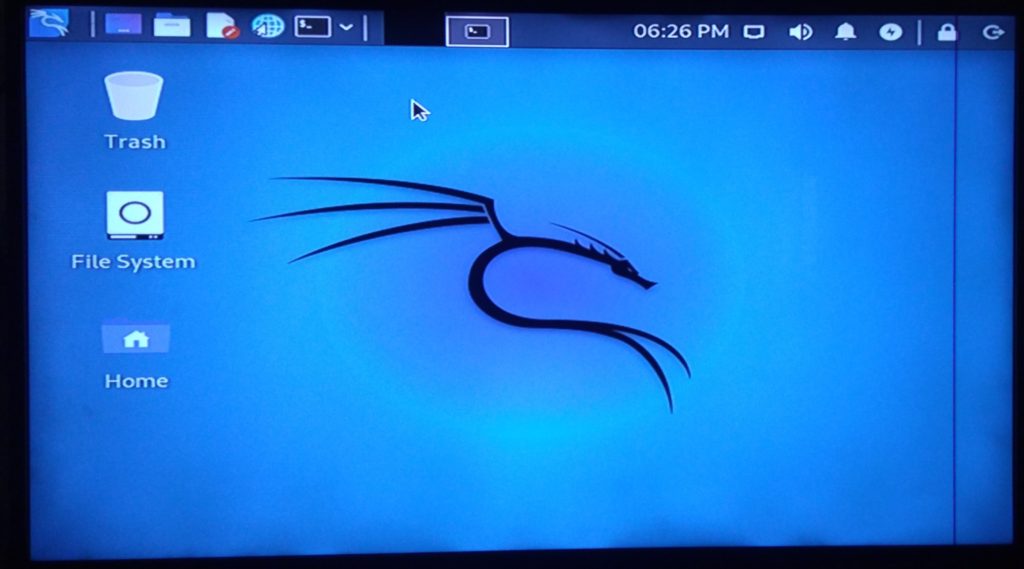
After writing the image, insert the SD card into your Raspberry Pi.
Now, connect all the required cables (Ethernet, HDMI, Power) and start the Raspberry Pi.
If you are using an HDMI cable to connect to a monitor or using a raspberry pi portable display, then you will see the login screen upon successful booting of Kali Linux.

The default username and password for login is “kali” (without quotes). After successful login, you’ll see the Kali Linux home screen.
Troubleshooting Tips
HDMI problems
If you are using an HDMI cable to connect Raspberry Pi to a monitor and you’re seeing a Blank screen or having other issues, then follow the below steps:
1. Insert the SD card into a card reader and connect it to the PC.
2. Open the “config.txt” file present in the boot partition.
3. Uncomment (Remove Hash “#” from the beginning) these two lines.
hdmi_force_hotplug=1
hdmi_drive=2
This should solve the problem.
Some Additional Tips
1. Change the default password
The first thing you should do, after installing Kali Linux on Raspberry Pi is changing the default password. Use the following command to change the password.
passwd
Now, enter the new password.

2. Expand the root Partition
When you write the Kali Linux raspberry image to an SD card, it will use only around 10 GB.
For instance, if your SD card is of more capacity (for example 32 GB) then only around 10 GB will be used by Kali Linux and the rest of the space will render useless.
Use the df command to check the space on the SD card:
df -h
You can expand the root partition size to use the full space of your SD card using the following command:
sudo raspi-config --expand-rootfs
Now, reboot the system for the changes to take effect.
reboot
Once rebooted, check again using the df command and you’ll be able to utilise the full space of the SD card.
3. Update Repositories and Packages
Next, you should update the repositories and packages to the latest version. For that use the following command:
sudo apt update && sudo apt upgrade
4. Enable SSH on Raspberry Pi
SSH stands for secure shell. By enabling SSH on Raspberry Pi, you can easily connect to your Raspberry Pi and execute commands remotely.
This is useful if you don’t have any portable display with your Raspberry Pi. You can connect to Raspberry Pi via SSH using your Smartphone.
Conclusion
I hope this guide helped you to install Kali Linux on Raspberry Pi without any problems.
You can also use the same steps to install any operating system other than Kali Linux (like Ubuntu, Debian etc.) on your Raspberry Pi. Just download the OS image for Raspberry and write it on the SD card.
Have fun with your new portable hacking station. 🙂

If you like this post, then follow Techsphinx on Facebook and Twitter for more reviews, tricks, tips and tutorials.
This article needs update or correction? Report the issue here so I can update it.