This post may contain affiliate links/ads and I may earn a small commission when you click on the links/ads at no additional cost to you. As an Amazon Affiliate, I earn from qualifying purchases. Techsphinx also participates in the StationX Affiliate program. You can read my full disclaimer here.

In this tutorial, I will show you how to install OPNsense on VirtualBox.
OPNsense is FreeBSD-based open-source firewall software. Deciso makes the official hardware for OPNsense. However, you can install OPNsense on devices like an Old desktop PC or Mini PC with a compatible network card and turn it into a hardware firewall.
You can also install OPNsense in a virtualized environment on hypervisors like VirtualBox, VMware and Proxmox.
Note: Although you can install OPNsense on VirtualBox, it is recommended to install it on OPNsense-compatible hardware for optimum performance.
Pre-Requisites to Install OPNsense on VirtualBox
Complete the following things before proceeding with the OPNsense installation steps.
1. Download and install the latest Oracle VirtualBox software.
2. Download the OPNsense ISO file.
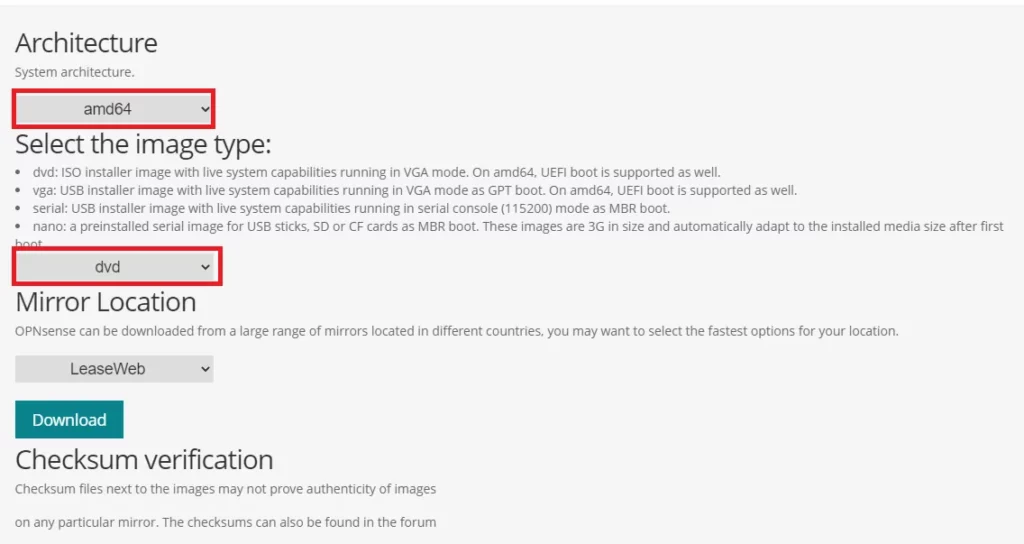
- Select the “AMD64” Architecture.
- Set the Image type as “DVD”.
- Select the closest mirror for faster download.
- Click on the “Download” button.
3. Extract the OPNsense ISO file.
Once the download is complete, you’ll notice that the downloaded file is in compressed (bz2) format. To extract the ISO file, use “7-zip” software (on Windows) or the “bzip2” command (on Linux):
bzip2 -d OPNsense.bz2
(Replace “OPNsense.bz2” with your downloaded filename.)
4. Make sure you have sufficient RAM (at least 1 GB) and storage (at least 8 GB) for OPNsense virtual machine.
My Setup:
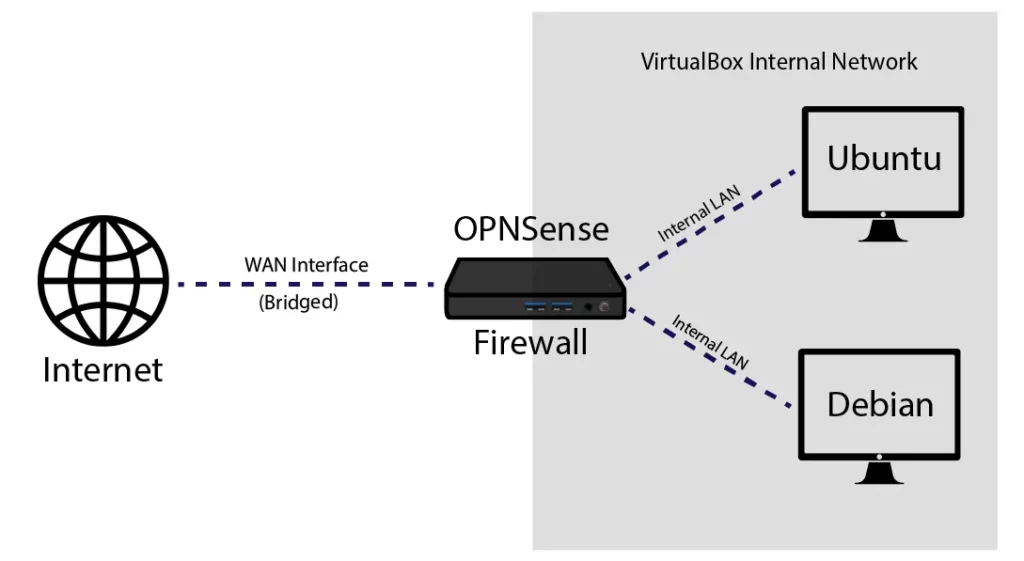
As shown in the image above, I am installing OPNsense and configuring two network interfaces (WAN and LAN) on the OPNsense VM. The WAN interface will be connected to the outside network (internet) and the LAN interface will be used to connect the two virtual machines (Ubuntu and Debian). These two VMs will act as end-user machines.
After that, I will test the connectivity to make sure everything is working without any problems.
Steps to install OPNsense on VirtualBox
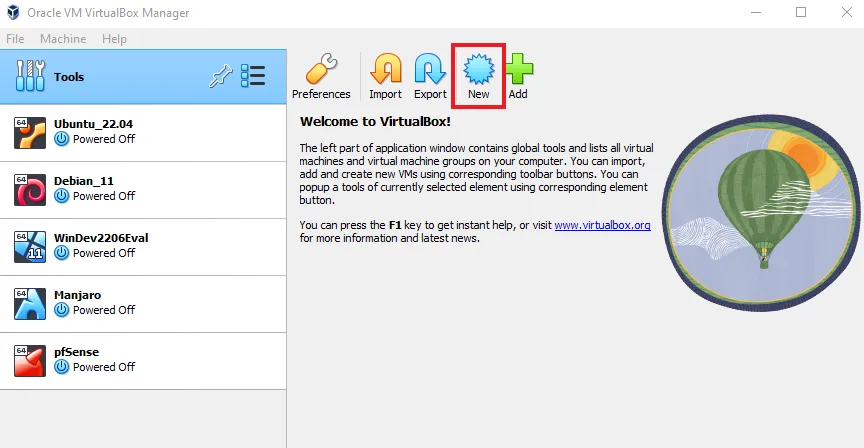
Create OPNsense Virtualbox Instance
Let’s start by creating a new OPNsense VirtualBox instance.
1. Start VirtualBox and click on “New”.
2. Enter the name of the new VM. I am using “OPNsense” here.
3. Choose a location where you want to save the VM. I am leaving it as default.
4. No need to attach the ISO image right now, we will add it later.
5. Set the type as “BSD” and the version as “FreeBSD (64-bit)”.
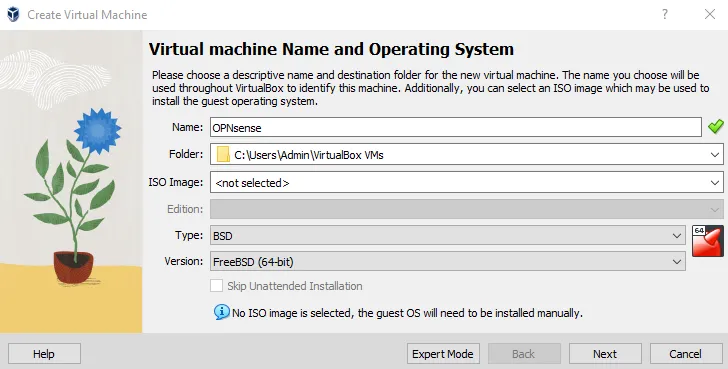
6. Click on “Next”.
Configure RAM and CPU
Next, allocate RAM and virtual CPU for the OPNsense VM.
1. Move the slider and select the appropriate amount of RAM for the OPNsense VM. You can also type the amount of RAM manually in the adjacent box. I am allocating 4 GB RAM.
2. Repeat the same for the virtual CPU. I am allocating 2 virtual CPUs for the VM.
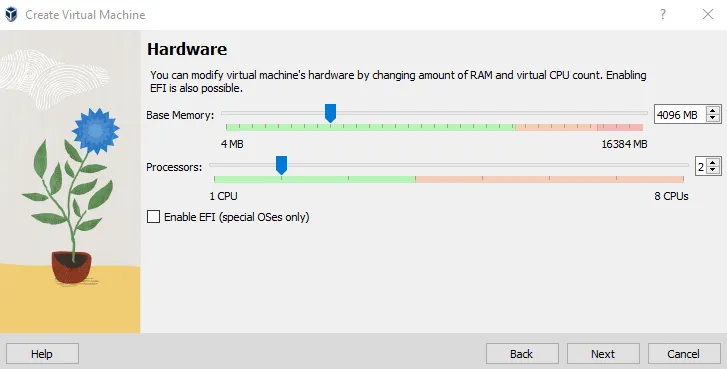
3. Click on “Next”.
Configure Storage
Now, let’s create a virtual Hard disk for the OPNsense VM.
1. Click on the “Create a virtual Hard disk now” option.
2. Move the slider to allocate your desired amount of storage. I am allocating 20 GB.
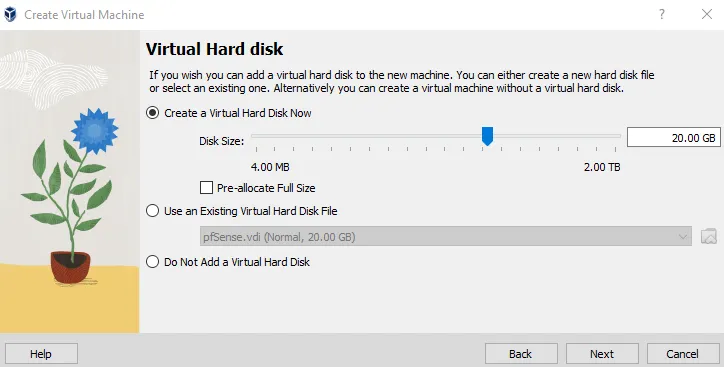
3. Click on “Next”.

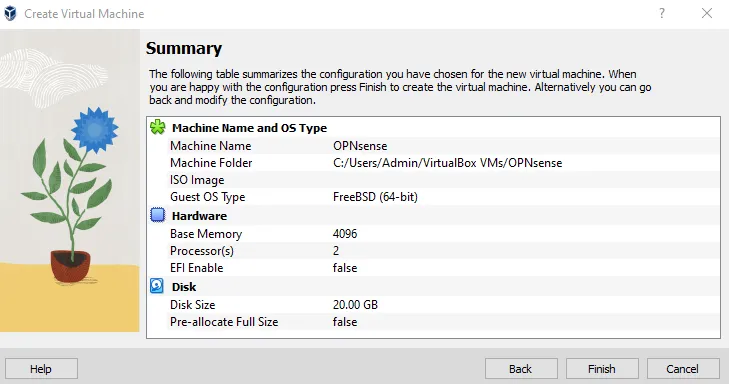
Next, VirtualBox will show you the summary of the configurations you have chosen for the OPNsense instance. Click on “Finish” to proceed.
Configure Network Interface
OPNsense requires two network interfaces, the WAN interface to connect to the internet and the LAN interface to connect the inside devices.
If you deploy OPNsense on a physical machine, you’ll need two Network Interface Cards (NIC). However, things are easy in a virtual environment. You can configure two virtual NICs in the VirtualBox for the OPNsense VM.
Configure the WAN interface:
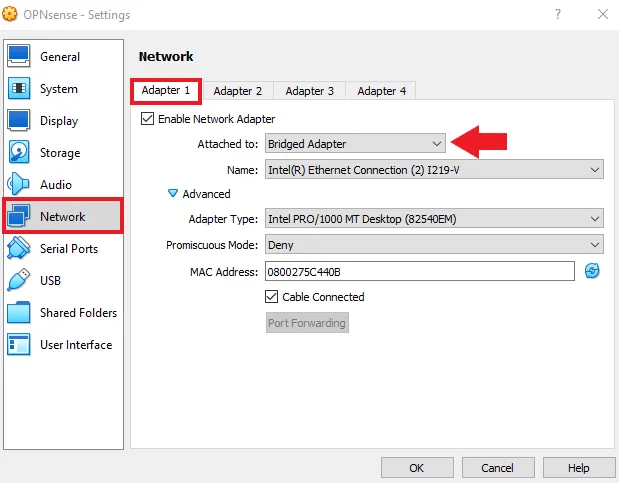
Now for the WAN interface, you can either choose the “NAT adapter” or “Bridged Adapter” mode in VirtualBox. I am using the bridge mode; hence the WAN interface will get the IP address directly from my router’s DHCP.
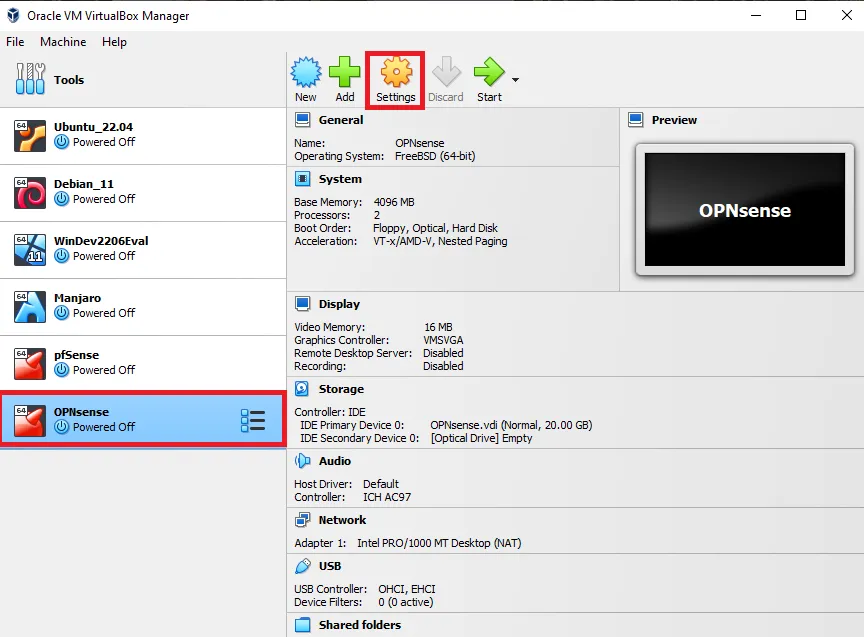
1. Select the OPNsense instance on VirtualBox and click on “Settings”.
2. Head over to the “Network tab” and check the “Enable Network Adapter option” under “Adapter 1”.
3. Change the “Attached to” option to “Bridged Adapter”.
Configure the LAN interface:
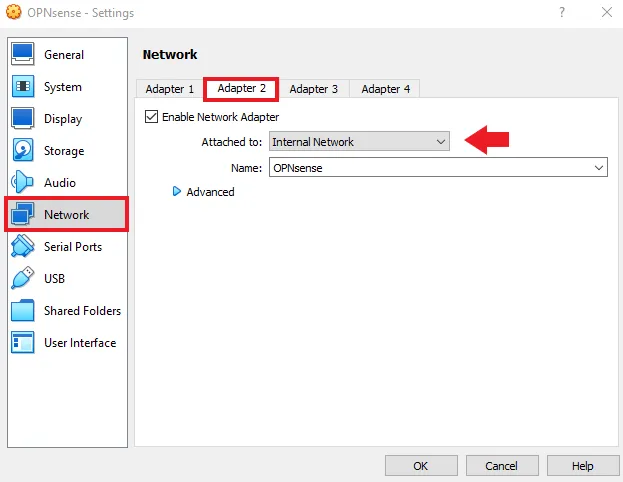
1. Move to “Adapter 2” and check the “Enable Network Adapter” option.
2. Set the “Attached to” option to “Internal network”.
3. Type a name for the LAN interface. I am using “OPNsense”.
Attach the OPNsense ISO image and Change the Boot order
Now, let’s attach the OPNsense ISO image.
1. Navigate to the “Storage” tab.
2. Click on “Empty” under the storage devices option.
3. Click on the little blue CD icon next to the “Optical Drive” option.
4. Select “Choose a Disk File” from the dropdown menu.
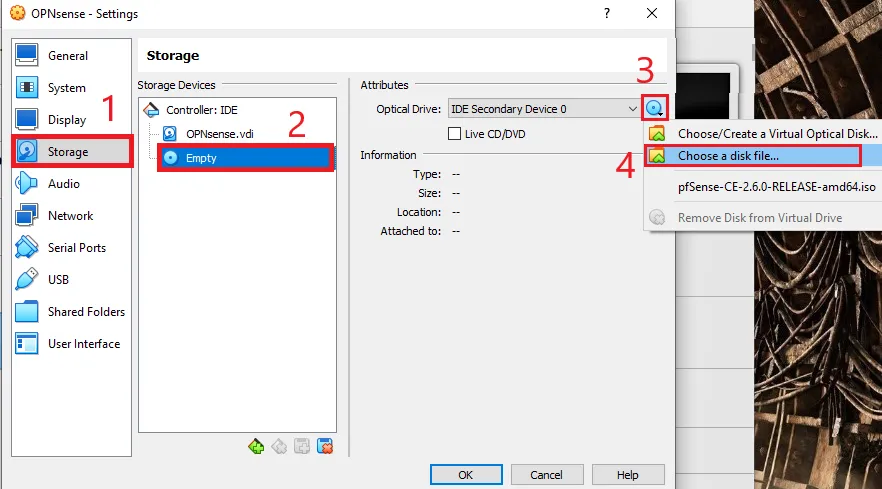
5. Locate the OPNsense ISO image on your computer and add it.
Once the ISO image is attached, you should the OPNsense ISO image instead of “Empty”.
Additionally, it is a good idea to change the boot order. The default boot order loads the “Floppy drive” first, since it is empty, it will load the second option the “Optical Drive” which contains the attached OPNsense ISO image.
There is nothing wrong with that, however, after installation, the OPNsense VM will reboot and it will follow the same boot order again. Floppy first, then the Optical Drive. We don’t want that; we want it to boot from the hard disk after installation.
Therefore, changing the boot order to hard disk first and optical drive second will be more appropriate. During the initial setup, the hard disk will be empty and it will boot from the Optical Drive. After installation when the VM reboots it will boot from the Hard disk.
1. Head over to the “System” tab.
2. Select “Hard disk” from the boot order and move it to the first position using the up arrow button present next to it.
3. Move the “Optical drive” to the second on the Boot Order.
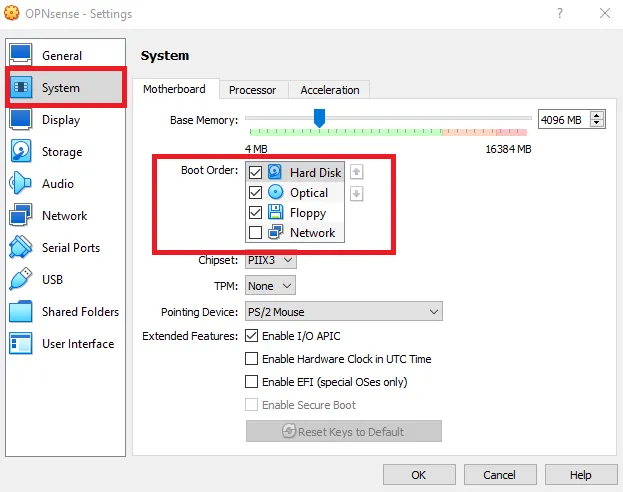
4. Lastly, click on “OK” to close the VM settings screen.
Initiate OPNsense Installation on VirtualBox
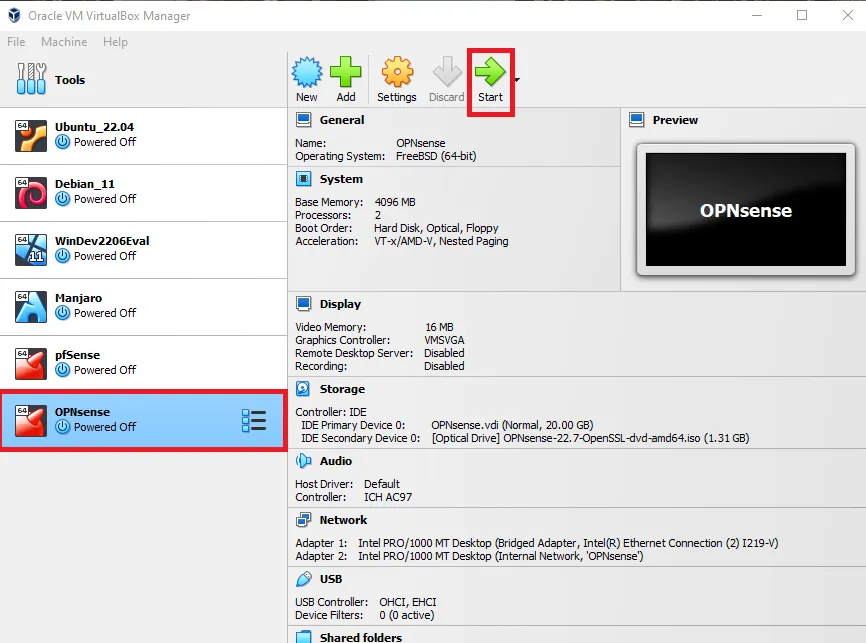
Select the OPNsense instance and click on the “Start” button to initiate the OPNsense installation.
It will start booting from the ISO image. During the boot process, for five seconds, OPNsense will prompt the option to assign the interfaces manually.

Don’t worry! You don’t need to press any key. If OPNsense doesn’t assign the interfaces correctly, we can change it after installation. I will show you how to assign the interfaces later in the post.
Once OPNsense is booted, you will see the OPNsense login screen. Now, this is the login screen from the live ISO image, you can log in using the username – root and password – opnsense. Since this is a live image, all changes will be deleted once the VM is rebooted.
We don’t want that; we want the fully installed OPNsense. Therefore, instead of logging in using the root, use the username – installer and password – opnsense to start the OPNsense installer.
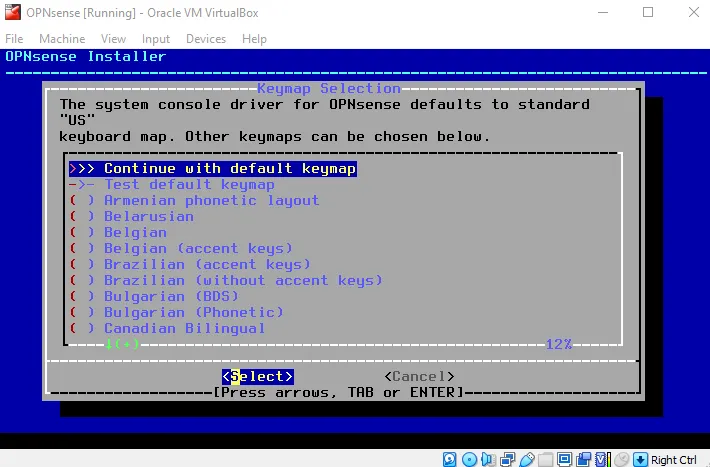
Note: OPNsense installer is TUI (Text-based User Interface), you’ll need to use the arrow keys to navigate.
1. On the OPNsense installer, select your desired keymap and hit enter. I am continuing with the default keymap.
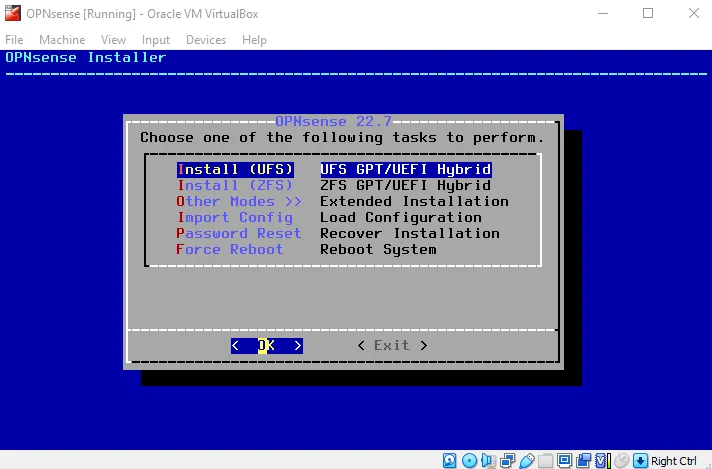
2. Select the first option – Install (UFS) and hit enter.
3. Select the virtual hard disk file you created earlier and hit enter. For me, it’s the “ada0” that has a 20 GB size.
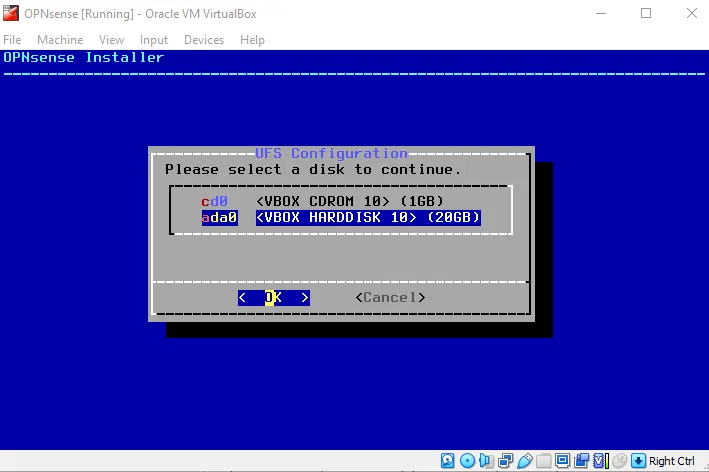
4. Choose “YES” and hit enter if you want to use the selected hard disk.
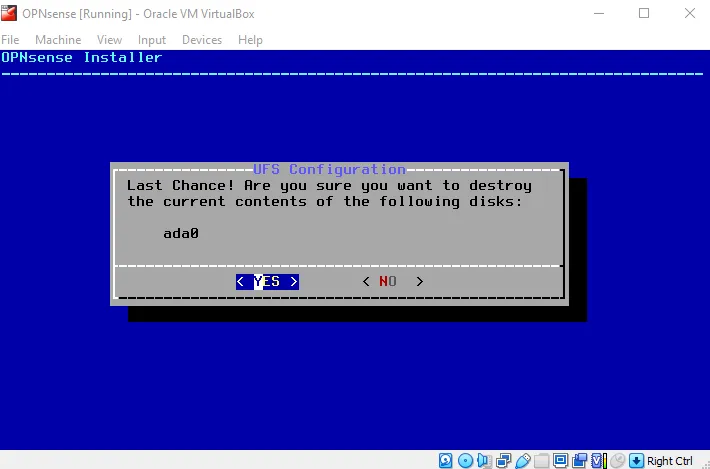
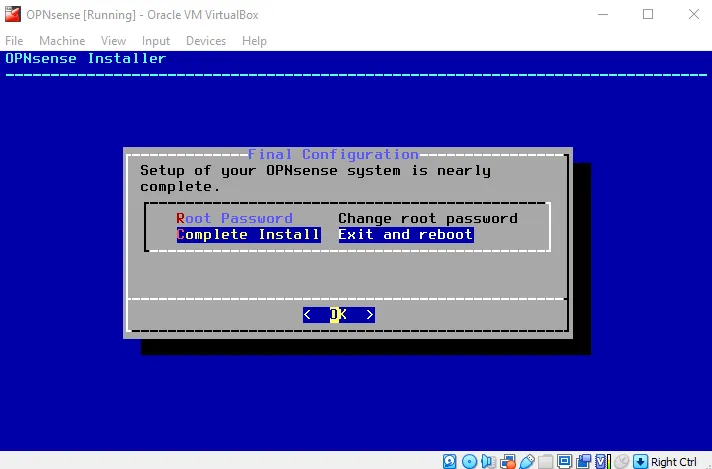
The installation process will begin, wait for it to finish. After that, you will be prompted to change the root password or reboot. If you wish to change the root password now, select the appropriate option and hit enter, else select the “Complete Install” option to reboot the OPNsense VM.
Assign the Interfaces
OPNsense automatically assigns the interfaces during installation. If it assigns them correctly, then no problem, if it doesn’t, use the steps below to manually assign the interfaces.
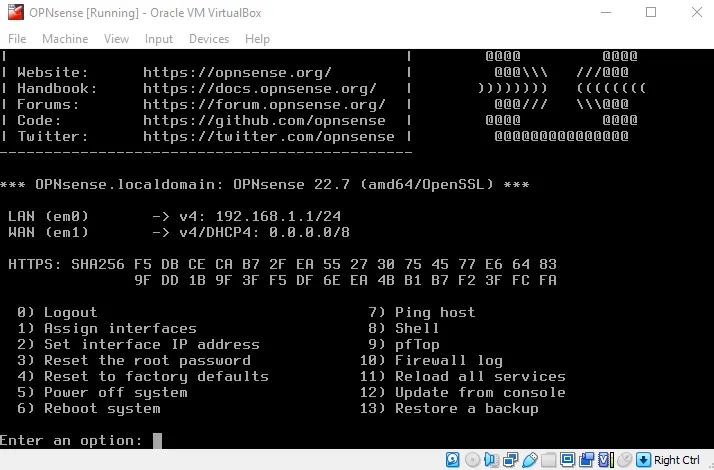
(In my case, OPNsense assigned the WAN interface as “em1” and the LAN interface as “em0”. I need to change it the other way around, LAN interface as “em1” and the WAN interface as “em0”.)
1. Log in to OPNsense, using the username – root and password – opnsense (if you haven’t changed it already).
2. On the OPNsense welcome screen, you can see the interfaces assigned by OPNsense. Type “1” to assign the interfaces manually.
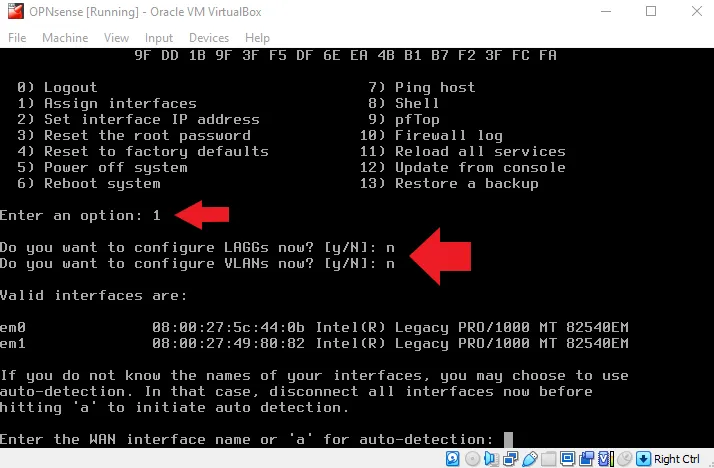
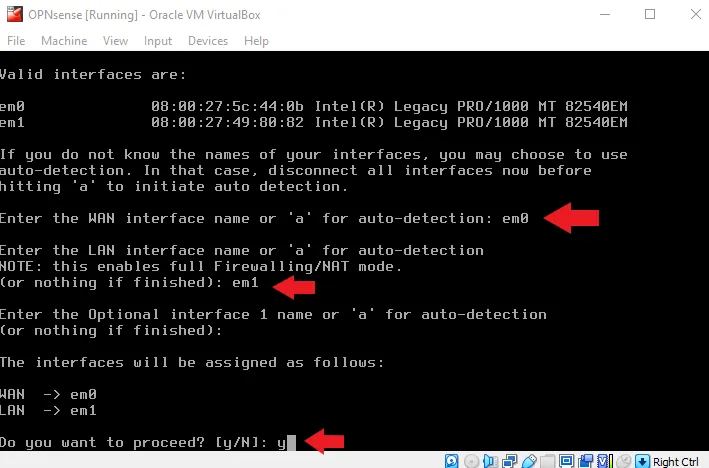
3. Type the correct WAN interface name and hit enter, when asked to enter the WAN interface name. In my case, I am typing “em0”.
4. Next, it will ask for the LAN interface. Type the appropriate interface name and hit enter. I am typing “em1”.
5. When asked for an optional interface name, just hit enter without typing anything.
6. OPNsense will show you a summary of changes you’ve made regarding the interfaces. Type “y” and hit enter to proceed.
You should be able to see the new changes on the OPNsense welcome screen.
In my case, the WAN interface automatically got the IP address from my router’s DHCP.
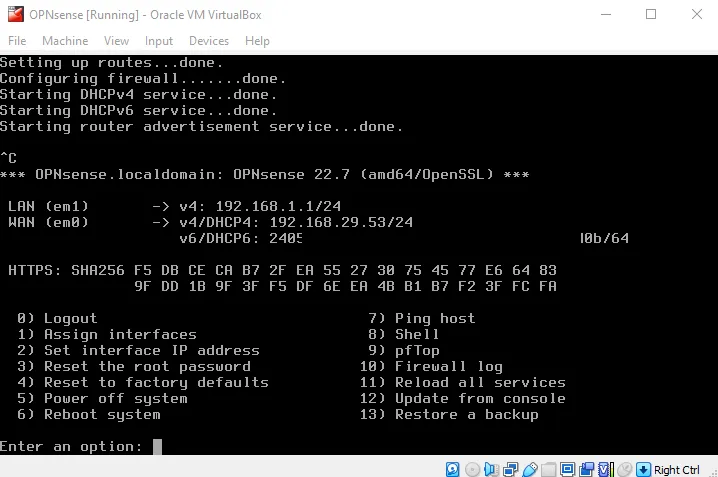
Change the LAN Interface IP Range
If your WAN interface IP range and LAN interface IP range have the same series (for example 192.168.1.x), then you may want to change that.
To change the LAN interface IP range, follow these steps:
1. Type “2” and hit enter to set the interface IP address.
2. From the available interfaces, choose the LAN interface by typing its corresponding number. In my case, it’s “1”.
3. Type “n” and hit enter when asked to configure the LAN IPv4 address via DHCP.
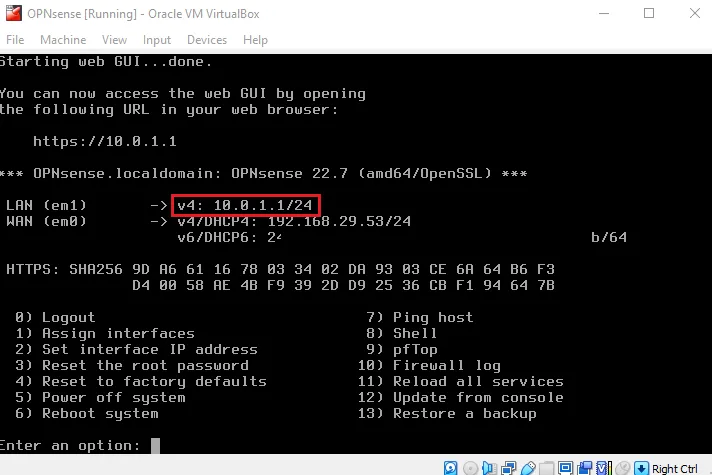
4. Next, enter the new LAN IPv4 address and hit enter. I am typing 10.0.1.1.

5. Now, enter your preferred IPv4 subnet mask and hit enter. I am typing “24” for “255.255.255.0”.
6. Hit enter and it will prompt for IPv6 configuration. Since I am not configuring IPv6, I am typing “n” and pressing enter when asked for the IPv6 address.
7. Press “y” and hit enter when asked to enable the DHCP server on LAN.

8. Next, enter the start address of the IPv4 address. I am starting from 10.0.1.10.
9. Enter the end address of the IPv4 address. I am ending at 10.0.1.255.
10. Type “n” when asked to change the web GUI protocol from https to HTTP.
11. Next, type “y” to generate a new self-signed certificate. Type “y” again to restore the web GUI access defaults.

After that, you will be redirected to the OPNsense welcome screen. There you will see the new LAN interface IP address.
Test OPNsense connectivity
1. To test the OPNsense connectivity, press 7 and hit enter.
2. Next, enter the IP address or hostname. I am entering “www.google.com”.
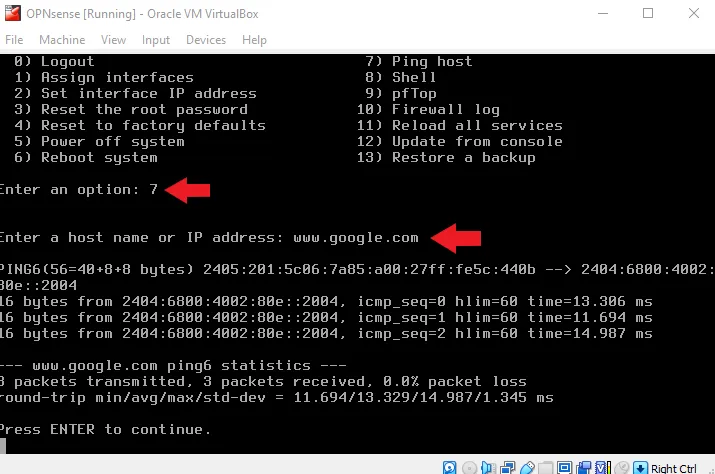
If you see the successful ping result on the screen, it means there is no issue in connecting to the internet via the OPNsense VM.
Connect other VMs to the OPNsense VM
You can connect other virtual machines installed on VirtualBox to the OPNsense firewall. I have Ubuntu installed on VirtualBox.
1. Click on the Ubuntu (or any other VM) and click on “Settings”.
2. Head over to the “Network” tab.
3. Under “Adapter 1”, check the “Enable Network Adapter” option.
4. Set the “Attached to” option to “Internal Network”.
5. Using the down arrow next to the name field, choose the LAN network we created earlier. In my case, it is “OPNsense”.
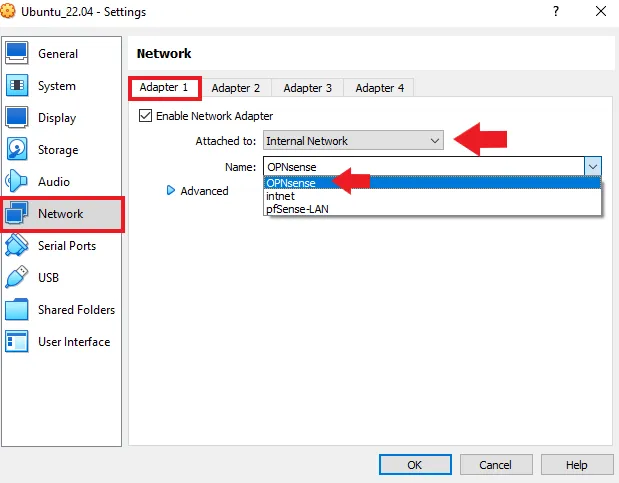
6. Click on “OK” and start the virtual machine.
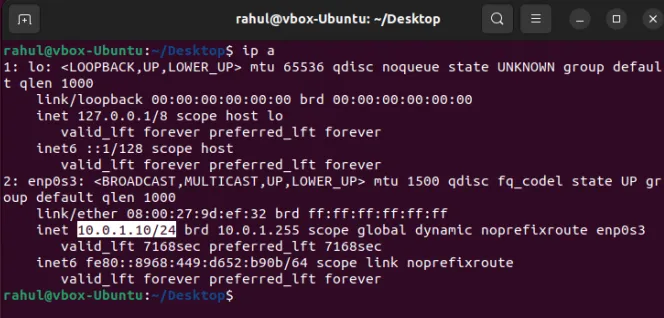
7. Once the virtual machine is booted, check its IP address. You’ll see that it is getting IP from the OPNsense LAN we set up earlier.
8. Use the ping utility to check if you can reach the internet.
ping 8.8.8.8
If you want to know the path that the packet is taking, use the traceroute utility.
mtr 8.8.8.8
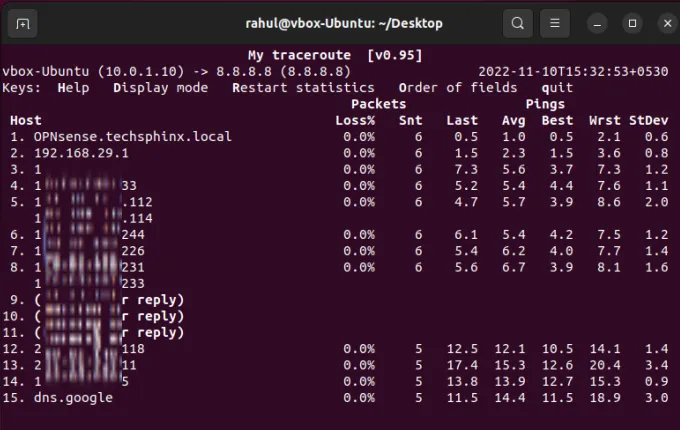
And you’ll see that it is going through the OPNsense firewall.
The Ubuntu machine is connected to the OPNsense LAN side. You can repeat the same process for any other virtual machine. I am also connecting the Debian installed on VirtualBox.
Access OPNsense Web GUI and Complete Initial Setup Wizard
Now, you can access the OPNsense GUI from the web browser of any virtual machine that is connected to the OPNsense LAN.
1. Open the web browser and type OPNsense LAN IP address. In my case it is:
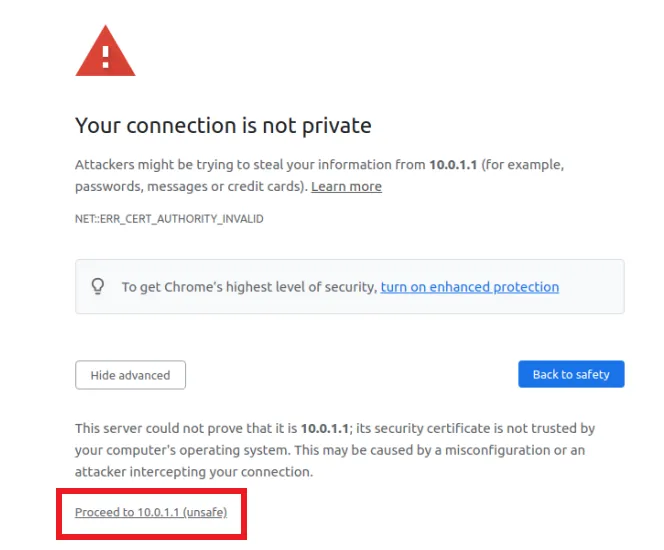
https://10.0.1.1
2. You’ll get a certificate warning; you can ignore that. Click on “Advanced” and then click on the “Proceed to URL (Unsafe)” option.
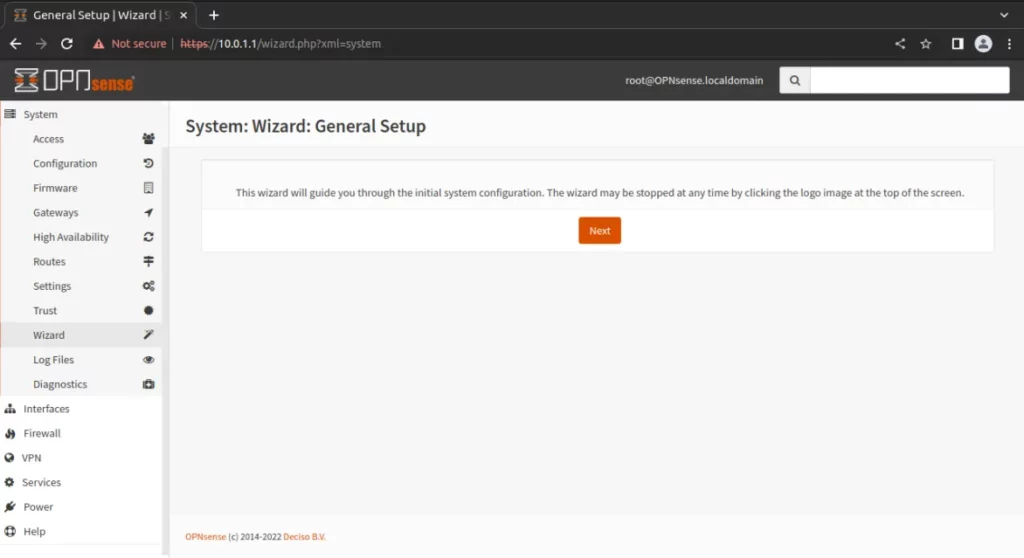
3. After that, you will see the OPNsense login screen.
4. Enter username – root and password – opnsense (if you haven’t changed the default password yet) to log in to the OPNsense dashboard.

After logging in, you will be able to go through the initial setup wizard. You can configure various settings such as hostname, domain, timezone, language, root password and even the LAN IP interface range. Just click “Next” to go through the wizard and at the last step click on “Reload” to apply the changes.
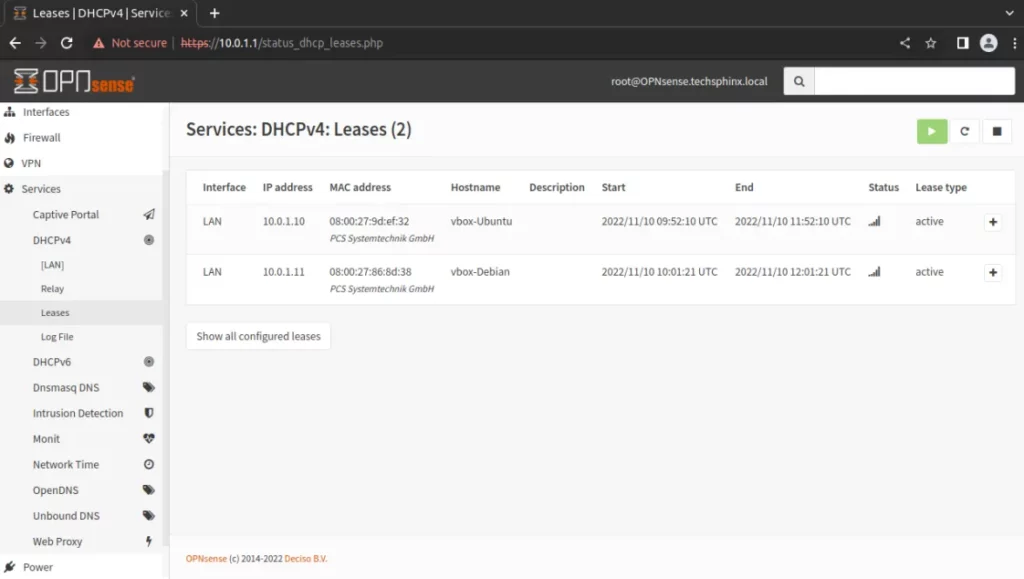
Additionally, you can also check the DHCP leases by navigating to Services > DHCPv4 > Leases. You will see all the IP addresses assigned by the OPNsense LAN.
Conclusion
This concludes the installation of OPNsense on VirtualBox. As you can see, installing OPNsense is easy and the steps are pretty straightforward. There is a similar FreeBSD-based firewall solution known as pfSense. You can install pfSense on VirtualBox and try that out too.

If you like this post, then follow Techsphinx on Facebook and Twitter for more reviews, tricks, tips and tutorials.
This article needs update or correction? Report the issue here so I can update it.