
This post may contain affiliate links/ads and I may earn a small commission when you click on the links/ads at no additional cost to you. As an Amazon Affiliate, I earn from qualifying purchases. Techsphinx also participates in the StationX Affiliate program. You can read my full disclaimer here.

In this tutorial, I will show you how to install ImageMagick on Ubuntu 20.04 LTS.
ImageMagick is a feature-rich, free and open-source image manipulation tool used to create, edit, compose, or convert digital images.
Apart from being feature-rich, it is also a cross-platform utility that runs on Linux, Windows, Mac OS X, iOS, Android OS and many other platforms.
Features of ImageMagick
Here are few features ImageMagick provides out-of-the-box:
- Animation
- Color Management
- Command-Line Processing
- Decorate & Draw
- Format conversion
- Image Calculator, Gradients and Identifications
- Large Image Support
- Noise and Color reduction
- Add Special effects
- Add Text and Comments
- Image Transform
- Transparency
- And many more.
You can check ImageMagick official website for a full list of features.
Pre-requisites to install ImageMagick on Ubuntu
- Ubuntu 20.04 installed and running.
- Sudo / Root privileges required.
- Internet connection to download ImageMagick
Methods to Install ImageMagick on Ubuntu
You can install ImageMagick through APT or by compiling it from the source. I am going to show you both methods, you can use any method you prefer.
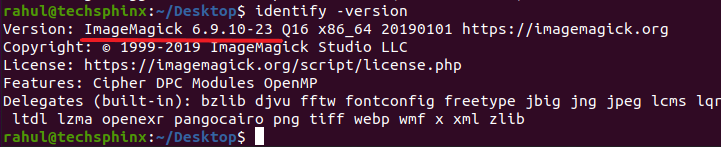
Note: Ubuntu software repository does not have the latest ImageMagick version – 7.0.11-8. It has ImageMagick – 6.9.10-23 (as of writing this post).
If you want to install the ImageMagick 7 then you have to compile it from the source.

1. Install ImageMagick via APT
Before installing ImageMagick, it’s recommended to update the software repositories:
sudo apt update
Now, install ImageMagick using:
sudo apt install imagemagick
After installing check the ImageMagick version using:
magick -version
Or
identify -version
You can also run the following command to check if ImageMagick is working properly:
convert logo: logo.gif
This will create the ImageMagick logo (logo.gif) on the present working directory.
2. Compile ImageMagick through source
To compile ImageMagick from the source, first, download the latest source tar file from ImageMagick’s official website.
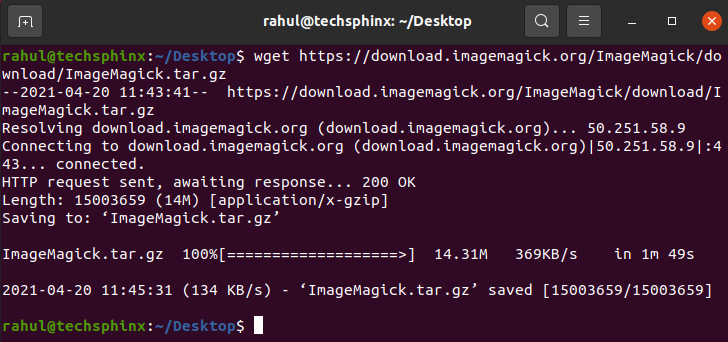
Alternatively, you can use the wget command to download the ImageMagick tar file using the terminal.

Install wget, if not installed already:
sudo apt install wget
Download ImageMagick tar file using wget:
wget https://download.imagemagick.org/ImageMagick/download/ImageMagick.tar.gz
Also, install the necessary packages to compile ImageMagick on Ubuntu.
sudo apt install build-essential
Now, extract the downloaded tar file using:
tar -xvf ImageMagick.tar.gz
Navigate to the extracted directory:
cd ImageMagick-7.0.11-8/
Run the following commands to compile the package.
./configure
make
(If you faced any dependency problems, then install the dependencies and run the “make” command again, otherwise proceed to the next steps.)
Now, to install the compiled packages run:

sudo make install
Configure the dynamic linker run-time bindings:
sudo ldconfig /usr/local/lib
Once, the installation has finished, you can check the ImageMagick version using:
magick -version
Or
identify -version

Also, run the following command to check if ImageMagick is working properly:
convert logo: logo.gif
After running this you should find an ImageMagick logo (logo.gif) in your current working directory.
Conclusion
I have shown you how to install ImageMagick 7 on Ubuntu 20.04. Now, you can use ImageMagick to create, edit, compose or convert digital images.
If you have suggestions or feedback, feel free to leave a comment.

If you like this post, then follow Techsphinx on Facebook and Twitter for more reviews, tricks, tips and tutorials.
This article needs update or correction? Report the issue here so I can update it.