
This post may contain affiliate links/ads and I may earn a small commission when you click on the links/ads at no additional cost to you. As an Amazon Affiliate, I earn from qualifying purchases. Techsphinx also participates in the StationX Affiliate program. You can read my full disclaimer here.

In this guide, I will not only show you various ways to enable SSH on your Raspberry Pi but also show you how to remotely connect to Raspberry Pi using SSH from Windows, Linux and Android devices.
SSH (Secure Shell) is a network communication protocol, that allows users to connect to a remote machine. Once you enable SSH on Raspberry Pi, then you can remotely execute commands on your Pi.
SSH comes pre-installed on most Linux distros including Raspberry Pi OS. Therefore, you don’t have to install anything and only need to enable the SSH service.
Equipment Needed
- Raspberry Pi (Pi 3 or 4 recommended)
- Power Supply
- Micro SD Card (32 GB Recommended)
- SD Card Reader
- Micro HDMI (For Pi 4) or HDMI Cable (For Pi 3 and below versions) [Optional]
Alternatively, you can purchase CanaKit Raspberry Pi 4 Extreme Kit that contains all the above-mentioned items.
- Keyboard and Mouse [Optional]
- Monitor or TV (Connect via HDMI) [Optional]
Pre-requisites
- Access to PC, Laptop or Android device.
- Internet connection to download the required software.
- Admin (Windows) or Sudo (Linux) permissions are required.
How to Enable SSH on Raspberry Pi?
There are various ways to enable SSH on Raspberry Pi:
- Enable SSH on Raspberry Pi OS while Writing OS image.
- Enable SSH on Raspberry Pi in headless mode.
- Using GUI Configurations to Enable SSH on Raspberry Pi.
- Using command-line to enable SSH on Raspberry Pi.
- Start and enable SSH using Systemctl.
Depending on your scenario, you can choose any of the above-mentioned methods to enable SSH on Raspberry Pi.
1. Enable SSH on Raspberry Pi while Writing OS Image
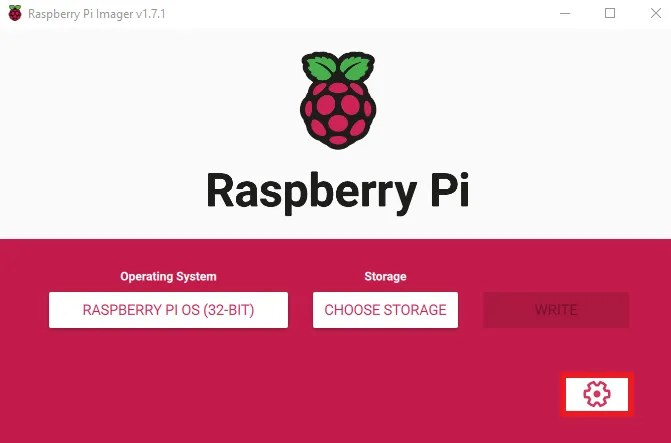
If you are using the official Raspberry Pi imager tool to write OS image to SD card then, you can enable SSH at the time of writing the SD card.
1. Plug in the SD card to your PC or laptop using the SD card reader (Adapter).
2. Open the Raspberry Pi Imager tool.
3. Choose the Operating system and SD card.
4. Before clicking on the “write” button. Press Ctrl+Shift+x key combination or the settings icon to enter the advanced settings option.
5. Click on the “Enable SSH” checkbox and select the “Use Password Authentication” option.
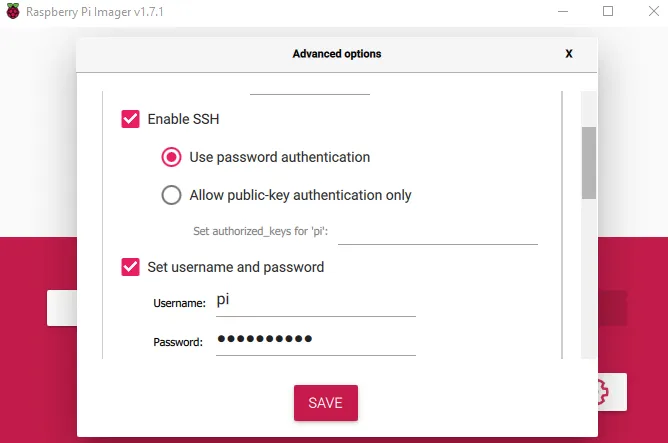
6. Set a password for the “pi” user and click on “Save”.
Now, you can click on the “Write” button to write the image. The SSH service will be enabled automatically.
2. Enable SSH on Raspberry Pi in Headless Mode
The above method was great if you want to install OS and Enable SSH. However, if you have already installed an OS and you need to enable SSH, then follow these steps:
1. Power off the Raspberry Pi and remove the Micro SD card.
2. Plug the SD card into the PC or laptop using an SD card reader or adapter.
3. Navigate to the SD card. You can use “File Explorer” on Windows or use the “cd” command on a Linux or Mac machine.
4. In the root folder of the SD card (boot partition), create a file called “ssh” without any extensions.
On Windows, right-click > New > Text document and name the file ssh. Remove the “.txt” extension.
Note: By default, Windows hides the extension of files. Click on “View” on the File Explorer and enable the “filename extensions” option.
On Linux, you can use the touch command.
touch ssh
An empty file called ssh will be created.
While booting, the Raspberry Pi looks for a file called ssh, if found, then the SSH service will be enabled automatically.

3. Enable SSH on Raspberry Pi using GUI Configuration Options
If you have a monitor or Raspberry Pi Screen connected, then you can easily enable SSH service with just a few clicks.
1. Boot up your Raspberry Pi.
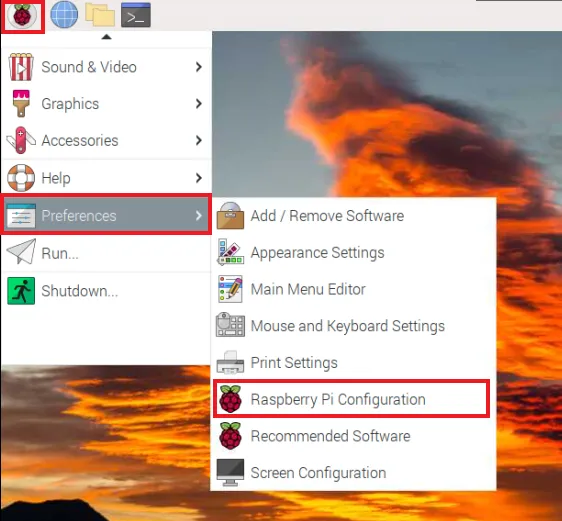
2. Click on the Raspberry Pi logo (on the top-left corner of the screen).
3. Navigate to Preferences and click on the “Raspberry Pi Configuration” from the drop-down.
4. The Raspberry Pi configuration screen will open, from there navigate to the “Interfaces” tab.
5. Enable SSH and click on “Ok” to save changes.
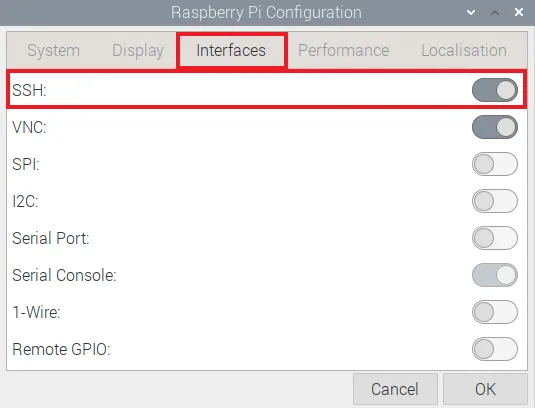
SSH service is now enabled on your Raspberry Pi.
4. Enable SSH on Raspberry Pi using the Terminal
You can also access the Raspberry Pi Configurations using the terminal.
1. Boot up your Raspberry Pi.
2. Open the terminal on Raspberry Pi and type the command:
sudo raspi-config
3. On the raspi-config screen, navigate to the “Interface options” using the arrow buttons of the keyboard and hit enter.
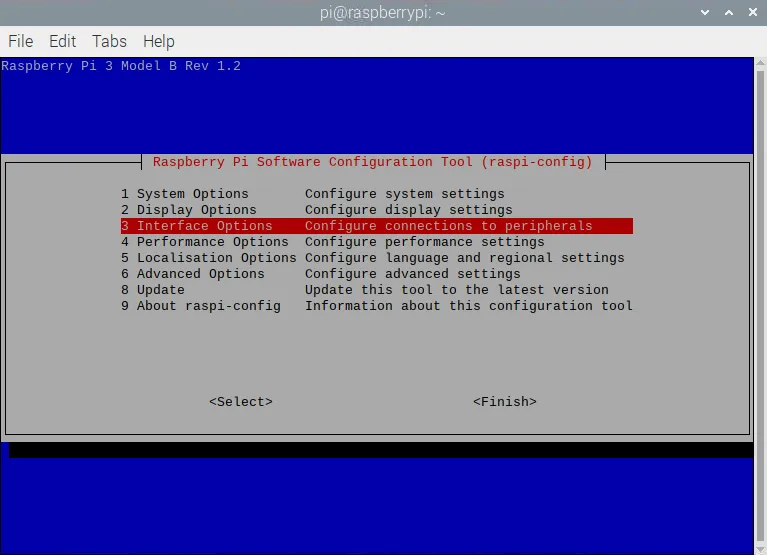
4. Next, select the “SSH” option and hit enter again.

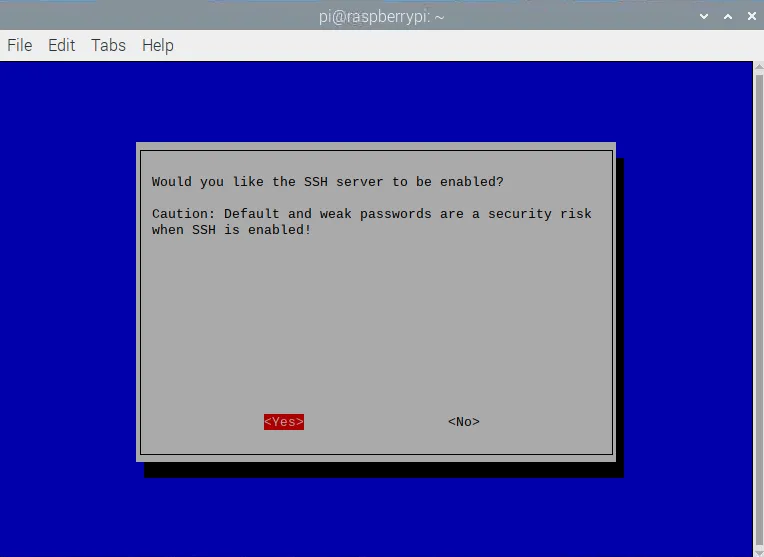
5. Select “<Yes>” on the “Would you like the SSH server to be enabled?” prompt.
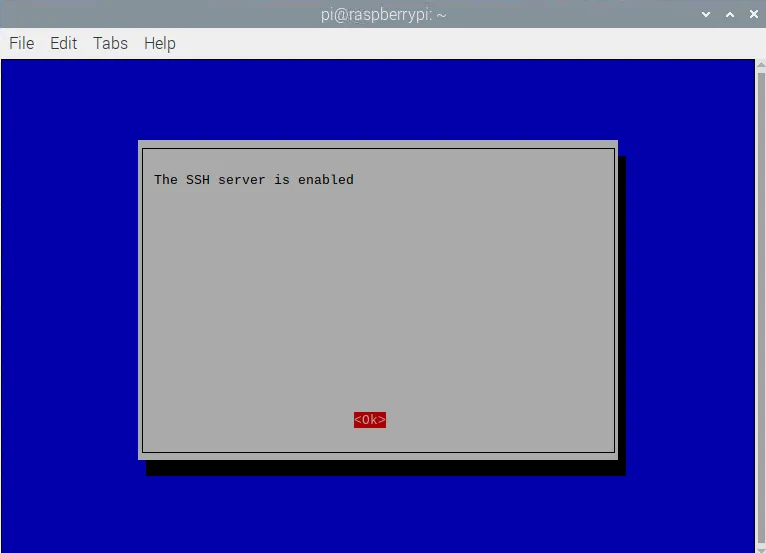
6. Hit Enter on the “The SSH server is enabled” confirmation box.
7. Lastly, use the arrow keys to navigate and select “Finish” to close the raspi-config screen.
That’s it. SSH service is now enabled on your Raspberry Pi.
5. Start and Enable SSH using systemctl
SSH is pre-installed on many Linux systems including the Raspberry Pi OS. You can use the “systemctl” to start and enable the SSH service.
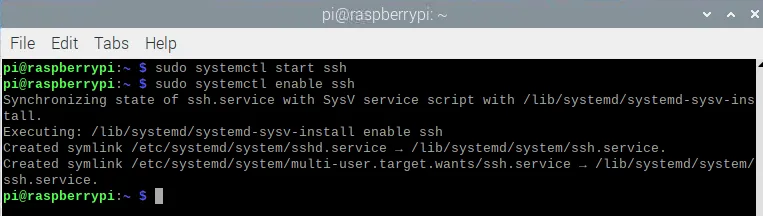
To start the SSH service, open terminal and run the following command:
sudo systemctl start ssh
To make SSH persistent after reboot, enable it using the following command:
sudo systemctl enable ssh
Now, SSH service is enabled and you can connect to your Raspberry Pi from a remote system.
Configure WiFi Settings
To connect to Raspberry Pi using SSH, you will need to connect the Raspberry Pi to the network via WiFi or Ethernet Cable.
I have written a complete guide on configuring WiFi on Raspberry Pi. Check that out if you need assistance.
Make sure Raspberry Pi and the other device that you’ll use to remotely access the Pi are on the same network.
How to SSH into Raspberry Pi?
You’ve seen various methods to enable SSH on Raspberry Pi. Now, it’s time to connect to Raspberry Pi remotely from another machine.

To connect to Raspberry Pi from another machine we need to know its IP address.
Once again, I will show you various methods to find the IP address:
- Find IP address from the Pi itself.
- Find IP address from other Machine on the network.
You can use any of the above-mentioned methods.
Find the IP Address of Raspberry Pi from the Pi itself
To find the IP address follow the steps:
Open the terminal and type any of the following commands:
ip a
ifconfig
By using any of the commands above you can easily find the IP address assigned to the Ethernet (eth) or WiFi card (wlan).
Alternatively, you can also use the hostname command to find the IP address assigned to your Raspberry Pi.
hostname -I
Once you know the IP, you can proceed with connecting to Raspberry Pi via SSH.
Find IP Address of Raspberry Pi from other Machine
If you can’t access the Pi or you have used the headless way to enable SSH on Raspberry Pi, then you have to use other tools to find the IP address from a remote machine.
Using Angry IP Scanner (Windows)
1. Download, install and start Angry IP scanner.
2. Enter the IP Range to scan then click on “Start”.
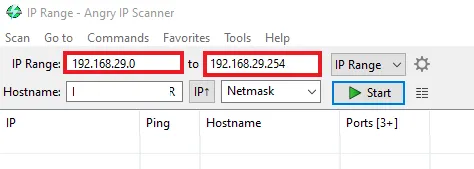
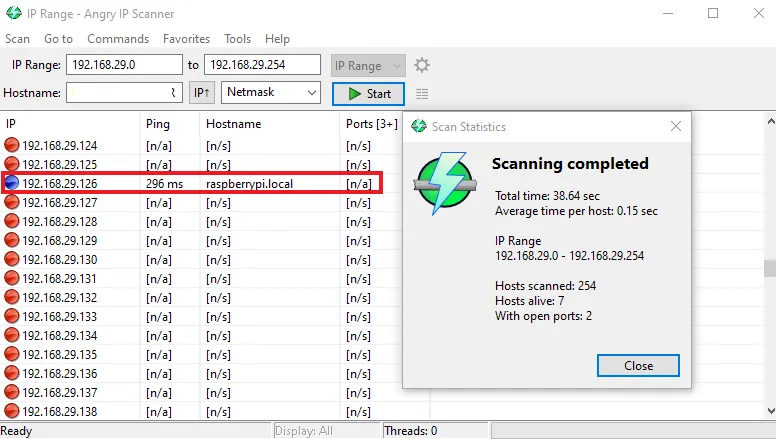
3. Once the scan is complete. You will get the IP address of the Raspberry Pi.
Using Nmap (Linux)
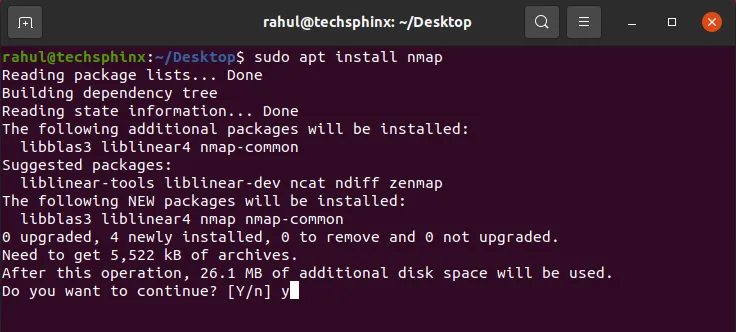
1. Install the “nmap” utility on your Linux Distro.
On Ubuntu/Debian based systems run:
sudo apt install nmap
On RHEL/Fedora based systems run:
sudo dnf install nmap
2. Now, use “nmap” to scan the network.
sudo nmap -sn 192.168.29.0/24
(Replace 192.168.29.0/24 with your IP address range and netmask.)
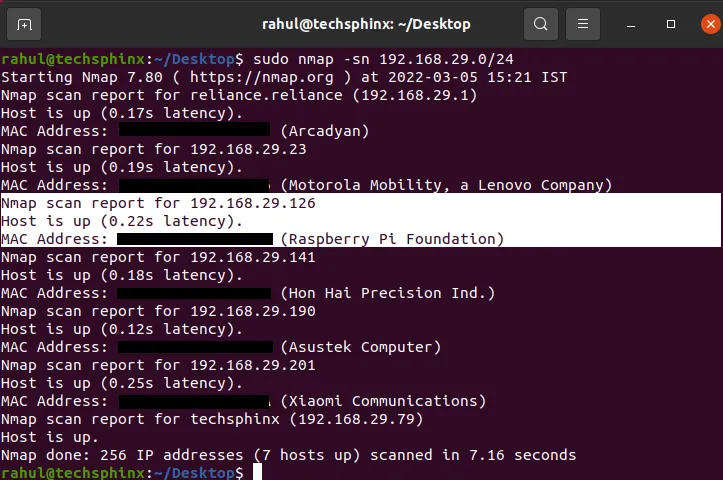
Now you know the IP address, use it to connect to the Raspberry Pi via SSH.
Connect to Raspberry Pi using SSH from Linux
To connect to Raspberry Pi remotely via SSH using a Linux machine follow the steps:
1. Open the terminal on Linux Machine.

2. Use the SSH command to connect to Raspberry Pi:
ssh [email protected]
(Replace username and IP address accordingly)
ssh: Name of the command.
[email protected]: Name of the user that we are trying to access via SSH (in this case, the “pi” user) along with IP address of the Raspberry Pi.
3. Hit enter and it will ask you to accept the RSA key when connecting for the first time. Type “yes” and hit enter.
4. Enter the password for the user on Raspberry Pi (in this case the password for the “Pi” user) and hit enter.
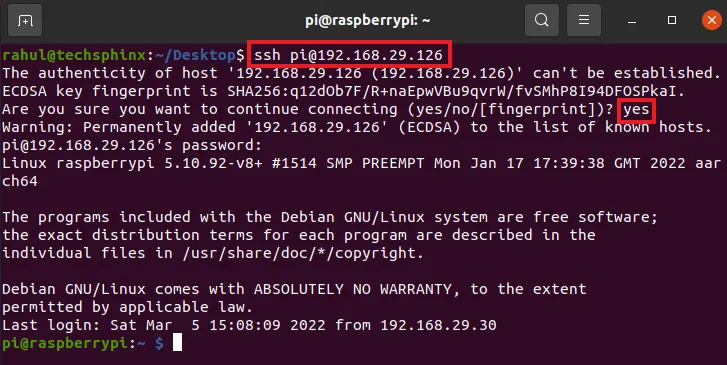
Now, you will get the SSH session for the “pi” user in the terminal. You can now perform any task on your Raspberry Pi remotely.
Connect to Raspberry Pi using SSH from Windows
To connect to Raspberry Pi from a Windows machine follow these steps:
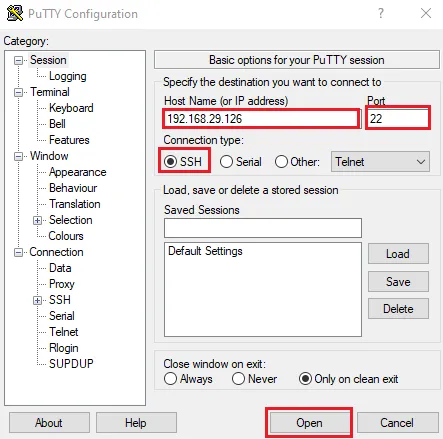
1. Download and install PuTTY SSH Client.
2. Start PuTTY and enter the IP address of the Raspberry Pi.
3. Click on SSH and make sure the port is set to 22.
4. Click on “Open” to start a new SSH session.
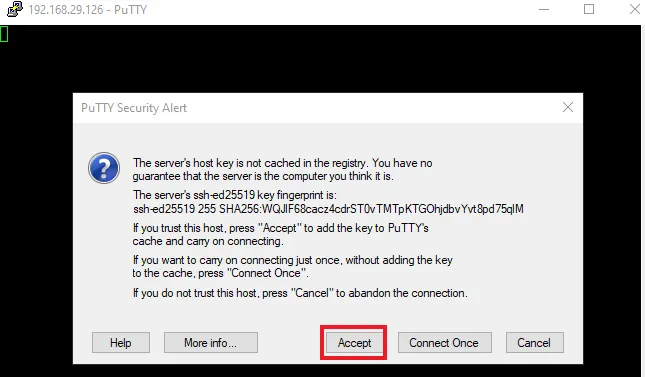
5. You’ll be prompted to add the host key. Click on Accept.
6. Enter the username and password to log in.
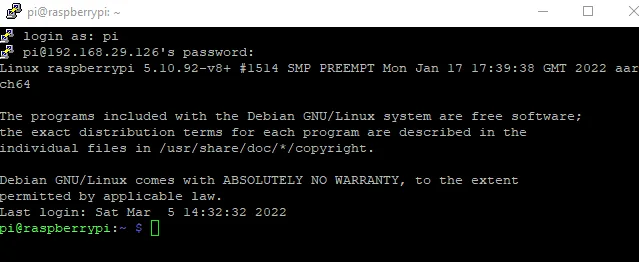
If you’ve done everything correctly, then you’ll be logged in to the Raspberry Pi via SSH. Now, you can run any commands from the Windows machine on the Raspberry Pi.
Connect to Raspberry Pi using SSH from Android
1. Download any SSH client app from Google Play Store. I am using JuiceSSH App.
2. Click on Quick Connect.
3. Enter the username and IP address of the Pi:
[email protected]
4. Click on connect, then click on “Accept” when asked for host verification.
5. Enter the password when asked and click on OK.
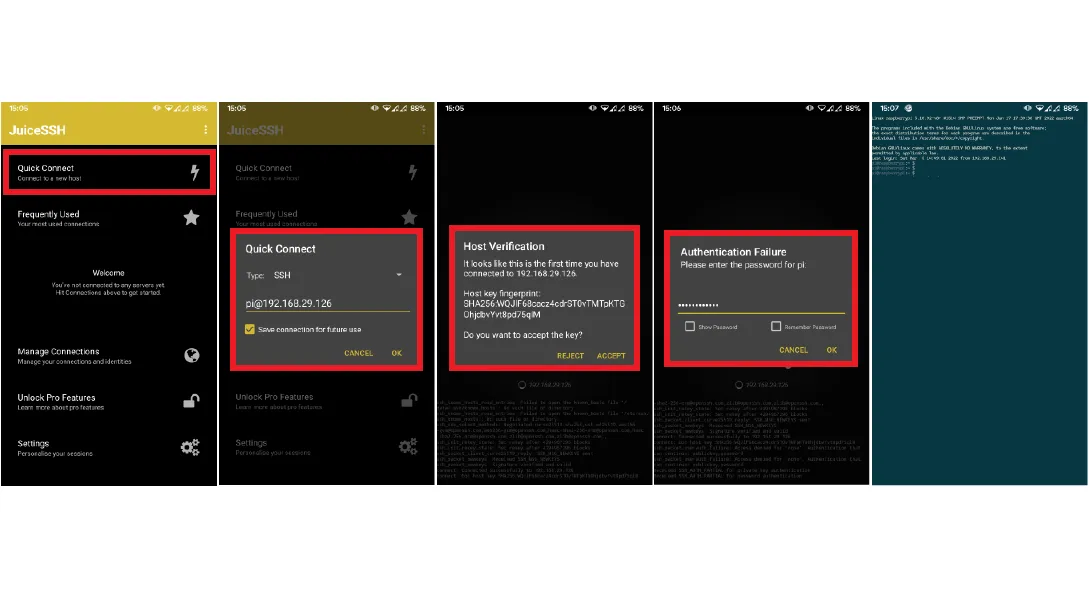
6. Once connected successfully, you can execute any commands on the Raspberry Pi using SSH from an Android device.
Conclusion
You’ve seen various methods of enabling SSH on Raspberry Pi and connecting to it remotely from other Machines. You can use any method according to your convenience.
I hope the instructions were easy to follow. However, if you encountered any errors, then feel free to ask in the comments.
Also, you can check my other articles related to Raspberry pi here.

If you like this post, then follow Techsphinx on Facebook and Twitter for more reviews, tricks, tips and tutorials.
This article needs update or correction? Report the issue here so I can update it.