This post may contain affiliate links/ads and I may earn a small commission when you click on the links/ads at no additional cost to you. As an Amazon Affiliate, I earn from qualifying purchases. Techsphinx also participates in the StationX Affiliate program. You can read my full disclaimer here.
Don’t have enough dough to own a Google Pixel device? Don’t worry this AOSP based custom ROM will turn your old device into a pixel device. Every custom ROM has a distinct set of features, some provide heavy customizations others have great performance stats. Pixel Experience ROM is made for a true pixel feel without having to own a pixel device.
What is Pixel Experience?
PIXEL Experience is an AOSP based custom ROM with all the amazing pixel goodies such as pixel launcher, wallpaper, fonts, boot animations and many other amazing features to turn your device into true pixel without compromising the stability and security.
Unlike other ROMs like resurrection remix, pixel experience does not focus on heavy customizations rather it will provide you with stable experience of a pixel device along with essential and useful features for the proper functioning of the device.
Compatible Devices
It’s a waste of time to read the entire post about Pixel Experience and come to know that your device is not supported by this ROM.
So, before talking about Pixel Experience in detail, let’s see what device manufacturers do pixel experience ROM supports:
- Asus
- LeEco
- Lenovo
- Motorola
- OnePlus
- Realme
- Samsung
- Sony
- Xiaomi
- Zuk
Note: The above mentioned are device manufacturers, not the actual device models. If you want to know that your device model is supported or not, then head over to Pixel Experience Website.
Pixel Experience developers and maintainers always update their supported device list, so always check their official website for updated information.
If your device is not supported by Pixel Experience ROM, then check out my Best Custom ROMs for Android Phones 2020 post to know about different custom ROMs available for your android device.
Features
Here’s a list of some of the interesting features that Pixel Experience android 10 provides out of the box:
- No Bloatware
- Pixel Launcher
- Butter-smooth performance for daily use
- Gestures based navigation
- Face Unlock
- Pixel Boot Animation
- Pixel sounds, wallpapers, fonts, icons
- Google Apps included
- Custom accents color
- LiveDisplay and reading mode feature.
- Hardware keys to take screenshots.
- Dark theme support (Even switch to dark theme based on time of the day)
- Pocket detection (A handy feature)
- Double-tap on the status bar and lock screen to sleep.
- Timely OTA Updates (at least once every month)
What is Pixel Experience Plus Edition?
As you know Pixel Experience ROM focusses on a true Pixel Experience rather than customizations.
Pixel Experience Plus Edition has all features of normal pixel experience ROM and also provides minor customizations to the users without compromising the stability, security and proper functioning of the device.
Here are some of the features Pixel Experience Plus provides:
- Screen Recorder
One of the newest editions of Plus Edition is an inbuilt screen recorder that allows you to record phone screen with microphone audio. Useful when making how-to videos or reviewing apps.
- Custom Screenshots
Now you don’t have to take full-screen screenshots and crop it afterwards. With this feature, you can take screenshots of custom dimensions.
Press and hold the Power Button and then Long press the screenshot button to take custom screenshots.
- Hide Navigation Bar Pill
Under settings, you can toggle the full-screen gesture and hide the navigation bar pill to enjoy full-screen gesture experience.
- Caffeine
Caffeine allows users to disable sleep mode or screen lock for a particular amount of time (5, 10, 30 minutes or infinitely). It’s a toggle switch which you can find under the quick toggle section.
- Hide Notch
Now you can hide notch space to enjoy seamless gaming experience and Netflix on devices like Poco F1 and Oneplus 6.
How to install Pixel Experience ROM?
In this guide, I am installing Pixel Experience on Moto G5s Plus device with TWRP recovery. The procedure is common for every other device, but in case any error occurred while installing it on any other device, then check out XDA for device-specific instructions. I do not own every android device supported by this ROM.
Disclaimer: Flashing custom ROMs may lead to problems. Don’t blame me if your WiFi is not working or your device is bricked. I / TechSphinx shall not be held responsible for your actions.
Pre-Requisites
- Unlocked bootloader
To install Pixel Experience ROM on your device, you will need to unlock the bootloader. If you want to know more about OEM unlocking, then check the following link:
What is OEM Unlock in Android? and How to enable it?
- Custom recovery installed on your device.
You’ll need a custom recovery to install a custom ROM. If you don’t have one installed already then check the below link:
Best Custom Recovery for Android devices 2020
- NANDroid Backup of device, in case something goes south.
A Complete NANDroid backup is recommended as you have to wipe the old system to install a new one. If there is trouble during installation, you may have to revert to your old ROM.
Learn more about NANDroid backup from the following link:
How to Create and Restore NANDroid Backup?
Note: NANDroid backup doesn’t backup internal storage files like Pictures or downloads, make sure to backup all those files manually.
- Pixel Experience ROM file for your device.
Head over to Pixel Experience ROM site and download the ROM file compatible with your phone.
You can also download Plus edition if available for your device. The installation process is the same.
- Device charged up to 70%
Charge your device at least 70%. The last thing you want is to run out of juice while installing or troubleshooting custom ROM.
Install Pixel Experience on your Phone
1. Enter into recovery mode of your device.
2. Select Wipe option from recovery.
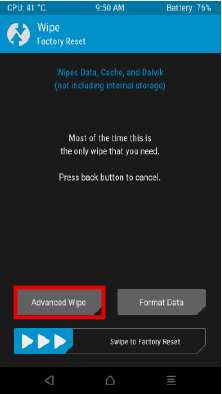
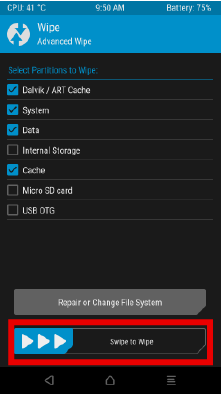
3. Click on Advanced Wipe and select the “data”, “system”, “Dalvik/ART cache”, “cache” and swipe right to wipe.
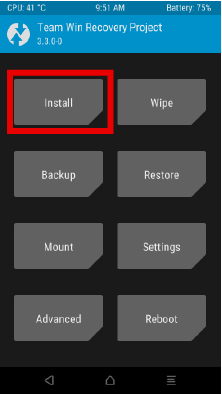
4. Go back to home screen of TWRP and select install.
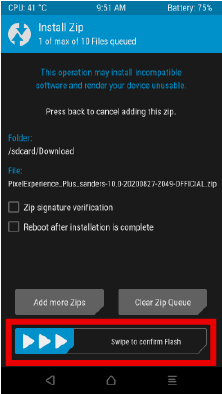
5. Navigate and Select the Pixel Experience ROM file and swipe to confirm flash.
6. After flashing, select wipe cache and dalvik.
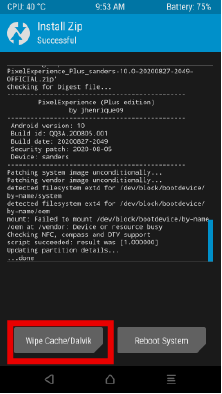
7. Reboot the system.
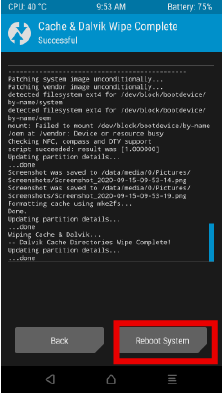
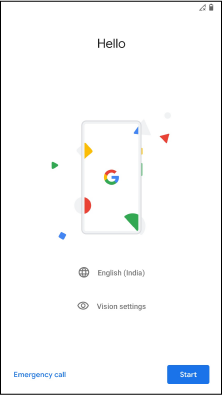
First boot will take some time (approx. 2-3 minutes depending on your phone).
After successful boot, you can proceed to setup your device.
Note: If you have device encryption enabled or if you face boot loop, then boot into recovery and wipe the internal storage (WIPE – FORMAT DATA – type “YES” to remove encryption). This will remove all data on your internal storage. So, backup all photos, videos and other important files to the cloud or personal computer before performing this step.
Enabling Device encryption is a great step to secure your private data from falling into wrong hands in case you lose your phone. If you want to know about securing your android device, then check my post:
How to secure an Android Phone in 2020? (12 Easy Steps)
FAQ – Pixel Experience
No, it is not pre-rooted. You have to root it manually (Using Magisk or SuperSU) after installing the ROM.
No, Pixel Experience already includes necessary Google Apps, so you don’t need to flash Gapps.
Yes, you will get OTA updates and it is also easy to install OTA updates for this ROM.
I have been using this ROM for 6-7 months now, and I must say this is one of those ROM that gets OTA updates very frequently (At least once or twice every month). Thanks to the Developers and Maintainers of this awesome project.
Yes, Pixel Experience ROM is an open-source project. If you have enough knowledge, then you can build this Rom for your own device.
Enjoy Pixel Experience
I hope this post helped you to install Pixel Experience on your phone.
Pixel Experience is one of the best custom ROMs out there, it would be a shame not to try it if it supports your device.
What is your experience with this ROM?
Tell me in the comments.
If you like this post, then follow Techsphinx on Facebook and Twitter for more reviews, tricks, tips and tutorials.
This article needs update or correction? Report the issue here so I can update it.


